Andersen 200 Series User manual

Type
User manual
Windows and doors can be heavy. Use safe lifting
techniques and a reasonable number of people
with enough strength to lift, carry and install
window and door products to avoid injury and/or
product damage.
Tape broken glass before removal to reduce glass fragmentation.
Keep all hardware parts and screws for reuse.
Use caution when working at elevated
heights and around unit openings. Follow
manufacturers’ instructions for ladders
and/or scaffolding. Failure to do so may
result in injury or death.
Follow manufacturers’ instructions for hand
or power tools. Always wear safety glasses.
Failure to do so may result in injury and/or
product damage.
For questions call 1-888-888-7020 Monday - Friday, 7 a.m. to 7 p.m. and Saturday, 8 a.m. to 4 p.m. central time. For more information
and/or guides visit andersenwindows.com.
Please leave this guide with building owner.
Thank you for choosing Andersen.
Read guide from beginning to end before starting installation. Read all warnings and cautions during unit installation.
Andersen” and all other marks where denoted are trademarks of Andersen Corporation. ©2003-2012 Andersen Corporation. All rights reserved.
0003911 BC Revised 04/11/12
for Andersen® 400 and 200 Series Casement and Perma-Shield
®
Casement Windows
Manufactured 1966 to Present
Sash Replacement
• For standard size sash, use dash (
I
) and Circular ( ) marks on the sash for hardware locations.
• For custom-size sash, use measurements indicated in step for hardware locations.
Wear gloves, safety glasses goggles
or eye shields when handling glass.
Tape broken glass with filament or
duct tape before removal to reduce
glass fragmentation.
Identify the hardware style that corresponds to the hardware on your window unit in one of the following
sections A-G. Proceed to that section in the guide for detailed instructions on replacing your sash.
• Checkthesashsize,glasstype,color,andkitcontentstoverifyallpartsarecorrect.
• Theunit/sashopeningmustbeplumb,level,square,andfreeofanybowedjambs.Tocheck,measureframe
diagonallyfromcornertocorner.Themeasurementsmustbewithin1/8"ofeachother.
• Inspectforanydamagetotheframeandvinylcover.Repairasneeded.
• Ifanyoftheaboverequirementsarenotmet,haveaqualiedcarpenter,builder,orcontractordetermine
whether the window frame should be replaced or reinstalled, or if there are structural problems that need to be
corrected before sash replacement.
Sash must be supported during
entire removal and installation
procedures. Failure to support Sash
mayresultininjuryorproduct
damage.
When drilling into the Sash,
drillonly1/8"deeptoavoid
penetrating the glass area or
drilling through the Sash.
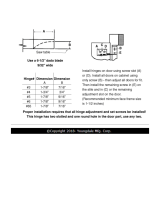
Table 1 - Keeper Position Dimensions
(Sections A & B)
Dimension “A” is the distance from the edge of the
sash to lower screw hole on the bottom keeper.
Dimension “B” is the distance from the edge of the
sash to the lower screw hole on the top keeper.
Overall Sash Height Dim. DIM. "A" DIM. "B"
C2 or 221/2" 915/16" N/A
C25or 225/8"-263/4" 121/8" N/A
C3 or 267/8"-343/8" 157/8" N/A
C35or 34-1/2"-391/4" 185/16" N/A
C4 or 393/8"-463/8" 91/2" 345/16"
C45or 461/2"-511/4" 117/8" 363/4"
C5 or 513/8"-581/4" 911/16" 46"
C55or 583/8"-631/4" 123/16" 487/16"
C6 or 633/8"-701/4" 1511/16" 52"
Straight Arm
October 2011 through Present
SashChannel
14" Straight Arm Operator
12" Straight Arm Operator
22"Hinge
Waterbar
Weatherstrip
(Located on
Top of Sash)
Keeper(s)
Component Identification
SECTION
A
Parts Included
(1) Sash
(1) InstallationGuide
Installation Tools Needed:
•SafetyGlasses
•PhillipsScrewdriver
•Pliers
•Pencil
•ElectricDrill
•3/32"DrillBit
•PryBar
•UtilityKnife
CasementSash
Sash Replacement Guide
2
Straight Arm
September 1998 to September 2011
SashChannel
Straight Arm Operator
22"Hinge
CasementSash
Keeper(s)
Component Identification
SECTION
C
Parts Included
(1) Sash (custom sizes will not be pre-marked
for hardware placement)
(1) InstallationGuide
Installation Tools Needed:
•SafetyGlasses
•PhillipsScrewdriver
•Pencil
•Drill/Driver
•3/32"DrillBit
•PryBar
•UtilityKnife
•Pliers
Waterbar
Weatherstrip
(Located on
Top of Sash)
Split Arm
May 1995 through September 1998
CasementSash
Component Identification
Split Arm Operator
Waterbar
Weatherstrip
(Located on
Top of Sash)
Keeper(s)
Sash Bracket
Hinge
SECTION
D
Parts Included
(1) Sash
(1) InstallationGuide
Installation Tools Needed:
•SafetyGlasses
•PhillipsScrewdriver
•FlatBladeScrewdriver
•Pencil
•Drill/Driver
•3/32"DrillBit
Split Arm
September 1998 to Current
CasementSash
Component Identification
Split Arm Operator
Waterbar
Weatherstrip
(Located on
Top of Sash)
Keeper(s)
Sash Bracket
Hinge
SECTION
B
Parts Included
(1) Sash (custom sizes will not be pre-marked
for hardware placement)
(1) InstallationGuide
Installation Tools Needed:
•SafetyGlasses
•PhillipsScrewdriver
•FlatBladeScrewdriver
•Pencil
•Drill/Driver
•3/32"DrillBit
For corrosion resistant sash channel, use Section A
3
Sash Replacement Guide
Straight Arm
1966 through May 1995
SECTION
G
Split Arm
1966 through May 1995
CasementSash
Waterbar
Weatherstrip
(Located on
Top of Sash)
Component Identification
Waterbar
Weatherstrip
(Located on
Top of Sash)
Component Identification
1974-82,1982-95(22"opg.)
Straight Arm Operator
Split Arm Operator
Sash Bracket
OperatorChannelType
Notched
Regular
Silver Satin
Hinge
Keeper(s)
1966-74SilverSatin
Straight Arm Operator
Parts Included
(1) Sash
(1) InstallationGuide
Installation Tools Needed:
•SafetyGlasses
•PhillipsScrewdriver
•Pencil
•Drill/Driver
•3/32"DrillBit
•PryBar
•UtilityKnife
Parts Included
(1) Sash
(1) InstallationGuide
Installation Tools Needed:
•SafetyGlasses
•PhillipsScrewdriver
•Pencil
•Drill/Driver
•3/32"DrillBit
CasementSash
Keeper(s)
Straight Arm
May 1995 through September 1998
SashChannel
Straight Arm Operator
22"Hinge
Waterbar
Weatherstrip
(Located on
Top of Sash)
Keeper(s)
Component Identification
SECTION
E
SECTION
F
Parts Included
(1) Sash
(1) InstallationGuide
Installation Tools Needed:
•SafetyGlasses
•PhillipsScrewdriver
•Pliers
•Pencil
•Drill/Driver
•3/32"DrillBit
•PryBar
•UtilityKnife
CasementSash
4
Sash Replacement Guide
Stationary
1966 through Present
1966throughApril1995,
December1998toPresent
SashClip
May1995through
December1998
SashClip
11/16"Flat
HeadNails
1/2"x#6
Screws
Waterbar
Weatherstrip
(Located on
Top of Sash)
Component Identification
Additional Parts Required
(AvailableatyourAndersenDealer)
(1) Package11/16"FlatHeadNails
(1) PackageSashClips
(1) Package1/2"x#6Screws
Parts Included
(1) Sash
(1) InstallationGuide
Installation Tools Needed:
•SafetyGlasses
•Hammer
•Drill/Driver
•3/32"DrillBit
•SmallPryBar
•ThinBladePuttyKnife
•GlassClamps
•ViseGrips
•Pliers
•4dFinishNails
SECTION
H
PartNumber
1359408
PartNumber
1359410
CasementSash
Sash Replacement Guide
5
WhenHingeScrewsareremovedSashisfreeto
comeout.Toavoidinjury,product,and/orproperty
damage, use a reasonable number of people to
support the Sash during the replacement process.
Useextremecarewhenworkingaroundwindow
opening.Neverleaveawindowopeningunattended,
especially when children are present. Falling from
windowopeningmayresultinsevereinjuryordeath.
Sash Replacement Guide
6
1. Remove Sill Stop
PryBar
Utility
Knife
Sill Stop
Extension
Jamb
SECTION
A
2. Remove Operator
• Breakvarnishorpaintsealbyscoringbetween
Sill Stop and Extension Jamb with a utility knife.
• PryunderSill Stopfromtheexteriortoremove
Sill Stop.UsecaretoavoiddamagingSill Stop.
• RemovenishnailsinSill Stop by pulling
through back side with pliers.
3. Remove Hinge Plate Screws
• OpenSashsufcientlytoaccessscrewinTop and
Bottom Hinge Plate. Top and Bottom Hinge remain
attachedtoSash.ItmaybenecessarytomoveSashfor
access to all screw locations. Keep screws for reuse.
4. Remove Sash Hardware
• RemoveTop and Bottom Hinges from Sash.
• RemoveOperator Channel from bottom of Sash.
• RemoveKeeper(s) from Sash.
• RemoveSnugger Screw(s) from Sash if present.
Top View
Exterior
Interior
Operator
Arm Shoe
Operator
Channel
Operator
• RemovescrewsfromOperatorbase.Onlythree(3)ofthe
ve(5)screwsshownareuseddependingonleftorright
hand operation. Keep screws for reuse.
• SlideOperator Arm Shoe off Operator Channel on bottom of Sash.
RemovingOperatorallowsSashtoswingfreely.
Duringwindyconditions,Sashmaysuddenlyswing
outandbreakfreecausinginjury,product,and/or
property damage. Support Sash during the entire
replacement process.
Top View
Exterior
Interior
HingePlate
Screws
Sash
Top View
Exterior
Interior
5. Attach Operator Channel
OperatorChannel
SECTION
A
DIM."A"
7. Attach Keepers
• PositionReplacement Sash, interior side up, with top
of Sash facing away. Apply Operator Channel to
bottomofSashusingmeasurement"A"foundintable.
Dimension"A"ismeasuredfromtheoppositesideof
Keeper(s) location.
8. Install New Sash
• InstallnewSash in frame opening reversing
Steps 1, 2, and 3.
• FastenTop and Bottom Hinge Plate to frame using
hinge screws removed in Step 3.
6. Attach Hinges
Drillonly1/8"deeptoavoidsashorglassdamage.
Dash(
I
)andCircular( ) marks on the Sash are
predrilllocationsforstandardsizesash.
Useonlythemarkindicatedineachinstruction.
These marks are NOT used in Step 5 for Operator
Channellocation.
LowerHole
to Mark (
I
)
Waterbar Weatherstrip
(Located on Top of Sash)
• Drill3/32"holes1/8"deepusingOperator Channel as a
template. Fasten using previously removed screws.
• FastenOperator using screws removed in Step 2.
• FastenSill Stop using finish nails.
Casement Sash with Channel Positioned on Right Hand Unit
Interior Side Up
First Mark
(
I
)
FirstHingeHole
Interior Side Up
Interior
Side Up
Overall Sash Width Dim. DIM. "A"
C or 23"
(12" Track)
25/8"
CW or 231/2-271/4"
(12" Track)
5-3/4"
CX or 271/8-30-3/8"
(14" Track)
7-3/4"
CXWor 301/2"-34-3/4"
(14" Track)
7-3/4"
Dimension"A"isthedistancefromtheedgeofthesash
(hingeside)toedgeofSashChannel.Dimensionvaries
dependingonsashsize.
1-3/4"
(for custom
sizesonly)
Snugger location
(ifequipped)
• PositionBottom Hinge with first screw hole over the (
I
)
markonthenewSashforstandardsizesoratmeasured
locationforcustomsizes.
• Predrillthrough(
I
)markormeasuredlocation,1/8"deep
witha3/32"drillbitandsecurewithpreviouslyremoved
5/8"atheadstainlesssteelhingescrew.Repeatfor
remaining hinge holes.
• RepeatprocedureforTop Hinge.
• InstallSnugger Screw, using old Sash for location,
measuring from end of Sash.
• Positionkeeper(s)accordingtolocationonoldsash.
-Forstandardsizes,positionlowerholeat(
I
) mark.
-Forcustomsizes,measureaccordingtoTable-1onpage2.
• Predrillthrough(
I
) mark(s) or measured location(s)
1/8"deepwitha3/32"drillbit,usingKeeper(s) as a template.
NotetheopenpartoftheKeeper faces away from the glass.
• Fastenusingpreviouslyremovedscrews.
Bottom
Hinge
Keeper
Sash Replacement Guide
7
Stopper
Screw
3. Release Hinge Arm
• LiftHinge Arm off Stud being careful
tokeepAdjustmentInsertattachedto
arm.
• IfLimited Vent Control Plate is
present, remove screw and slide it off
HingePlate.
2. Release Operator Arm
• ReleasetheOperator Arm Clip from the Sash Bracket
usingaatbladescrewdriver.
• CrankOperator open to clear Sash.
• LiftOperator Arm and swing out under Sash.
1. Remove Stopper Screws
• OpentheSashtoabout30°andremovetheStopper
Screws from the Top and Bottom Hinge Channel.
• Keep screw for reuse.
4. Remove Sash
• HoldSashrmlyandslideTop and Bottom Hinge Shoes off
ends of hinge channels and remove Sash.
• PlaceSashonaatworkingsurfacewithinteriorfacingup.
5. Remove Sash Hardware
• RemoveTop and Bottom Hinges from Sash.
• RemoveSash Bracket from bottom of Sash.
• RemoveKeeper(s) from Sash.
ReleasingOperatorArmallowsSashtoswingfreely.
Duringwindyconditions,Sashmaysuddenlyswingout
andbreakfreecausinginjuryand/orproductdamage.
Support Sash during entire replacement process.
SECTION
B
OperatorArmClip
BottomHingeShoe
HingeArm
Sash Bracket
30°
LimitedVent
ControlPlate
Top View
Exterior
Interior
Top View
Exterior
Interior
Top View
Exterior
Stud
Adjustment
Insert
Clip
Interior
HingePlate
Top View
Exterior
Interior
Useextremecarewhenworkingaroundwindowopening.
Neverleaveawindowopeningunattended,especially
when children are present. Falling from window opening
mayresultinsevereinjuryordeath.
• RemoveSnugger Screw(s) from Sash if present.
• Keepscrewsforreuse.
8
Sash Replacement Guide
SECTION
B
Casement Sash with Bracket
Positioned on Right Hand Unit
Sash
Bracket
Hingemustbetight
against Sash Lip
8. Attach Keepers
9. Install New Sash
7. Attach Hinges
LowerHole
To (
I
) Mark
• PositionBottom Hinge(blackorbrownHingeShoe)withrst
screw hole over the (
I
)markonthenewSashforstandardsizes
oratmeasuredlocationforcustomsizes.
• Predrillthrough(
I
)markormeasuredlocation,1/8"deepwitha
3/32"drillbitandsecurewithpreviouslyremoved5/8"athead
stainlesssteelhingescrew.Repeatforremaininghingeholes.
• RepeatprocedureforTop Hinge
(whiteoralmondHingeShoe).
Drillonly1/8"deeptoavoidsashorglassdamage.
• Predrillthrough(
I
)markormeasuredlocation,1/8"deep
witha3/32"drillbit.UsingSash Bracket as a template, drill
remaining holes and secure with previously removed screws.
Sash
HingeShoe
HingeChannel
Sash Bracket
Stopper
Screw
Operator Arm
HingeArm
Stud
Adjustment
Insert
Clip
Top View
Exterior
Interior
• InstallnewSash in frame opening reversing
Steps 1, 2, 3, and 4.
• SlideTop and Bottom Hinge Shoes onto Hinge
Channelstowardframe'ssidejamb.
• InsertandsecurepreviouslyremovedStopper
Screws in Top and Bottom Hinge Channel.
• AttachTop and Bottom Hinge Arms to frame
using Adjustment Insert and Clip.
• AttachOperator Arm to Sash Bracket using
screwdriver to snap Stud Fastener in place.
Interior Side Up
Interior
Side Up
Interior
Side Up
3-9/16"
(for custom
sizesonly)
1-3/4"
(for custom
sizesonly)
BottomHinge
(Brown or Black Shoe)
• Positionkeeper(s)accordingtolocationonoldsash.
-Forstandardsizes,positionlowerholeat(
I
) mark(s).
-Forcustomsizes,measureaccordingtoTable-1onpage2.
• Predrillthrough(
I
)mark(s)ormeasuredlocation(s)1/8"deep
witha3/32"drillbit,usingKeeper(s)asatemplate.Notethe
open part of the Keeper faces away from the glass.
• Fastenusingpreviouslyremovedscrews.
Dash(
I
)andCircular( ) marks on the Sash are
predrilllocationsforstandardsizesash.
Forcustom-sizesash,usemeasurementsshown.
Useonlythemarkindicatedineachinstruction.
• PositionreplacementSash,interiorsideup,withtopof
Sashfacingaway.PositionSash Bracket to bottom of
Sashatthepre-markeddash(
I
)forstandardsizesorat
measuredlocationforcustomsizes.
Keeper
6. Attach Sash Bracket
Waterbar Weatherstrip
(Located on Top of Sash)
9
Sash Replacement Guide
1. Remove Sill Stop
PryBar
Utility
Knife
Sill Stop
ExtensionJamb
SECTION
C
2. Remove Operator
• Breakvarnishorpaintsealbyscoringbetween
Sill Stop and Extension Jamb with a utility knife.
• PryunderSill Stopfromtheexteriortoremove
Sill Stop.UsecaretoavoiddamagingSill Stop.
• RemovenishnailsinSill Stop by pulling
through back side with pliers.
• OpenSashsufcientlytoaccessscrewinTop and
Bottom Hinge Plate. Upper and Lower Hinge remain
attachedtoSash.ItmaybenecessarytomoveSashfor
access to all screw locations. Keep screws for reuse.
4. Remove Sash Hardware
• RemoveTop and Bottom Hinges from Sash.
• RemoveOperator Channel from bottom of Sash.
• RemoveKeeper(s) from Sash.
• RemoveSnugger Screw(s) from Sash if present.
3. Remove Hinge Plate Screws
WhenHingeScrewsareremovedSashisfreeto
comeout.Toavoidinjury,product,and/orproperty
damage, use a reasonable number of people to
support the Sash during the replacement process.
Top View
Exterior
Interior
Operator
Arm Shoe
Operator
Channel
Operator
• RemovescrewsfromOperatorbase.Onlythree(3)of
theve(5)screwsshownareuseddependingonleftor
right hand operation. Keep screws for reuse.
• SlideOperator Arm Shoe off Operator Channel on
bottom of Sash.
RemovingOperatorallowsSashtoswingfreely.
Duringwindyconditions,Sashmaysuddenlyswing
outandbreakfreecausinginjury,product,and/or
property damage. Support Sash during the entire
replacement process.
Top View
Exterior
Interior
HingePlate
Screws
Sash
Top View
Exterior
Interior
Useextremecarewhenworkingaroundwindow
opening.Neverleaveawindowopeningunattended,
especially when children are present. Falling from
windowopeningmayresultinsevereinjuryordeath.
Sash Replacement Guide
10
5. Attach Operator Channel
OperatorChannel
SECTION
C
DIM."A"
7. Attach Keepers
• PositionReplacement Sash, interior side up, with top
of Sash facing away. Apply Operator Channel to
bottomofSashusingmeasurement"A"foundintable.
Dimension"A"ismeasuredfromtheoppositesideof
Keeper(s) location.
8. Install New Sash
• InstallnewSash in frame opening reversing
Steps 1, 2, and 3.
• FastenTop and Bottom Hinge Plate to frame using
hinge screws removed in Step 3.
6. Attach Hinges
Drillonly1/8"deeptoavoidsashorglassdamage.
Dash(
I
)andCircular( ) marks on the Sash are
predrilllocationsforstandardsizesash.
Useonlythemarkindicatedineachinstruction.
These marks are NOT used in Step 5 for Operator
Channellocation.
LowerHole
to Mark (
I
)
Waterbar Weatherstrip
(Located on Top of Sash)
• Drill3/32"holes1/8"deepusingOperator Channel as a
template. Fasten using previously removed screws.
• FastenOperator using screws removed in Step 2.
• FastenSill Stop using finish nails.
Casement Sash with Channel Positioned on Right Hand Unit
Interior Side Up
First Mark
(
I
)
FirstHingeHole
Interior Side Up
Interior
Side Up
Overall Sash Width Dim. DIM. "A"
C or 23" 6"
CW or 231/2-271/4" 9-1/8"
CX or 271/8-30-3/8" 9-1/8"
CXWor 301/2"-34-3/4" 9-1/8"
Dimension"A"isthedistancefromtheedgeofthesash
(hingeside)toedgeofSashChannel.Dimensionvaries
dependingonsashsize.
1-3/4"
(for custom
sizesonly)
Snugger location
(ifequipped)
• PositionBottom Hinge with first screw hole over the (
I
)
markonthenewSashforstandardsizesoratmeasured
locationforcustomsizes.
• Predrillthrough(
I
)markormeasuredlocation,1/8"deep
witha3/32"drillbitandsecurewithpreviouslyremoved
5/8"atheadstainlesssteelhingescrew.Repeatfor
remaining hinge holes.
• RepeatprocedureforTop Hinge.
• InstallSnugger Screw, using old Sash for location,
measuring from end of Sash.
• Positionkeeper(s)accordingtolocationonoldsash.
-Forstandardsizes,positionlowerholeat(
I
) mark.
-Forcustomsizes,measureaccordingtoTable-1onpage2.
• Predrillthrough(
I
) mark(s) or measured location(s)
1/8"deepwitha3/32"drillbit,usingKeeper(s) as a template.
NotetheopenpartoftheKeeper faces away from the glass.
• Fastenusingpreviouslyremovedscrews.
Bottom
Hinge
Keeper
Sash Replacement Guide
11
1. Remove Stopper Screws
Stopper
Screw
30°
3. Release Hinge Arms
• RemoveFastener Screw from Top and Bottom-
Hinge Arms and window frame.
• CrankOperator open to clear Sash.
2. Release Operator Arm
• ReleasetheOperator Arm Clip from the Sash Bracket
usingaatbladescrewdriver.
• IfthereisasashLimited Vent Control Plate, remove
screw and slide it off from the hinge plate.
• OpentheSashtoabout30°andremovetheStopper
ScrewsfromtheUpperandLowerHingeChannel.
• Keepscrewsforreuse.
4. Remove Sash
• HoldSashrmlyandslideTop and Bottom Hinge
Shoes off ends of hinge channels and remove Sash.
• PlaceSashonaatworkingsurfacewiththeinterior
facing up.
5. Remove Sash Hardware
• RemoveTop and Bottom Hinges from Sash.
• RemoveSash Bracket from bottom of Sash.
• RemoveKeeper(s) from Sash noting difference
between upper and lower keepers.
SECTION
D
ReleasingOperatorArmallowsSashtoswingfreely.
DuringwindyconditionsSashmaysuddenlyswing
outandbreakfreecausinginjuryand/orproduct
damage. Support Sash during entire replacement
process.
OperatorArmClip
LowerHingeShoe
HingeArm
Sash Bracket
LimitedVent
ControlLocation
(if present)
Fastener
Screw
Top View
Exterior
Interior
Top View
Exterior
Interior
Top View
Exterior
Interior
Top View
Exterior
Interior
• RemoveSnugger Screw(s) from Sash if present.
• Keepscrewsforreuse.
Useextremecarewhenworkingaroundwindow
opening.Neverleaveawindowopeningunattended,
especially when children are present. Falling from
windowopeningmayresultinsevereinjuryordeath.
Operator
Sash
Sash Replacement Guide
12
6. Attach Sash Bracket
SECTION
D
8. Attach Keepers
7. Attach Hinges
• PositionKeeper(s) on Sash according to location on
old Sash.
• Predrillthrough(
I
)mark(s)1/8"deepwitha3/32"drill
bit, using Keeper(s)asatemplate.Notetheopenpart
of the Keeper faces away from the glass.
• Fastenusingpreviouslyremovedscrews.
• PositionBottom Hinge(blackorbrownHingeShoe)
with first screw hole over the (
I
) mark located on
the replacement sash.
• Predrillthrough(
I
)mark(s)1/8"deepwitha3/32"drillbit
andsecurewithpreviouslyremoved5/8"atheadstain-
lesssteelhingescrew.Repeatforremaininghingeholes.
• RepeatprocedureforTop Hinge(whiteoralmondHinge
Shoe).
Drillonly1/8"deeptoavoidsashorglassdamage.
Waterbar Weatherstrip
(Located on Top of Sash)
Sash
Bracket
BottomHingehas
Brown or Black Shoe
Dash(
I
)andCircular( ) marks on Sash indicate
predrilllocations.Useonlythemarkindicatedin
each instruction.
• PositionreplacementSash,interiorsideup,withtop
of Sash facing away. Apply Sash Bracket to bottom of
Sash using the (
I
) mark on the new Sash.
• Predrillthrough(
I
)mark1/8"deepwitha3/32"drill
bit.UsingSash Bracket as a template, drill remaining
holes and secure with previously removed screws.
Hingemust
be tight against
Sash Lip
LowerHole
To (
I
) Mark
Interior Side Up
Casement Sash with Bracket
Positioned on Right Hand Unit
Interior Side Up
Interior Side Up
Keeper
Sash Replacement Guide
13
9. Install New Sash
• PositionSashinframeopeningandreverse
procedure,Steps4,3,2,and1.
• SlideTop and Bottom Hinge Shoes onto Hinge Chan-
nelstowardsframe'ssidejamb.
• InsertandsecurepreviouslyremovedStopper Screws
in the Top and Bottom Hinge Channel.
• AttachTop and Bottom Hinge Arms to frame using
washer and Hinge Screw.
• AttachOperator Arm to Sash Bracket using
screwdriver to snap Stud Fastener in place.
Sash
Hinge
Channel
Sash Bracket
Operator Arm
Stopper
Screw
HingeArm
HingeScrew
Washer
HingeShoe
Top View
(ExteriorSide)
Interior
Clip
Stud
14
Sash Replacement Guide
1. Remove Sill Stop
SECTION
E
2. Remove Operator
3. Remove Hinge Plate Screws
4. Remove Sash Hardware
• RemovescrewsfromOperatorbase.Onlythree(3)of
theve(5)screwsshownareuseddependingonleft
or right hand operation. Keep screws for reuse.
• SlideOperator Arm Shoe off Operator Channel on
bottom of Sash.
• BreakvarnishorpaintsealbyscoringbetweenSill
Stop and Extension Jamb with a utility knife.
• PryunderSill StopfromtheexteriortoremoveSill
Stop.UsecaretoavoiddamagingSill Stop.
• RemovenishnailsinSill Stop by pulling through
back side with pliers.
• OpenSashsufcientlytoaccessscrewinUpper and
Lower Hinge Plate. Top and Bottom Hinge remain
attachedtoSash.ItmaybenecessarytomoveSashfor
access to all screw locations. Keep screws for reuse.
• RemoveTop and Bottom Hinges from Sash.
• RemoveOperator Channel from bottom of Sash.
• RemoveKeeper(s) from Sash noting difference
between upper and lower keepers.
• RemoveSnugger Screw(s) from Sash if present.
RemovingOperatorallowsSashtoswingfreely.
Duringwindyconditions,Sashmaysuddenlyswing
outandbreakfreecausinginjuryand/orproduct
damage. Support Sash during the entire replace-
ment process.
Operator
Arm Shoe
PryBar
Sill Stop
ExtensionJamb
OperatorChannel
Operator
HingePlate
Screws
Sash
UtilityKnife
Top View
Exterior
Interior
Top View
Exterior
Interior
Top View
Exterior
Interior
Hinge
WhenHingeScrewsareremovedSashisfreeto
comeout.Toavoidinjury,product,and/orproperty
damage, use a reasonable number of people to
support the Sash during the replacement process.
Useextremecarewhenworkingaroundwindow
opening.Neverleaveawindowopeningunattended,
especially when children are present. Falling from
windowopeningmayresultinsevereinjuryordeath.
Sash Replacement Guide
15
5. Attach Operator Channel
SECTION
E
• InstallnewSash in frame opening and reverse
procedure,Steps3,2,and1.
• SecureTop and Bottom Hinge Plate to frame with
hingescrewsremovedinStep3.
OperatorChannel
DIM.“A”
Casement Sash with Channel
Positioned on Right Hand Unit
Dimension"A"isthedistancefromtheedgeofthe
sash(hingeside)totheedgeoftheSashChannel,
whichvariesdependingonsashsize.
Overall Sash Width Dim. DIM. "A"
C 22-15/16" 6"
CW 27-1/4" 9-1/8"
CXW 34-3/4" 9-1/8"
Snugger
location
(ifequipped)
LowerHole
to Mark (
I
)
Waterbar Weatherstrip
(Located on Top of Sash)
7. Attach Keepers
• PositionKeeper(s) on Sash according to location on
old Sash.
• Predrillthrough(
I
)mark(s)1/8"deepwitha3/32"drill
bit, using Keeper(s)asatemplate.Notetheopenpart
of the keeper faces away from the glass.
• Fastenusingpreviouslyremovedscrews.
• PositionreplacementSashexteriorsidedownwith
top of Sash facing away. Apply Operator Channel to
bottomofSashusingmeasurement"A"foundintable.
Dimension"A"ismeasuredfromtheoppositesideof
the Keeper(s) location.
8. Install New Sash
6. Attach Hinges
• PositionBottom Hinge with first screw hole over the (
I
)
mark located on the replacement Sash.
• Predrillthrough(
I
)mark(s)1/8"deepwitha3/32"drillbit
andsecurewithpreviouslyremoved5/8"atheadstain-
lesssteelhingescrew.Repeatforremaininghingeholes.
• RepeatprocedureforTop Hinge.
• InstallSnugger Screw, using old Sash for location,
measuring from end of Sash.
• Predrillscrewholes1/8"deepwitha3/32"drillbit,
using Operator Channel as a template and secure with
previously removed screws.
Drillonly1/8"deeptoavoidsashorglassdamage.
TheDash(
I
)andCircular( ) marks on the Sash
arelocationsforpredrilling.Useonlythemark
indicatedineachinstruction.ThesemarksareNOT
usedinStep5forOperatorChannellocation.
• AttachOperatorusingscrewsremovedinStep2.
• AttachSill Stop using finish nails.
Interior Side Up
Interior Side Up
First Mark
(
I
)
FirstHingeHole
Interior
Side Up
Bottom
Hinge
Keeper
Sash Replacement Guide
16
Snugger
Screw
Location
(if present)
1. Remove Stopper Screws
SECTION
F
Stopper Screw
SplitArmStudClip
Sash Bracket
• ReleasetheSplit Arm Stud Clip from the Sash Bracket
usingaatbladescrewdriver.
• IfthereisasashLimited Ventilation Control Plate,
remove screw and slide it off from the hinge plate.
• CrankdetachedSplit Arm out of the way for Sash removal.
• OpentheSashtoabout30°andremovetheStopper
ScrewsfromtheUpperandLowerHingeChannel.
• Keepscrewsforreuse.
2. Release Split Arm Stud Clip
ReleasingOperatorArmallowsSashtoswing
freely.Duringwindyconditions,Sashmay
suddenlyswingoutandbreakfreecausinginjury
and/orproductdamage.SupportSashduringentire
replacement process.
• ReleaseStud Clips on the Top and Bottom Hinge
using a screwdriver.
• HoldSash firmly and slide the Top and Bottom
Hinge Shoes off ends of hinge channels and remove Sash.
• PlaceSashonaatworkingsurfacewiththeinteriorfacingup.
3. Remove Sash
4. Remove Sash Hardware
• RemoveTop and Bottom Hinges
from Sash.
• RemoveSash Bracket from bottom
of Sash.
• RemoveKeeper(s) from Sash noting
difference between upper and lower
keepers.
• RemoveSnugger Screw(s) from
Sash, if present.
• Keepscrewsforreuse.
Waterbar Weatherstrip
(Located on Top of Sash)
Hinge
Split Arm
Bracket
Keeper(s)
Top View
Exterior
Interior
Top View
Exterior
Interior
Top View
Exterior
Interior
Interior Side Up
LimitedVentilation
ControlPlate
(if present)
Useextremecarewhenworkingaroundwindow
opening.Neverleaveawindowopeningunattended,
especially when children are present. Falling from
windowopeningmayresultinsevereinjuryordeath.
Sash
Split Arm
Crank
Sash
StudClip
Bottom
Hinge
Sash Replacement Guide
17
5. Attach Hinges
SECTION
F
BottomHinge
(Black Shoe)
• PositionBottom Hinge with first countersunk screw hole
over the (
) mark located on the new Sash. (Bottom
Hinge has a black shoe, Top Hinge has a white shoe.)
Drillonly1/8"deeptoavoidsashorglassdamage.
Sash are designed for universal replacement. The
Dash(
I
)andCircular( ) marks on the Sash are
locationsforpredrilling.Useonlythemarkindicated
in each instruction.
Split-Arm
Bracket
7. Attach Keepers
• PositionKeeper(s) on Sash according to location on
old Sash.
• Predrillthrough(
)mark(s)1/8"deepwitha3/32"
drill bit, using Keeper(s)asatemplate.Notetheopen
part of the Keeper faces away from the glass.
• Fastenusingpreviouslyremovedscrews.
8. Install New Sash
• PositionSash in frame opening and reverse
procedure,Steps1,2,and3.
• SecureTop and Bottom Hinge Plate to frame with
hingescrewsremovedinStep3.
• AttachOperatorusingscrewsremovedinStep2.
• AttachSill Stop using finish nails.
6. Attach Split Arm Bracket
• PositionSplit Arm Bracket with first screw hole over
the (
) mark located on the new Sash.
• Predrillthrough(
)mark(s)1/8"deepwitha3/32"
drillbitandsecurewithpreviouslyremoved5/8"at
headstainlesssteelhingescrew.Repeatforremaining
hinge holes.
• InstallSnugger Screw, using old sash for location,
measuring from end of Sash.
TopHolein
Keeper(s) to
Mark ( )
• Predrillthrough( )mark(s)1/8"deepwitha3/32"drill
bitandsecurewithpreviouslyremoved5/8"atheadstain-
lesssteelhingescrew.Repeatforremaininghingeholes.
• RepeatforTop Hinge.
Interior Side Up
Interior Side Up
Interior Side Up
Snugger Screw
Location
(if present)
Keeper
Sash Replacement Guide
18
1. Remove Stopper Screws
SECTION
G
2. Remove Sash
• ReleaseStud Clips on the Top and Bottom Hinge using
a screwdriver.
NotchedChannel
• HoldSashrmlyandslidetheOperator Arm Shoe to
the notch, lift shoe up to release the Operator Arm.
SatinorRegularChannel
• HoldSashrmlyandslidetheOperator Arm Shoe from
its channel while sliding the Top and Bottom Hinge
Shoes off the ends of the hinge channels and remove
Sash.
• PlaceSashonaatworkingsurfacewiththeinterior
facing up.
• OpentheSashtoabout30°andremovetheStopper
Screws from the Top and Bottom Hinge Channel.
• Keepscrewsforreuse.
3. Remove Sash Hardware
• RemoveUpper and Lower Hinges from
Sash.
• RemoveChannel from bottom of Sash.
• RemoveKeeper(s) from Sash noting
difference between upper and lower
keepers.
• RemoveSnugger Screw(s) from Sash if
present.
• Keepscrewsforreuse.
ReleasingtheOperatorArmallowstheSashto
swingfreely.Duringwindyconditions,theSash
may suddenly swing out and break free causing
injuryand/orproductdamage.SupporttheSash
during the entire replacement process.
Waterbar Weatherstrip
(Located on Top of Sash)
Hinge
Channel
Keeper(s)
StudClip
Channel
Operator
Arm Shoe
Stopper
Screw
Top View
Exterior
Interior
Top View
Exterior
Interior
Interior Side Up
Snugger Screw
Location
(if present)
Sash
Hinge
Shoe
Useextremecarewhenworkingaroundwindow
opening.Neverleaveawindowopeningunattended,
especially when children are present. Falling from
windowopeningmayresultinsevereinjuryordeath.
Sash Replacement Guide
19
4. Attach Hinges
SECTION
G
• PositionBottom Hinge with first countersunk screw hole
over the (
) mark located on the new Sash. (Bottom
Hinge has a black shoe, Top Hinge has a white shoe.)
• Predrillthrough(
)mark(s)1/8"deepwitha3/32"drill
bitandsecurewithpreviouslyremoved5/8"atheadstain-
lesssteelhingescrew.Repeatforremaininghingeholes.
• RepeatforTop Hinge.
Drillonly1/8"deeptoavoidsashorglassdamage.
BottomHingehas
Brown or Black Shoe
Sash are designed for universal replacement. The
Dash(
I
)andCircular( ) marks on the Sash are
locationsforpredrilling.Useonlythemarkindicated
in each instruction.
RegularChannel
(CenteronSash)
5. Attach Operator Channel
SilverChannel
1-3/8"
SilverChannel
• PositionedgeofSilver Channel1-3/8"infromSash
corner.
• Predrillscrewhole1/8"deepwitha3/32"drillbitand
securewithpreviouslyremovedscrewsinStep3.
RepeatforremainingChannelholes.
• InstallSnugger Screw if present, using old sash for
location, measuring from end of Sash.
RegularChannel
•PositionRegular Channel centered on Sash.
• Predrillscrewhole1/8"deepwitha3/32"drillbitand
securewithpreviouslyremovedscrewsinStep3.
RepeatforremainingChannelholes.
• InstallSnugger Screw if present, using old Sash for
location, measuring from end of Sash.
Interior Side Up
Interior Side Up
Interior Side Up
Snugger Screw
Location
(if present)
Snugger Screw
Location
(if present)
Sash Replacement Guide
20
  • Page 1 1
  • Page 2 2
  • Page 3 3
  • Page 4 4
  • Page 5 5
  • Page 6 6
  • Page 7 7
  • Page 8 8
  • Page 9 9
  • Page 10 10
  • Page 11 11
  • Page 12 12
  • Page 13 13
  • Page 14 14
  • Page 15 15
  • Page 16 16
  • Page 17 17
  • Page 18 18
  • Page 19 19
  • Page 20 20
  • Page 21 21
  • Page 22 22
  • Page 23 23
  • Page 24 24

Andersen 200 Series User manual

Type
User manual

Ask a question and I''ll find the answer in the document

Finding information in a document is now easier with AI