
Organize your parts. You may need a rubber mallet.
Parts :
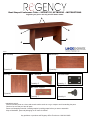
A: Tabletop
Quantity: 2
IMPORTANT NOTICE:
Place all wooden parts on a clean and smooth surface such as a rug or carpet to avoid scratching the parts.
Check to be sure that you have all parts.
Remove all wrapping materials, including staples & packing straps before you start to assemble.
Keep all hardware, parts and packaging out of reach of children.
Any problems or questions call Regency Ofce Furniture at 1-866-816-9822
A
B
C
C
Boat Shaped Conference Table • SCTBS7135, SCTBS9543 • INSTRUCTIONS
B: Modesty
Quantity: 1
C: Legs
Quantity: 2
Quantity: 2
E: Center Support
Quantity: 1
D: Cantilever
Quantity: 2
G: Thumb Screw
Quantity: 8
F: Flat Bracket
D
D

Any problems or questions call Regency Ofce Furniture at 1-866-816-9822
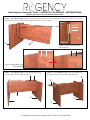
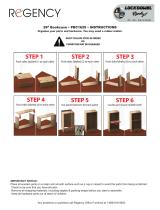
STEP 1 : Attach Modesty (B) to Leg (C) by inserting E-Clips into grooves and sliding down into place (See Figures 1 and 2). Please
note there are (2) grooves on the inside of Legs (C) and only one on the outside.
C
B
Figure 1: Insert E-Clip into wide
end of groove
PINS
E-CLIP
STEP 2 : Attach Modesty (B) to second Leg (C) by inserting
E-Clips into grooves and sliding into place.
B
C
Boat Shaped Conference Table • SCTBS7135, SCTBS9543 • INSTRUCTIONS
Organize your parts. You may need a rubber mallet.
GROOVE
Figure 2: Slide down to lock
E-Clip in place
B
B
B
C
C
C
STEP 3 : Attach Cantilevers (D) to outside of Legs (C) by
inserting E-Clips into grooves and sliding into place.
C
D
D
C
C

Any problems or questions call Regency Ofce Furniture at 1-866-816-9822
STEP 4 : Attach Center Support (E) to Modesty (B) by inserting Lockdowels into coordinating holes and pressing down into place
(See Figure 3).
B
E
Boat Shaped Conference Table • SCTBS7135, SCTBS9543 • INSTRUCTIONS
Organize your parts. You may need a rubber mallet.
LOCKDOWELS
Figure 3: Insert Lockdowels into
coordinating holes and press down
to snap into place
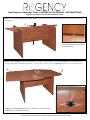
STEP 5 : Attach Tabletops (A) to assembled table by insterting E-Clips into grooves. Once both Tabletops (A) are attached (Tops will
be offset), slide into place to lock E-Clips. Note: Fit will be snug- you may need to tap Tabletops (A) into place with a rubber mallet.
STEP 6 : Attach Flat Brackets (F) into pre-drilled holes on the underside of
Tabletops (A) with Thumb Screws (G)
A
A
A A
F
G
G
-
 1
1
-
 2
2
-
 3
3


Regency SCTBS9543CH Operating instructions
- Type
- Operating instructions
- This manual is also suitable for
Ask a question and I''ll find the answer in the document
Finding information in a document is now easier with AI
Related papers
-
Regency SCTRD42JV Installation guide
-
-
-
Regency HDPFTT4824CH Installation guide
-
-
-
-
-
-
Other documents
-
Hay Boa Table User manual
-
 Nucraft Fleet™ Installation guide
-
 Niche NCT8442TF Operating instructions
-
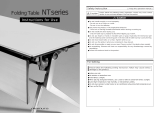 Okamura NT Operating instructions
-
Eaton Linx Installation guide
-
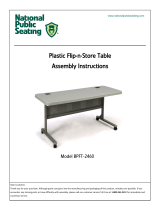 National Public Seating BPFT-2472-20 Installation guide
-
Bretford 3521-GMQ Datasheet
-
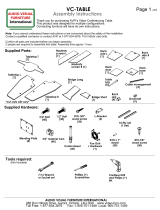 Audio Visual Furniture VC-TABLE Assembly Instructions Manual
-
 Niche PBC1629WC Installation guide
-


