Page is loading ...

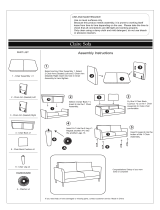
Assembly Instructions
Caution: You must read this before you proceed
Chair
Parts List
Label Picture Description QTY
A Chair Base 1
B Chair Backrest 1
C Seat Cushion 1
D Left Arm Board 1
Noble house Home Furnishings LLC
Page 1 OF 12

E Right Arm Board 1
F Arm Pillow 2
G Wooden Leg 4
Hardware List
Label Picture Description QTY
①Bolt(M6*60mm) 9
②Washer 10
③Spring Washer 10
④Double-threaded Bolt
(M8*70mm) 1
⑤Wing Nut 1
⑥Allen Wrench 1
⑦
Extra Gaskets,
available for Chair
Uneveness/Wobbles
Adjustments
7
Noble house Home Furnishings LLC
Page 2 OF 12

Assembly Preparation
Before Begining
Assembly:
Noble house Home Furnishings LLC
Page 3 OF 12

Assembly Steps
This Chair has multiple parts and may require about 30 minutes to assemble. To give you an
overview of the Chair parts, the above picture is to help you put the various parts into
perspective. Please read through the instructions below to familiarise yourself with the parts
and steps before assembly.
Step 1
Take the Chair Base(A), Chair Backrest(B), Seat Cushion(C), Left Arm Board(D), Right Arm
Board(E), Arm Pillow(F) and Small Box out from the carton and place them on a clean, non-
marring surface.
Arm Pillow (F)
FRONT FACING
Chair Backrest (B)
Chair Base (A)
Left Arm Board (D)
Seat Cushion (C)
Wooden Leg (G)
Right Arm Board (D)
AC
DE
B
F
Small Box
Arm Pillow (F)
Noble house Home Furnishings LLC
Page 4 OF 12

Step 2
Carefully peel the back non-woven cover under the Chair Base(A) and to take out the other
Arm Pillow(F).
Step 3
Open the Small Carton Box to take out the Wooden Legs(G), Gaskets(⑦), Bolts(①),
Washers(②), Spring Washers(③), Double-threaded Bolts(④), Wing Nuts(⑤), and Allen
Wrench(⑥).
①
Small Box
③
④
⑥
⑤
⑦
G
②
A
F
Hardware and
Legs inside
Noble house Home Furnishings LLC
Page 5 OF 12

Step 4
Turn the Seat Base(A) facedown.
Carefully peel back the left and right non-woven cover under the Seat Base(A) to expose the
mounting positions.
A
Noble house Home Furnishings LLC
Page 6 OF 12

Step 5
5.1) Align Left Arm Board(D) with the left side of the Chair Base(A).
5.2) Attach Left Arm Board(D) to Sofa Base(A) using Bolts(①), Spring Washers(③), and
Washers(②) with Allen Wrench(⑥).
Tighten the Bolts fully in a sequential manner.
D
A
D
A
②①
③⑥
5.1
5.2
Noble house Home Furnishings LLC
Page 7 OF 12

Step 6
6.1) Align Right Arm Board(E) to the right side of the Chair Base(A).
6.2) Attach Right Arm Board(E) to Sofa Base(A) using Bolts(①), Spring Washers(③), and
Washers(②) with Allen Wrench(⑥).
Tighten the Bolts fully in a sequential manner.
⑥
AE
E
D A
②
①③
6.2
6.1
Noble house Home Furnishings LLC
Page 8 OF 12

Step 7
Locate the mounting position under the Chair Backrest(B), then insert Double-threaded
Bolt(④) into the mounting position and tighten clockwise by hand.
Step 8
With assistance from your adult partner, hold up the Chair Backrest(B), while standing behind
the Chair Base(A).
Align the mounting brackets on both sides of the Chair Backrest(B) with those on the Left Arm
Board(D) and Right Arm Board(E).
Then slide Chair Backrest(B) downward and while inserting the Double-threaded Bolt(④) into
the mounting position on Chair Base(A) by hand to make sure it locks into place as pictured
A
D
E
B
④
B B
④④
Noble house Home Furnishings LLC
Page 9 OF 12

Step 9
Open the back non-woven cover under Chair Base(A).
You will see one mounting position on the back panel of the Chair Base(A).
Then, place Washer(②) and Spring Washer(③) onto the Double-threaded Bolts(④), and
secure using Wing Nut(⑤).
Tighten the Wing Nut fully by turning it clockwise by hand.
②
③
⑤
④
A
A
B
D
E
Noble house Home Furnishings LLC
Page 10 OF 12

Step 10
Install the Wood Legs(G) at the bottom of the Chair by placing one Gasket(⑦) on the
threaded stem.
Then insert threaded stem into the mounting postion at the corner of the Chair.
Tighten by turning the Leg clockwise.
Note: The use of Gaskets are OPTIONAL and are especially useful to help alleviate
slight wobbleness. Some Legs may need more than one Gasket whilst some Legs may
not need any.
Step 11
Put the Seat Cushion(C) on the Chair Base(A).
Step 12
Place Arm Pillows(F) against Left Arm Board(D) and Right Arm Board(E).
Your Chair is ready for use.
This Chair can only be used on a flat, level surface.
GG
C
F
F
Noble house Home Furnishings LLC
Page 11 OF 12

Noble house Home Furnishings LLC
Page 12 OF 12
/