Page is loading ...

©COPYRIGHT 2020 METRA ELECTRONICS CORPORATION
Metraonline.comMetra Electronics Corp.
®
REV. 10/20/2020 INSTJP-JLKT
Attention!
When testing the aftermarket
equipment, ensure that all factory equip-
ment is connected before cycling the key to
ignition.
JP-JLKT
INSTALLATION INSTRUCTIONS
Camera Removal ................................................ 2-4
Assembly ................................................................ 5
Wiring .....................................................................6
Specifications ......................................................... 7
TABLE OF CONTENTS
TOOLS REQUIRED
• 3/16 Allen bit
• Phillips bit
• Reciprecating saw or other cutting device
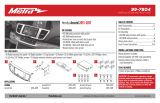
Jeep Wrangler JL 2018-UP*
Replacement Camera Kit
*Visit Metraonline.com for more detailed informatuon about the product and up-to-date vehicle specific
applications.
Part Components
A) Camera B) Housing Front/back C) Harness and Hardware
A B C
Product Features
• Designed to replace the LVDS camera on Jeep Wranglers
• Direct OE replacement
• ABS housing
• Resolution: 500 TV lines
• Viewing Angle: 160 degrees

386-257-1187
|
Metraonline.com
2
1. Remove the interior panel. It is held on with
panel clips. (Figure A)
2. Disconnect the two connectors shown. (FIg-
ure B) Pop out the grommet behind these
two connectors and run the harness outside.
This will allow easier access when removing
the spare tire mount from the vehicle. Retain
this harness as it will still be needed for the
third brake light.
Figure A Figure B
CAMERA REMOVAL

REV. 10/20/2020 INSTJP-JLKT
3
1. Remove the bolts holding the tire
onto the back of the tailgate.
2. To remove the camera it is easiest to
remove the spare tire mount from
the tailgate. Remove the four 14mm
bolts from the mount to remove it
from the tailgate. (Figure A)
3. Disconnect any wiring and remove
the mount from the tailgate. Re-
move the two T-25 torx to release
the camera mount from the spare
tire mount. (Figure B)
Figure A
Figure B
CAMERA REMOVAL (CONT.)

386-257-1187
|
Metraonline.com
4
Figure A
Figure B
Figure A
CAMERA REMOVAL (CONT.)
1. Use the 3 bolts to help push the
camera mount out of the back of
the spare tire mount. Push the bolts
down. Some force may be needed.
2. Remove the three T-8H torx screws to
remove the camera from the mount.
(Figure B)
3. Unplug the camera from the spare
tire harness and keep the harness.
This will still be needed for the brake
light. Tape back and secure the
camera connector if the need arrives
to go back to the factory camera.

REV. 10/20/2020 INSTJP-JLKT
5
Figure A Figure B
A SS E M B LY
1. Place the camera between the
front and rear housings like
shown in Figure A. Make sure to
notice and properly place the
camera using the small top ledge
as an indicator.
2. Run the assembly through the
jeep spare tire housing and
secure with either the factory
screws or the provided 3 stainless
steel screws. (Figure B)
3. Re-assemble spare tire assembly
following the steps in reverse.

386-257-1187
|
Metraonline.com
6
1. After re-assemblying the spare tire bracket. Plug the brake
harness back into the tailgate and run the wire through the
tailgate using zip-ties. Follow the current run of the wiring in
the tailgate to help with fitment of the panel that will go back
on once the wires are ran.
2. Run the wire through the boot into the vehicle.
3. Once inside the vehicle, you can power the camera via a
reverse trigger from the taillight. Connect the RED wire to the
reverse trigger. Connect the BLACK wire to a chassis ground.
The RED wire is also located at the opposite end of the
harness with the YELLLOW RCA if the user wants the camera
powered with an accessory circuit.
4. Run the wire down the length of the vehicle caerfully. Make
sure not to run near any objects that can cause extreme heat
or catch the wire.
5. Connect the YELLOW RCA to the after market radio. There is a
Red wire with the RCA, this can be used in two ways. This wire
can bring a reverse trigger to the front of the vehicle if the
camera is powered in the rear. This can also be used to power
the camera in the front if the camera is desired to ne powered
via an accessory circuit.
Figure A
WIRING

REV. 10/20/2020 INSTJP-JLKT
7
• RCA output for aftermarket radios or monitors
• Can be viewed while driving with compatible monitor
• ABS plastic housing to mount camera
• (4) Stainless steel screws provided for mounting
• Direct OE replacement
• Resolution: 550 TV Lines
• Selectable parking lines
• Viewing angle - 160 degrees
• Water resistant - IP68
6.4 FT26 FT
3.9 FT
RED wire at the RCA is the same wire as in the
back of the extension harness
RED wire = Camera power
BLACK wire = Chassis ground
Kit Includes
• 1 camera and extension cable
• Front and back - ABS camera housing
• 4 stainless steel screws
• Instruction booklet
SPECIFICATIONS

©COPYRIGHT 2020 METRA ELECTRONICS CORPORATION
Metraonline.comMetra Electronics Corp.
®
REV. 10/20/2020 INSTJP-JLKT
KNOWLEDGE IS POWER
Enhance your installation and fabrication skills by
enrolling in the most recognized and respected
mobile electronics school in our industry.
Log onto www.installerinstitute.com or call
800-354-6782 for more information and take steps
toward a better tomorrow.
®
JP-JLKT
INSTALLATION INSTRUCTIONS
Having difficulties? We’re here to help.
Contact our Tech Support line at:
386-257-1187
Or via email at:
techsupport@metra-autosound.com
Tech Support Hours (Eastern Standard Time)
Monday - Friday: 9:00 AM - 7:00 PM
Saturday: 10:00 AM - 7:00 PM
Sunday: 10:00 AM - 4:00 PM
Metra Recommends MECP
certified technicians
/