Page is loading ...

Panels &
Divider Rails
(1)
Base Rail
(2)
Top Cap
(0 - 2)
Divider Rail
(1 - 3)
Panel
(14)
#10-32 Screw
(2)
Side Rail
(6)
Tee Nut
Slide Side Rails into
Base Rail as shown
Install screws in
locations shown
(1)
Top Rail
(1)
1/8" Hex
Wrench
(2)
Angle Connector
Floor Partition / MPXXXX
Installation Instructions
www.ghent.com/install - Lebanon, Ohio 800-543-0550 IS-MP 12/20
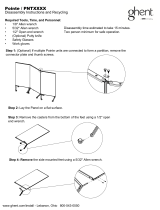
Step 1:
Remove and unpack the Panels, Rails, and Hardware.
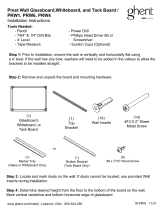
Step 3:
Carefully lift the connected Base and Side
Rails and place onto the floor. Then gather all
Panels and Divider Rails if applicable.
Step 4:
Add each Panel by lowering from the top
into the Side Rail channels. If applicable use the
Divider Rails to separate multiple Panels.
Step 2:
Place the Side Rails and Base Rail onto a clean tabletop surface. Slide the Side Rails into the
Base Rail as shown and connect each side with two Screws.

Free Angle Link
Loosely tighten Screw such that the Top
Cap does not slide off of the Top Rail
Once all Rails are aligned
tighten Screws with 1/8"
Hex Wrench
Right Angle Connection
Floor Partition / MPXXXX
Installation Instructions
www.ghent.com/install - Lebanon, Ohio 800-543-0550 IS-MP 12/20
Step 8:
Recycle all packaging in accordance with local regulations.
Step 5:
On each Top Cap loosely fasten one Screw and Tee Nut together as shown.
Then slide both assembled Top Caps onto the Top Rail and gently tighten.
Step 6:
Lower the assembled Top Rail onto the Panels and secure the Top Caps in place with two
Screws on each side. To minimize gaps between Rails loosen the Screws installed in Step 5 and
pull the frame together before retightening.
Step 7 (Optional):
Use the Angle Connectors to connect multiple units together. Additional
accessory kits are available for flush mount, wall mount, and quad mount configurations.

Top Cap
Pivot Pin
#10-32 Screw
Drywall Insert
Tee Nut
#10-16 Screw
1/8" Hex
Wrench
Angle Connector
Flush Mount Cap
Flush Mount
Rail Support
Right Angle
Connection
Wide Angle
Connection
Flush Mount
Connection
Wall Mount
Connection
Tee Arrangement
(2 Right Angles)
Quad Arrangement
(2 Right Angles + 1 Wide Angle)
Tri Arrangement
(2 Wide Angles)
Floor Partition / MP-CONN
Accessory Connection Installation Instructions
www.ghent.com/install - Lebanon, Ohio 800-543-0550
IS-MP-CONN 4/21
Step 1:
Remove and unpack all connection Hardware.
Please note, enclosed hardware depends on accessory kit purchased.
Step 2:
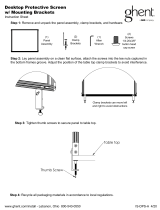
Choose from the following connection options, then follow the specific instructions for each.
Step 3:
Combine connections to make the following arrangements.
Four Standard Connection Options
Three Standard Arrangement Options

Top Cap
Flush Mount Connection
Flush Mount
Top Cap
Flush Mount
Rail Support
Right Angle Connection
Side Rail
Tee Nuts
Floor Partition / MP-CONN
Accessory Connection Installation Instructions
www.ghent.com/install - Lebanon, Ohio 800-543-0550
IS-MP-CONN 4/21
Right Angle:
Place two Floor Partition units next to one another as shown.
•
Loosely assemble two Angle Connectors using #10-32 Screws and Tee Nuts.
•
Slide the Tee Nuts from the top of the unit into the side rails.
•
Move the Angle Connectors in line with with dividers (if applicable) and tighten using the
•
1/8" Hex Wrench.
Flush Mount:
Remove the Top Caps from two adjacent Floor Partition units.
•
Install the Flush Mount Caps beginning with the Tee Nut.
•
Tighten all screws using the 1/8" Hex Wrench.
•
Insert the Flush Mount Rail Support in the opening between Caps.
•
When installed fully this should drop to the ground level.
To disassemble, remove Flush Mount Caps then lift one unit
approximately one inch off the ground to disconnect the Rail Connector.

Wide Angle Connection
Side Rail
Tee Nut
Pivot Pin
Note:
If wall has a baseboard
or other obstruction, use
extended #10-16 screws.
#10-16 Screw
Wall Mount Connection
Side Rail
Tee Nut
Top Cap
Floor Partition / MP-CONN
Accessory Connection Installation Instructions
www.ghent.com/install - Lebanon, Ohio 800-543-0550
IS-MP-CONN 4/21
Wall Mount:
Loosely assemble one Top Cap using one #10-32 Screw and Tee Nut as shown.
•
Slide the Top Cap into the side rails, ensure the open holes are accessible.
•
Tighten the screws using the 1/8" Hex Wrench.
•
Move the Floor Partition Unit to a wall, mark the open hole locations.
•
(If necessary) Drill and add Drywall Inserts to the wall at marked locations.
•
Use #10-16 Screws to secure Floor Partition to the wall at marked locations.
•
Wide Angle:
Place two Floor Partition units next to one another as shown.
•
Loosely assemble Four Angle Connectors using #10-32 Screws and Tee Nuts.
•
Slide the Tee Nuts from above the unit into the side rails, stacking upon adjacent connectors.
•
Tighten the screws using the 1/8" Hex Wrench.
•
Add a Pivot Pin or #10-32 Screw between Angle Connectors and position as desired.
•

Office Layout Recipe:
(2) Tri Arrangements
(3) Flush Mount Connections
(4) Right Angle Connections
Cubicle Layout Recipe:
(1) Quad Arrangement
(4) Right Angle Connections
Meeting Layout:
(3) Right Angle Connections
(2) Flush Mount Connections
(2) Wide Angle Connections
Floor Partition / MP-CONN
Accessory Connection Installation Instructions
www.ghent.com/install - Lebanon, Ohio 800-543-0550
IS-MP-CONN 4/21
Step 5:
Recycle all packaging in accordance with local regulations.
Step 4:
Follow Recipes for more purpose built constructions.
/