Page is loading ...

CEN-ODT-C-POE
Dual-Technology Occupancy Sensor, PoE,
2,000 Sq Ft
Supplemental Guide
Crestron Electronics, Inc.

Original Instructions
The U.S. English version of this document is the original instructions.
All other languages are a translation of the original instructions.
Crestron product development software is licensed to Crestron dealers and Crestron Service Providers (CSPs) under a
limited nonexclusive, nontransferable Software Development Tools License Agreement. Crestron product operating
system software is licensed to Crestron dealers, CSPs, and end-users under a separate End-User License Agreement.
Both of these Agreements can be found on the Crestron website at www.crestron.com/legal/software_license_
agreement.
The product warranty can be found at www.crestron.com/warranty.
The specific patents that cover Crestron products are listed at www.crestron.com/legal/patents.
Certain Crestron products contain open source software. For specific information, visit www.crestron.com/opensource.
Crestron, the Crestron logo, Cresnet, Crestron XiOCloud, and infiNETEX are either trademarks or registered trademarks
of Crestron Electronics, Inc. in the United States and/or other countries. Active Directory, Azure, and Microsoft are either
trademarks or registered trademarks of Microsoft Corporation in the United States and/or other countries. Other
trademarks, registered trademarks, and trade names may be used in this document to refer to either the entities
claiming the marks and names or their products. Crestron disclaims any proprietary interest in the marks and names of
others. Crestron is not responsible for errors in typography or photography.
©2019 Crestron Electronics, Inc.

Contents
Introduction 1
Dual-Technology Occupancy Sensing 1
Ambient Light Recognition 1
Crestron XiO Cloud™ Service 1
Enterprise-Grade Security 2
Walk-Through Mode 2
Grace Occupancy Feature 2
Versatile Installation 2
Power over Ethernet 2
Product Features 3
Configure the CEN-ODT-C-POE 4
Actions Menu 5
Reboot 5
Restore 5
Update Firmware 5
Download Logs 6
Manage Certificates 6
Save Changes 6
Revert 7
Status 8
Device 8
Network 9
Occupancy 10
Photo Sensor 11
Control System 11
Settings 12
System Setup 13
Control System 15
Occupancy 16
Sensors 17
Photo Sensor 18
Security 19
802.1x Configuration 20
Supplemental Guide — 8598A Contents • i

ii • Contents Supplemental Guide — 8598A

Supplemental Guide — 8598A CEN-ODT-C-POE • 1
Introduction
The Crestron® CEN-ODT-C-POE is a low-profile, ceiling-mounted occupancy sensor that
features passive infrared (PIR) and ultrasonic (US) motion detection technology.
The CEN-ODT-C-POE is designed for areas up to 2,000 square feet, making it great for
use in large spaces such as auditoriums, warehouses, and building lobbies. It is an effective
solution for reducing energy consumption and enhancing the functionality of lighting and
environmental systems.
A single-wire Ethernet connection allows the CEN-ODT-C-POE to report to the Crestron
XiO Cloud™ service when no control system is in place. Crestron XiO Cloud integration
allows for device configuration, occupancy status reporting, and online/offline status.
Dual-Technology Occupancy Sensing
Achieving consistent and dependable occupancy sensing is accomplished using a
combination of ultrasonic (US) and passive infrared (PIR) sensing technologies. Ultrasonic
motion detection is highly sensitive to small movements over a large area, while passive
infrared sensing ensures superior immunity to false triggers from vibrations, inanimate
objects, or movement in an adjacent corridor.
Ultrasonic motion detection can be turned on for Side A, Side B, or both sides of the
occupancy sensor to avoid false occupancy readings when the sensor is facing a hallway or
doorway. The CEN-ODT-C-POE provides independent sensitivity adjustment for each
sensor type for optimum performance in any space.
Ambient Light Recognition
A built-in photosensor detects the amount of ambient light in the room. When enabled, the
photosensor can override the occupancy sensor’s signal to turn on the lights if the ambient
light level is above a set threshold, preventing lights from turning on when there is
sufficient daylight in the room and also performing daylight harvesting and dimming when
appropriate. Programming logic must be included to utilize this override feature.
Crestron XiO Cloud™ Service
The CEN-ODT-C-POE is compatible with the Crestron XiO Cloud™ service, which is an IoT
(Internet of Things) based platform for remotely provisioning, monitoring, and managing
Crestron devices across an enterprise or an entire client base. Built on the Microsoft®
Azure® software platform and utilizing Microsoft's industry leading Azure IoT Hub
technology, Crestron XiO Cloud enables installers and IT managers to deploy and manage
thousands of devices in the time it previously took to manage just one. Unlike other virtual
machine based cloud solutions, Azure services provide unlimited scalability to suit the ever
growing needs of an enterprise. For more information, visit www.crestron.com/xiocloud.

2 • CEN-ODT-C-POE Supplemental Guide — 8598A
Enterprise-Grade Security
Crestron employs enterprise-grade networking with robust security features such as
802.1X authentication, TLS encryption, HTTPS connectivity, and Active Directory® service
integration. These features are imperative to protect your network against service
interruptions and malicious intrusions, and to ensure compliance with your organization’s
network policies. Cloud-based provisioning and management streamlines the process of
configuring, monitoring, and updating every device on the network. Additional support for
SNMP allows Crestron devices to be monitored by your IT administrator alongside other
devices on the network.
Walk-Through Mode
Walk-through mode prevents the lights from remaining on for a long period when
someone quickly enters and then leaves a room. The sensor enters walk-through mode
when it detects occupancy for less than 90 seconds. When walk-through mode is
activated, the sensor indicates that the room is vacant after 60 seconds.
Grace Occupancy Feature
When the lights turn off in a room programmed to vacancy only mode, a 15 second grace
period starts during which the room lights can be turned on again by simply waving a hand
to trigger the sensor.
Versatile Installation
The CEN-ODT-C-POE achieves a discreet, nearly hidden appearance when installed on a
typical drywall or droptile ceiling. Hardware is included for fast and simple mounting in a
standard 4 in. octagon box or in a hole created with the help of the provided cutout
template.
Power over Ethernet
Using PoE technology (802.3af), the CEN-ODT-C-POE gets its operating power through
the LAN wiring from a PoE power source (PWE-4803RU, CEN-SW-POE-5, or
CEN-SWPOE-16, all sold separately).

Supplemental Guide — 8598A CEN-ODT-C-POE • 3
Product Features
Refer to the following chart to determine the product features that are available on
Crestron® occupancy sensors.
CEN-ODT-C-POE GLS-ODT-C-CN GLS-OIR-C-CN GLS-OIR-CSM-EX-BATT
Passive IR(PIR)Sensor Yes Yes Yes Yes
Ultrasonic Sensor Yes Yes No No
Ambient Light Sensor Yes Yes Yes No
Coverage Area 2,000 sq ft 2,000 sq ft 2,000 sq ft 500 sq ft
Grace Occupancy Yes Yes Yes Yes
Cresnet® Communication No Yes Yes No
infiNETEX®
Communication
No No No Yes
Ethernet Communication Yes No No No
Crestron XiOCloud™
Service
Yes No No No
Occupancy Sensor Feature Chart

4 • CEN-ODT-C-POE Supplemental Guide — 8598A
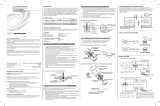
Configure the CEN-ODT-C-POE
The occupancy sensor may also be monitored and configured using the included web
configuration interface. The configuration interface is accessible from a web browser if the
IP address of the occupancy sensor is known. This interface is also accessible using the
Crestron XiO Cloud™ service.
To access the web configuration interface:
1. Open a web browser.
2. Enter the CEN-ODT-C-POE's IP address into the browser URL field. The
configuration interface is displayed.
NOTE: If authentication is enabled for the occupancy sensor, an administrator
username and password must be entered prior to accessing the web
configuration interface. For more information on configuring authentication
settings, refer to Security (on page19).
3. The web configuration interface provides tabs for Status, Settings, Security, and
802.1x Configuration.
NOTE: The Status tab is the default tab that is displayed.

Supplemental Guide — 8598A CEN-ODT-C-POE • 5
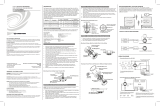
Actions Menu
The configuration interface provides an Actions drop-down menu on the top right of the
page. The Actions drop-down menu provides access to the Reboot, Restore, Update
Firmware, Download Logs, and Manage Certificates functions. It also provides the ability
to Save and Revert changes that are made in the web configuration interface.
Reboot
Click Reboot to reboot the CEN-ODT-C-POE.
After Reboot is selected, a dialog box is displayed asking whether the CEN-ODT-C-POE
should be rebooted. Select Yes to reboot the device or No to cancel the reboot.
Restore
Click Restore to factory reset the CEN-ODT-C-POE and restore the default settings.
After Restore is selected a dialog box is displayed asking whether the device settings should
be restored. Select Yes to restore the settings or No to cancel the restore.
Update Firmware
Click Firmware Upgrade to upgrade the CEN-ODT-C-POE firmware with a downloaded
PUF (package update file).The Firmware Upgrade dialog box opens.
To upload a firmware PUF through the web configuration interface:
NOTE: Visit www.crestron.com/firmware to download the latest firmware PUF.
1. Click Browse, and then navigate to the firmware PUF on the host computer.
2. Select the firmware PUF, and then click Open.
3. Click Load to load the PUF to the CEN-ODT-C-POE. The upload progress is shown in
the dialog box.
4. Once the CEN-ODT-C-POE has completed the firmware upgrade, click OK.
Click the x button to close the Firmware Upgrade dialog box at any time during the
upgrade process. Clicking the x button before the PUF is uploaded to the
CEN-ODT-C-POE cancels the upgrade.

6 • CEN-ODT-C-POE Supplemental Guide — 8598A
Download Logs
Click Download Logs to download the CEN-ODT-C-POE message logs for diagnostic
purposes. The message files download as a compressed .tgz file. Once the compressed file
is downloaded, extract the message log files to view them.
Manage Certificates
Click Manage Certificates to add or remove root, intermediate, machine and web server
certificates.
To add a certificate:
1. Click the Root, Intermediate, Machine, or Web Server tab and then the Add Root
Certificate, Add IntermediateCertificate, Add Machine Certificate button
2. Click Browse, and then navigate to the certificate on the host computer.
3. Select the certificate, and then click Open.
4. Once the CEN-ODT-C-POE has uploaded the certificate, click OK.
Click the x button to close the Add Certificate dialog box at any time during the upload
process. Clicking the x button before the certificate is uploaded to the CEN-ODT-C-POE
cancels the upload.
To delete a certificate:
1. Click the Root, Intermediate, Machine, or Web Server tab and then Add Root
Certificate, Add IntermediateCertificate, Add Machine Certificate button.
2. Click Delete. The Delete Certificate dialog box is displayed asking whether certificate
should be deleted.
3. Select Yes to delete the certificate or No to keep the certificate.
Save Changes
Changes made using the web configuration interface do not take place until they are saved.
Click Save Changes to save any changes made to the configuration settings.
NOTE:The Actions menu text changes to Save Changes when a configuration setting is
changed on the CEN-ODT-C-POE. Click Save Changes to save the current
configuration.

Supplemental Guide — 8598A CEN-ODT-C-POE • 7
Revert
Changes made using the web configuration interface do not take place until they are saved.
Click Revert to discard unsaved changes and display the current settings from the
CEN-ODT-C-POE.

8 • CEN-ODT-C-POE Supplemental Guide — 8598A
Status
Click the Status tab on the top left of the configuration interface to display selections for
viewing the status of device settings and network settings.
Click on a selection name to expand the selection. Click the selection name again to collapse
the section.
Device
Click Device to view device information.
The following Device information is displayed:

Supplemental Guide — 8598A CEN-ODT-C-POE • 9
l Model: The occupancy sensor model name.
l Firmware Version: The firmware version loaded onto the occupancy sensor.
l Serial Number: The occupancy sensor serial number.
Click + More Details at the bottom of the Device tab to display an expanded section that
shows additional occupancy sensor information (for Crestron internal use only). Click -
Less Details to collapse the section.
Network
Click Network to view the status of the network settings for the occupancy sensor.
The following Network information is displayed:
l Host Name: The occupancy sensor hostname.
l Domain Name: The occupancy sensor domain name.
l Primary Static DNS: The primary DNS (domain name server) addresses used to
resolve the occupancy sensor domain to an IP address.
l Secondary StaticDNS: The secondary DNS (domain name server) addresses used
to resolve the occupancy sensor domain to an IP address.
l DHCP: Reports whether the IP address is static (Yes) or dynamic (No).
l IP Address: The occupancy sensor IP address.
l Subnet Mask: The occupancy sensor subnet mask address.
l Default Gateway: The gateway router address.

10 • CEN-ODT-C-POE Supplemental Guide — 8598A
l Link Active: Reports the status of the Ethernet connection. Yes indicates that the
Ethernet connection is active and No indicates that the Ethernet connection is
inactive.
l MAC Address: The unique occupancy sensor MAC (media access control) address.
For more information on configuring network settings, refer to System Setup (on page13).
Occupancy
Click Occupancy to view the occupancy status of the room.
The following Occupancy information is displayed:
l Occupied: Reports the occupancy status of the room. Yes indicates that the room is
occupied and No indicates that the room is vacant.
l Timeout (seconds): The timeout setting for the occupancy sensor.

Supplemental Guide — 8598A CEN-ODT-C-POE • 11
Photo Sensor
Click Photo Sensor to view the light level in the room.
The following Photo Sensor information is displayed:
l Light Level: Reports the light level in the room as determined by the internal photo
sensor. The light level is scaled linearly from 0 to 65535.
Control System
Click Control System to view the control system connection.
The following Control System information is displayed:
l Encrypt Connection: Reports the encryption status between the occupancy sensor
and the control system.Yes indicates that encryption is enabled and No indicates
that encryption is disabled.
Click + IPTable at the bottom of the Control System tab to display the IPtable for the
control system. Click - IPTable to collapse the section.

12 • CEN-ODT-C-POE Supplemental Guide — 8598A
Settings
Click the Settings tab on the top left of the configuration interface to display selections for
configuring various occupancy sensor settings.
Click on a selection name to expand the selection. Click the selection name again to collapse
the section.

Supplemental Guide — 8598A CEN-ODT-C-POE • 13
System Setup
Click System Setup to configure date and time settings and network settings for the
occupancy sensor.
Click + Time/Date at the bottom of the System Setup tab to display the date and time
settings for the occupancy sensor. Click - Time/Date to collapse the section.
The following Time/Date information is displayed:
Time Synchronization:
l Enable Time Synchronization: Toggle the switch to turn time synchronization via
SNTP (Simple Network Time Protocol) on or off. When set to on, the Time Server
and Synchronize Now options become available.
l Time Server: Enter the SNTP server used to synchronize the date and time for the
occupancy sensor.
l Synchronize Now: Click Synchronize Now to synchronize the occupancy sensor with
the SNTP server entered for Time Server.
Time Configuration:
l Time Zone: Select a time zone for the occupancy sensor using the drop-down menu.
l Time(24hr Format): Select the time for the occupancy sensor (in 24-hour format)
using the pop-up menu that is displayed.
l Date: Select the date for the occupancy sensor using the pop-up calendar that is
displayed.

14 • CEN-ODT-C-POE Supplemental Guide — 8598A
Click + Network at the bottom of the System Setup tab to display the date and time
settings for the occupancy sensor. Click - Network to collapse the section.
The following Network information is displayed:
NOTE: The IP Address, Subnet Mask, and Default Gateway fields are required only if
DHCP is set to Disabled.
l Host Name: Enter the occupancy sensor's hostname.
l Domain Name: Enter the fully qualified domain name on the network.
l Primary Static DNS: Enter the primary DNS address used to resolve the domain
name to an IP address.
l Secondary Static DNS: Enter the secondary DNS address used to resolve the
domain name to an IP address if the primary DNS fails.
l DHCP: Toggle the switch to enable or disable using DHCP.
NOTE: If DHCP is enabled, IP does not function until a reply has been received
from the server. The occupancy sensor broadcasts requests for an IP address
periodically.
l IP Address: Enter the occupancy sensor's IP address on the network. Valid IP
addresses consist of four octets, 0 to 255, separated by periods.
l Subnet Mask: Enter the occupancy sensor's subnet mask address on the network.
l Default Gateway: Enter the gateway router address on the network.

Supplemental Guide — 8598A CEN-ODT-C-POE • 15
Control System
Click Control System to connect the occupancy sensor to a control system and to view the
IPtable of the control system.
NOTE: The CEN-ODT-C-POE must be part of the control system before it can be
added to the control system.
The following Control System information is displayed:
l Encrypt Connection: Click the check box to enable entry of the control system
username and password.
l Control System Username: Enter the control system username.
l Control System Password: Enter the control system password.
Click + IPTable at the bottom of the Control System tab to display the IPtable for the
control system. Click +Add and then enter the IP address of the control system.
Click-IPTable to collapse the section.

16 • CEN-ODT-C-POE Supplemental Guide — 8598A
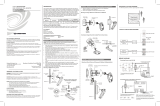
Occupancy
Click Occupancy to configure the occupancy sensor settings.
The following Occupancy information is displayed:
l LEDFlash: Toggle the switch to enable or disable the LEDs on the occupancy sensor.
The red LED turns on as the PIR sensor detects motion, and the green LED turns on
when an ultrasonic sensor detects motion.
l Timeout (seconds): The length of time that must pass without the occupancy sensor
detecting motion before it determines that the room is vacant. If the occupancy
sensor detects motion during the timeout period, the occupancy sensor determines
that the room is still occupied. The timeout duration can be set from 5 seconds to
1,800 seconds.
l Short Timeout: Toggle the switch to enable a “walk-through” mode for a shorter
timeout upon periods of minimal occupancy. If the room is occupied for less than 90
seconds, the timeout will revert to 60 seconds. If the normally programmed timeout
is set less than 60 seconds, that timeout will take precedence. This is useful for
rooms with normally a long timeout setting, so if the room is entered for a short
period of time, and occupancy is triggered, the lights do not remain on for a longer
period than needed.
l Initial Occupancy: Select how the occupancy sensor determines that the room is
occupied when it is in the vacant state. Select Ultrasonic and PIR if both the
ultrasonic and PIR sensors are needed to detect motion and determine that the
room is occupied or Ultrasonic or PIR if only one sensor is needed.
/