Page is loading ...

GLS-OIRLCL-C-CN
Occupancy Sensor and Photocell
Installation Guide
Description
The Crestron
®
GLS-OIRLCL-C-CN sensor features passive infrared (PIR) technology
for occupancy detection. It provides a powerful and cost-effective solution for reducing
energy consumption and enhancing the functionality of lighting and environmental
systems. The GLS-OIRLCL-C-CN is a low-prole, ceiling-mounted occupancy sensor
designed for areas up to 500 square feet, making it great for use in conference rooms,
hallways, and private ofces. Reliable Cresnet
®
wired communications directly connects
the sensor to a Crestron control system for integrated control of lighting, climate, and
other devices in the room.
A built-in photosensor detects the amount of ambient light in the room. When daylight
harvesting is enabled, the photosensor can override the occupancy sensor’s signal to turn
on the lights if the ambient light level is above a set threshold. This prevents the lights
from turning on when there is sufcient daylight in the room. Programming logic must be
included to utilize this override feature.
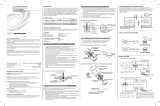
The dimensions of the GLS-OIRLCL-C-CN are shown below.
1.10 in
(28 mm)
2.02 in
(52 mm)
Ø 1.5 in
(38 mm)
2.15 in
(55 mm)
Additional Resources
Visit the product page on the Crestron website (www.crestron.com)
for additional information and the latest rmware updates. Use a QR
reader application on your mobile device to scan the QR image.
Installation
The GLS-OIRLCL-C-CN can be installed into a drop ceiling, drywall, or an octagon electrical
box. Refer to the instructions that follow to install the sensor.
NOTE: Before securing the sensor to the ceiling, refer to the “Mounting Location
Diagram” section to choose the best orientation. Avoid areas where false tripping may
occur due to outside motion such as an open door. Identify and avoid areas of possible
vibrations and air currents (e.g., projectors, fans, vents) and mount the sensor at least
5 feet (2 meters) away from these items.
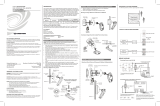
Install into drop ceiling or drywall:
1. Select the mounting location for the sensor application.
2. Use cutting tools appropriate for the surface to create a 1 in (26 mm) hole in the ceiling.
3. Connect the Cresnet wires to the GLS-OIRLCL-C-CN’s pigtail using the wire nuts (not
included).
4. Press the GLS-OIRLCL-C-CN into the hole. The mounting clips on either side of the
device hold it in place.
Mount GLS-OIRLCL-C-CN to Drywall or Drop Ceiling
1 in (26 mm) hole in
drywall or drop ceiling
Ceiling
Mounting
Clips
GLS-OIRLCL-C-CN
pigtail wires
Cresnet
wires
Mounting Location Diagram
The GLS-OIRLCL-C-CN is designed to be mounted in the center of a room or the corner of
a room.
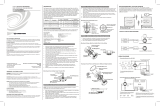
Detection Range
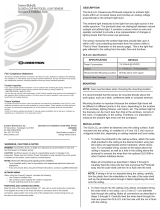
The detection pattern for the PIR sensitivity setting is shown in the illustration below. The
rst illustration shows the top view of the detection range, and the second illustration
shows the detection range based on the side view of the sensor.
GLS-OIRLCL-C-CN Detection Range—Top View
8.21 ft
(2.5 m)
8.21 ft
(2.5 m)
8.21 ft
(2.5 m)
16.4 ft
(5 m)
16.4 ft
(5 m)
56˚ 56˚
50˚ 50˚
GLS-OIRLCL-C-CN Detection Range—Side View
8.21 ft
(2.5 m)
8.21 ft
(2.5 m)
8.21 ft
(2.5 m)
16.41 ft
(5 m)
16.41 ft
(5 m)
49˚
49˚
41˚
41˚

Operation
The descriptions below refer to a system which has been congured as an occupancy
sensor—the lights turn on when a room is occupied, and the lights turn off when the room
is vacant.
NOTE: The GLS-OIRLCL-C-CN can also operate as a vacancy sensor—the lights turn
off when the room is vacant. The sensor will not turn the lights on.
• Timeout - The sensor is designed to turn the lights off after it stops detecting motion.
The lights turn off if no motion is detected during the device’s timeout period. The
timeout is set using the IR remote.
• Short Timeout - The short timeout allows a room to turn on the lights while it is being
temporarily occupied; when the occupant leaves the room, the lights turn off shortly
after the occupant leaves the room.
NOTE: The short-timeout feature works as follows: When a person enters the
room, the lights turn on as usual, but, if the person leaves the room within
90 seconds, the short-timeout takes effect and the lights turn off after 60 seconds.
• LED Operation - The LED is disabled during normal operation. The LED can be
enabled using the programming remote.
Photocell Adjustment
The GLS-OIRLCL-C-CN has a built-in photocell that allows for complete daylight
harvesting using the Crestron lighting system. Through programming, the photocell can
dim lights or choose to not turn lights on at all if sufcient natural daylight is present.
Setup and Conguration
Initial setup done using Crestron Toolbox™ software for the following:
• Detect device in Network Device Tree
• Set the NET ID
• Identify device
• Reboot/Restore
Additional conguration of the GLS-OIRLCL-C-CN is performed using the
GLS-REMOTE-ODT/OIR remote (not included) as follows:
• Timeout - Press the desired TIMEOUT - 30s/2m/5m/10m/15m/30m button to set the
timeout.
• Short Timeout - Press SHORT TIMEOUT - ENABLE or SHORT TIMEOUT - DISABLE to
enable or disable Short Timeout mode. Short timeout allows the timeout to be set to
60 seconds when occupied for less than 90 seconds.
• LED - Press LED - ENABLE or LED - DISABLE to enable or disable the LED of the
device during normal operation.
• Sensitivity - Press PIR HIGH, PIR MED, or PIR LOW to adjust the sensitivity of the
sensor.
Set Net ID
The Net ID needs to be set prior to operation. The Net ID can be set using Crestron
Toolbox software or the GLS-REMOTE-ODT/OIR remote.
To set or change the Net ID of the sensor, use the remote.
1. Press and hold the SET ID button for 3 seconds. The sensor emits 3 short beeps to
indicate that it is ready for Net ID entry.
2. Enter the Net ID of the sensor using the numeric keypad on the remote. The sensor
emits 1 short beep for each number entry.
3. Press SET ID to conrm the entry. The sensor emits one long beep to indicate
successful Net ID entry or three short beeps to indicate failed entry.
Verify Operation
After the GLS-OIRLCL-C-CN is installed, verify its installation location and operation.
Conrm Installation Location
Verify the installation location by entering the room, closing any doors and sitting in the
room while observing the device’s LED. While sitting still, verify that the sensor only detects
actual motion and is not affected by any projectors, fans, vents, etc. Monitor the LED
activity on the device. A properly installed occupancy sensor should have no LED activity
when there is no motion in the room.
Adjust Occupancy Sensitivity
NOTE: If multiple occupancy sensors are located in the same room, adjust one at a
time.
1. Press and hold OCC SETUP for 3 seconds on the IR remote to enter Occupancy Setup
mode.
2. Set the room sensitivity based on the illustrations in the “Detection Range” section on
the previous page.
3. Walk around the room to simulate typical room motion (e.g., sit at various places
around a conference table and simulate typical motion for a conference room).
4. Verify LED indication of motion (red for PIR).
5. Adjust sensitivity levels, if necessary.
• If no motion is detected in main areas of the room, increase the sensitivity.
• If no motion is detected in the corners of the room, increase the timeout to allow
greater chance of detecting motion.
6. Repeat these steps until all expected motion is detected.
Adjust Vacancy Sensitivity
1. In Vacancy Setup mode, verify that nothing triggers occupancy when the room is
vacant. When in Vacancy Setup mode, the occupancy sensor beeps to indicate motion.
The occupancy sensor should beep when re-entering the room.
2. Using the IR remote, place the sensor into vacancy setup mode by pressing the VAC
SETUP button. Exit the room and close the door.
3. Listen for beeps that indicate there is motion detected in the room.
4. Walk by open door ways or entrances/exits to ensure that no false occupancies are
being detected.
5. If unwanted motion is detected, lower the PIR setting and retest.
Troubleshooting
The following table provides corrective actions for possible trouble situations. If further
assistance is required, please contact a Crestron customer service representative.
GLS-OIRLCL-C-CN Troubleshooting
TROUBLE POSSIBLE CAUSE CORRECTIVE ACTION
The controlled devices do
not turn on.
The circuit breaker or fuse
has tripped.
Reset the circuit breaker or
replace the fuse.
There is incorrect
programming in the control
system.
Check the control system
logic or contact Crestron for
assistance.
There are incorrect settings
on the device.
Increase the sensitivity
slowly via the knob under
the cover.
The device is not mounted
in the correct location.
Move the sensor into
an area that can see the
occupant or point of
motion.
The controlled devices do
not turn off.
Constant motion is
detected by the device.
Slowly reduce the
sensitivity and remove the
motion source. Change the
mounting location if there is
no change.
The sensor can detect
motion in the hallway or
another adjacent space.
Put the sensor in Test
mode and walk through
the adjacent spaces. If the
red LED blinks, move the
sensor or use masks.
There are incorrect settings
on the device.
Slowly reduce the
sensitivity and TIMEOUT
knob under the cover.
There is incorrect
programming in the control
system.
Check the control system
logic or contact Crestron for
assistance.
The controlled devices
remain on too long.
The timeout setting is too
high.
Reduce the timeout setting
to a lower setting.
The light level is too high
or low.
The photosensor is blocked Ensure that the
photosensor has a full view
of the room.
As of the date of manufacture, the product has been tested and found to comply with specications for
CE marking.
Federal Communications Commission (FCC) Compliance Statement
This device complies with part 15 of the FCC Rules. Operation is subject to the following conditions:
(1) This device may not cause harmful interference and (2) this device must accept any interference
received, including interference that may cause undesired operation.
CAUTION: Changes or modications not expressly approved by the manufacturer responsible for
compliance could void the user’s authority to operate the equipment.
NOTE: This equipment has been tested and found to comply with the limits for a Class B digital device,
pursuant to part 15 of the FCC Rules. These limits are designed to provide reasonable protection against
harmful interference in a residential installation. This equipment generates, uses and can radiate radio
frequency energy and, if not installed and used in accordance with the instructions, may cause harmful
interference to radio communications. However, there is no guarantee that interference will not occur in
a particular installation. If this equipment does cause harmful interference to radio or television reception,
which can be determined by turning the equipment off and on, the user is encouraged to try to correct
the interference by one or more of the following measures:
• Reorient or relocate the receiving antenna.
• Increase the separation between the equipment and receiver.
• Connect the equipment into an outlet on a circuit different from that to which the receiver is
connected.
• Consult the dealer or an experienced radio/TV technician for help.
Industry Canada (IC) Compliance Statement
CAN ICES-3 (B)/NMB-3(B)
The product warranty can be found at www.crestron.com/warranty.
The specic patents that cover Crestron products are listed at www.crestron.com/legal/patents.
Certain Crestron products contain open source software. For specic information, please visit
www.crestron.com/opensource.
Crestron, the Crestron logo, Crestron Toolbox, and Cresnet are either trademarks or registered
trademarks of Crestron Electronics, Inc. in the United States and/or other countries. Other trademarks,
registered trademarks, and trade names may be used in this document to refer to either the entities
claiming the marks and names or their products. Crestron disclaims any proprietary interest in the marks
and names of others. Crestron is not responsible for errors in typography or photography.
This document was written by the Technical Publications department at Crestron.
©2019 Crestron Electronics, Inc.
Crestron Electronics, Inc. Installation Guide - DOC. 7951B
15 Volvo Drive Rockleigh, NJ 07647 (2048112)
Tel: 888.CRESTRON 09/09/19
Fax: 201.767.7576 Specications subject to
www.crestron.com change without notice.
/