Page is loading ...

IFC2421
IFC2422
Quick Manual
confocalDT 2421/2422
EN

MICRO-EPSILON
MESSTECHNIK
GmbH & Co. KG
Koenigbacher Str. 15
94496 Ortenburg / Germany
Phone +49 (0) 8542/168-0
Fax +49 (0) 8542/168-90
e-mail [email protected]
www.micro-epsilon.com
You can find more information about the measuring system
in the operating instructions. They are available online at:
www.micro-epsilon.de/download/manuals/
man--confocalDT-2421-2422--en.pdf
Contents
General .......................................................................... 3
Symbols Used .................................................................... 3
Warnings ............................................................................3
Intended Use ......................................................................4
Proper Environment ...........................................................4
Glossary .............................................................................4
System Design, Connection Options ........................... 5
Sensor Cable, Optical Fiber...............................................5
Sensor Mounting, Mounting Adapter ................................6
Screw Terminals .................................................................7
RS422 8
Controller LEDs ............................................................. 8
Multifunction Button ...........................................................9
Start of Measuring Range ..................................................9
Initial Operation ........................................................... 10
Selecting the Sensor ........................................................10
Performing the Dark Reference .......................................11
Positioning the Target ......................................................11
Measurement Configuration Selection ............................12
Checking the Video Signal ..............................................13
Signal Quality ..................................................................13
Distance Measurement with Website Display ............ 14
One-Sided Thickness Measurement, Transparent
Target ........................................................................... 16
Preset ...............................................................................16
Material Selection .............................................................16
Video Signal .....................................................................17
Measurement Chart .........................................................18
RS422 Interface ................................................................19
Ethernet Interface ............................................................. 19
RS422 Data Output, Ethernet ..........................................19
IP Address Assignment ....................................................19
Service, Repair ............................................................ 20
Liability for Material Defects ...................................... 20

Page 3
General
confocalDT 2421 / 2422
General
Symbols Used
The following symbols are used in this document:
Indicates a hazardous situation which, if not avoided, may result in minor or
moderate injury.
Indicates a situation that may result in property damage if not avoided.
Indicates a user action.
i
Indicates a tip for users.
Warnings
Connect the power supply and the display/output device according to the safety regulations for
electrical equipment.
> Risk of injury, damage to or destruction of the sensor and/or the controller
Avoid shocks and impacts to the sensor and controller.
> Damage to or destruction of the sensor and/or the controller
The supply voltage must not exceed the specified limits.
> Damage to or destruction of the sensor and/or the controller
Never kink optical fibers or bend them in tight radii.
> Damage to or destruction of the optical fiber, failure of measuring device
Protect the ends of the optical fiber against contamination (use protective caps).
> Incorrect measurement, failure of the measuring device
Protect the cable against damage.
Failure of the measuring device

Page 4
General
confocalDT 2421 / 2422
Intended Use
- The measuring system is designed for use in an industrial environment. It is used for
displacement, distance and movement measurement, thickness measurement,
measuring the position of parts or machine components
- The measuring system must only be operated within the limits specified in the technical data.
The measuring system must only be used in such a way that no persons are endangered or machines are dama-
ged in the event of malfunction or total failure of the sensor.
Take additional precautions for safety and damage prevention in case of safety-related applications.
Proper Environment
- Sensor protection class: IP40 ... IP65
- Controller protection class: IP40
Lenses are excluded from protection class. Contamination of the lenses causes impairment or failure of the function.
- Operating temperature range
Sensor: +5 ... +70 °C ( +41 ... +158 °F)
Controller: +5 ... +50 °C (+41 ... +122 °F)
- Storage temperature range: -20 ... +70 °C (-4 ... +158 °F)
- Humidity: 5 - 95 % (non-condensing)
- Ambient pressure: Atmospheric pressure
- EMC: As per EN 61000-6-3 / EN 61326-1 (Class B) Emitted interference; EN 61000-6-2 / EN 61326-1 Immunity to
interference
Glossary
SMR Start of measuring range MMR Mid of measuring range
MR Measuring range EMR End of measuring range
Minimum target thickness See Sensor Technical Data, Operating Instructions
Maximum target thickness Sensor measuring range x Refractive index of target

Page 5
System Design, Connection Options
confocalDT 2421 / 2422
System Design, Connection Options
Connect the components to one another, install the
sensors in the holders.
Patch cable
Run
BECKHOFF EK1122
X1
X2
230 VAC
PE
PS2020
N L
C240x
Optical fiber
Ethernet
EtherCAT
Controller
Sensor
PC
PS 2020
2-port EtherCAT
branch
Sensor Cable, Optical Fiber
The sensor is connected to the controller by means
of an optical fiber.
- Do not shorten or extend the optical fiber.
- Do not pull or carry the sensor by the cable.
Do not kink the sen-
sor cable.
Do not squash the
sensor cable, do
not use cable ties to
secure it.
Do not pull the sensor
cable over sharp
edges.
Do not pull on the
sensor cable.
The plugs may only be cleaned by persons with the
appropriate expertise.

Page 6
System Design, Connection Options
confocalDT 2421 / 2422
General Rules
Do not
- any contamination of the connector, e.g., dust
- apply any mechanical stress to the optical fiber
- curve the cable to a significant extent
Never bend the sensor cable more tightly than the per-
mitted bending radius.
R
If the cable is immova-
bly routed:
R = 30 mm or more
If the cable is movably
routed:
R = 40 mm or more
IFS2405 series sensor clam-
ped in an MA2405-x mounting
adapter
Sensor Mounting, Mounting Adapter
IFS240x optical sensors operate in the μm range.
i
Ensure careful handling during installation and
operation!
Install the IFS240x sensors using a mounting adap-
ter or on the mounting surface/mounting thread.
Sensor
IFS2402-x
IFS2403-x
IFS2404-2
IFS2404/90-2
IFS2407-0,1
IFS2405-0.3
IFS2405-1
IFS2406-3
IFS2406-10
IFS2405-3
IFS2405-6
IFS 2405-10
IFS 2407-3
IFS2405-28
IFS2405-30
IFS2406-2,5
IFS2407/90-0,3
Mounting
adapter
MA2400-27
•
MA2402-4
•
MA2403
•
MA2404-12
•
MA2405-34
•
MA2405-40
•
MA2405-54
•
MA2405-62
•
MA2406-20
•
Mounting
thread
•

Page 7
System Design, Connection Options
confocalDT 2421 / 2422
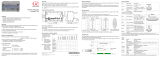
Screw Terminals
Pin Description Notes
U/I out
GND
Shield
Analog Out
U/I out
Voltage output
0 ... 5 V; 0 ... 10 V;
R
i
approx. 50 Ohm; 5.5 V / 10.9 V in the event of an
error, outside of measuring range
Current output
4 ... 20 mA; R
L
≤ 500 Ohm; 23.7 mA in the event of
an error, outside of measuring range
GND Ground analog output Electrically connected to supply
+Sync/Trig
-Sync/Trig
Input/output synchroni-
zation, input triggering
RS422 level (EIA422)
+ Sync/Trig
- Sync/Trig
Digital I/O
GND
Shield
TrigIn
GND
Error 1
GND
Shield
Error 2
GND
TrigIn Input triggering
TTL or HTL level
TTL: Low ≤ 0.8 V, High ≥ 2 V
HTL: Low ≤ 3 V, High ≥ 8 V
Error 1 / 2 Error outputs
NPN, PNP or Push-Pull
I
max
= 100 mA, U
H max
= 30 V
GND Reference ground
All GND conductors are interconnected with one
another and to operating voltage ground.
24 VDC Operating voltage ± 15%, I
max
< 1 A
24 VDC
GND
Shield
Power
GND
Operating voltage
ground
GND is electrically connected to GND of switching
outputs, synchronization, analog and encoder input
Shield Shields for relevant output/input, plug housing
The plug-in screw terminals are designed for an optical fiber cross-section of 0.14 mm² to 1.5 mm².

Page 8
Controller LEDs
confocalDT 2421 / 2422
RS422
- Differential signals according to EIA-422, electrically isolated
from the supply voltage.
- Receiver Rx with 120 Ohm internal terminating resistor.
Terminate the transmitter input Tx on the evaluation unit (re-
ceiver) with 90 ... 120 Ohm.
Use a shielded cable with twisted wires.
Cable length less than 30 m.
Connect the ground connections.
i
The pin assignment for the 9-pin D-sub socket is not stan-
dardized.
Pin Name Signal
3 RX - Receiver -
2 RX + Receiver +
5 GND422 Ground RS422
9 TX + Transmitter +
1 TX - Transmitter -
Housing Shield Cable shield
Pin assignment for 9-pin D-Sub socket (RS422)
Controller LEDs
Power on Green Operating voltage present
Status
Off No error
Flashing red Error during processing
If the EtherCAT interface is active, refer to the EtherCAT guidelines for the meaning of the LEDs.
Intensity
Sensor 1/2
Flashing red Dark signal acquisition in progress
Red Signal saturated
Yellow Signal too low
Green Signal OK
Range
Sensor 1/2
Flashing red Dark signal acquisition in progress
Red No target present, outside of measuring range
Yellow Target close to mid of measuring range
Green Target within the measuring range

Page 9
Controller LEDs
confocalDT 2421 / 2422
Multifunction Button
The Multifunction button on the controller is assigned multiple functions. As standard, the button is assigned the
dark reference function.
Multifunction
Function 1
Function 2
Dark reference
Starts the dark reference for sensor 1 or sensor 2
Mastering, Reset Mastering
Starts or stops a master measurement of the selected signals
LED
Switches the light source for sensor 1 or sensor 2 on/off
The functions can be assigned to the individual time slots. All time intervals are indicated by the LEDs flashing/lighting
up.
Dark reference
LED
Mastering
Function 1
2 sec0 5 sec 10 sec 15 sec
Function 2
Key lock
x min Time
Factory
setting
Multifunction Button Actuation Time
As standard, the Multifunction button has a lock that is activated 5 min after the controller is switched on.
Start of Measuring Range
An offset distance (SMR) between each sensor and the target must be kept.
Sensor SMR Target
Start of measuring range (SMR), the shortest distance
between the front surface of the sensor and the target.

Page 10
Initial Operation
confocalDT 2421 / 2422
Initial Operation
i
The measuring system is ready to use approx. 10 s
after the controller is switched on.
To ensure precise measurements, let the measu-
ring system warm up for approx. 30 minutes.
The controller is shipped with the factory-set IP address
169.254.168.150.
You can query the IP addresses of the controllers that
are connected to a PC or network by using the sen-
sorTOOL.exe program. You can find this program on-
line at https://www.micro-epsilon.de/download/software/
sensorTOOL.exe.
Launch the sensorTOOL and click the button.
Select the controller from the list.
Click the Open Website button to connect the cont-
roller to your default browser.
The start screen of the controller software should now be
displayed in the web browser. You can configure the soft-
ware using the web pages or ASCII commands integrated
in the controller.
Selecting the Sensor
Go to the Settings > Sensor menu.
Select the connec-
ted sensor for the
relevant channel. Pay
attention to type and
serial number.

Page 11
Initial Operation
confocalDT 2421 / 2422
Performing the Dark Reference
This step is required each time a sensor is changed;
controller warm-up time approx. 30 min.
Cover the sensor with a piece of dark paper. Go to
the Settings > Sensor > Dark reference
menu and click on the Start button.
As a check, set the measuring rate to 100 Hz, Set-
tings > Data recording > Measuring rate
menu.
Use Video to select the video signal display.
Make sure that an exposure time of 10,000 μs is dis-
played. If the signal is not satisfactory, we recommend
cleaning the connections on the controller and on the
fiber optics. For this, use the One-Click Cleaner from the
optional accessories, article 0135032.
Typical signal curve for a dark signal
During the dark reference, there must be no objects
within the measuring range nor ambient light reaching the
sensor under any circumstances. Duration approx. 20 s.
Positioning the Target
Position the target as centrally as possible within the
measuring range.
100 %
50
0
SMR MMR EMR
Dis-
place-
ment
Signal
Sensor
SMR
Measuring range (MR)
Target
The Range LED on the front of the controller indicates the
position of the target relative to the sensor.
Flashing red
Dark signal acquisition in
progress
Red
No target present or target
outside of measuring range
Yellow
Target close to mid of
measuring range
Green
Target within the measuring
range

Page 12
Initial Operation
confocalDT 2421 / 2422
Measurement Configuration
Selection
Conventional measurement con-
figurations (presets) for various
target surfaces are saved in the
controller.
Basic features such as the peak
and material selection and the
calculation functions are already
set in the Presets.
Go to the Home > Measu-
rement configuration
menu and start the Stored
configurations. Select a
configuration or setup.
Then, you can apply your own
settings (setups). When saving a
modified preset, the web inter-
face displays a dialog for ente-
ring a setup name.
Distance measurement, e.g., for ceramic mate-
rial, non-transparent plastics. Highest peak, no
averaging, distance calculation.
Distance measurement, e.g., for metal, polis-
hed surfaces. Highest peak, median over 5
values, distance calculation.
Distance measurement, e.g., for PCBs, hybrid
materials. Highest peak, median over 9 values,
distance calculation.
One-sided thickness measurement, e.g., for
glass, BK7 material. First and second peak, no
averaging, thickness calculation.
Layer thickness measurement
1
for laminated
glass, e.g. windshield, 1st layer BK7, 2nd layer
PC, 3rd layer BK7, first and second peak, no
averaging.
Thickness measurement
1
e.g. for mask under
glass. 1st layer BK7, 2nd layer air, first and
second peak, median over 5 values.
Two-sided thickness measurement
2
for metal.
Highest peak, median over 5 values.
Formula: -1*01DIST -1*02DIST1 + 10
1) Possible in IFC242x (001) MP controller. 2) Possible in IFC2422 controller.

Page 13
Initial Operation
confocalDT 2421 / 2422
Checking the Video Signal
Go to the Measurement
chart menu. Overlay the
video signal display using
Video. In the Signal se-
lection section, you can
switch between channel 1
(sensor 1) and channel 2
(sensor 2). If required, make
adjustments to the exposure
mode and measuring rate.
Signal Quality
A good measurement result can be achieved if the video signal is sufficiently intense. Reducing the measuring rate
increases the exposure time for the CCD row and thus improves the measurement quality.
Go to the Home > Signal
quality menu and adjust
the measurement dynamics
as required. Monitor the
result in the video signal.
Measuring rate Averaging
Static
200 Hz Moving, 128 values
Balanced
1 kHz Moving, 16 values
Dynamic
6.5 kHz Moving, 4 values

Page 14
Distance Measurement with Website Display
confocalDT 2421 / 2422
Distance Measurement with Website Display
Align the sensor perpendicularly to the object to be measured.
Then, move the sensor (or the target) closer and closer to the start of the measuring range of the relevant sensor.
As soon as the object is within the measuring field of the sensor, the Range LED on the front panel of the controller
lights up (green or yellow). Alternatively, you can watch the video signal.
5
6
2
8
2
1
3
4
7
Measurement (distance measurement) web page

Page 15
Distance Measurement with Website Display
confocalDT 2421 / 2422
1 Stop pauses the chart; you can still use the data selection and zoom functions. Save opens a Windows selection
dialog for the file name and save location to save the last 10,000 values in a CSV file (separation using semico-
lon).
2 All changes only become effective when you click on the Save settings button.
3 In the left-hand window, the signals of channel 1/2 to be displayed can be switched on or off during or after the
measurement. Inactive curves are grayed out and can be added by clicking on the check mark. The changes
become effective when you save the settings.
You can show or hide the individual signals using the eye symbols . The calculation continues in the back-
ground.
• 0xSHUTTER: Exposure time
• 0xINTENSITY: Signal quality of the underlying peak in the video signal
• 0xDIST: Distance signal curve over time
4 To scale the axis in the graph for the measured values (Y axis), you can use Auto (= automatic scaling) or Ma-
nual (= manual scaling).
5 The current values for distance, exposure time, current measuring rate and time stamp are shown in the text
boxes above the graph. Errors are also displayed.
6 Mouseover function. When the chart has been stopped and you move the mouse over the graph, points on the
curve are marked with a circle and the associated values are displayed in the text boxes above the graph. The
intensity bars are also updated.
7 The peak intensity is displayed as a bar chart.
8 Scaling the x axis: During an ongoing measurement, you can use the left-hand slider to enlarge the entire signal
(zoom). The time range can also be defined using an input field under the time axis. When the chart has been
stopped, the right-hand slider can also be used. You can also move the zoom window with the mouse in the
center of the zoom window (four-sided arrow).

Page 16
One-Sided Thickness Measurement, Transparent Target
confocalDT 2421 / 2422
One-Sided Thickness Measurement, Trans-
parent Target
The controller evaluates two signals reflected on the
surfaces. Based on these two signals, the controller cal-
culates the distances from the surfaces and, from this,
derives the thickness.
Align the sensor perpendicularly to the object to
be measured. Make sure that the target is approxi-
mately in the mid of the measuring range (SMR +
0.5 x MR).
i
The light beam must strike the surface of the object
at a perpendicular angle. Otherwise, measure-
ments might be inaccurate.
SMR MR
Displace-
ment 1
Displace-
ment 2
Thickness
One-sided thickness measurement for a transparent
target
Preset
Switch to the Home menu.
Select One-sided thickness measurement in
the Measurement configuration menu.
This presetting prompts the controller to use the first
and second peak in the video signal for the thickness
calculation.
Material Selection
Specifying the material is essential for calculating a
correct thickness value. To compensate for the spectral
change of the index of refraction, at least three refractive
indices at different wavelengths or a refractive index and
the Abbe number must be known.
Switch to the Settings > Data recording >
Material selection menu.
Select the material of the target for Layer 1.

Page 17
One-Sided Thickness Measurement, Transparent Target
confocalDT 2421 / 2422
Distance A
01DIST1
Distance B
01DIST2
Video signal (thickness measurement) web page
Video Signal
If a surface of the target
lies outside the measu-
ring range, the controller
will send only one signal
for the distance, intensi-
ty and center of gravity.
This may also occur if
a signal is below the
detection threshold. Two
boundary surfaces are
active when the thick-
ness of a transparent
material is measured.
As a result, two peaks
are visible in the video
signal.

Page 18
One-Sided Thickness Measurement, Transparent Target
confocalDT 2421 / 2422
Measurement Chart
Switch to the Measurement chart tab and select Mess as the chart type.
The web page shows the two distances and the thickness Ch01Thick12 (difference between 01DIST2 and
01DIST1) graphically and numerically. Optionally, the intensities of both peaks (Peak 1 = near, Peak 2 = far) can also
be displayed.

Page 19
One-Sided Thickness Measurement, Transparent Target
confocalDT 2421 / 2422
RS422 Interface
The RS422 interface has a maximum baud rate of
4000 kBaud. The baud rate is set to 115.2 kBaud when
the interface is delivered.
The RS422 interface transmits 18 bits per output value.
The maximum number of measured values that can
be transmitted for a measuring point depends on the
measuring rate of the controller and the transmission
rate set for the RS422 interface.
Ethernet Interface
The controller transmits the TCP/IP packets at an
Ethernet transmission rate of 10 MBit/s or 100 MBit/s.
When measurement value data are transmitted to a
measurement value server, the controller sends each
measured value to this server or to the connected cli-
ent after the connection has been successfully set up.
No specific request is required for this.
The distance and thickness values are transmitted as a
32-bit signed integer with a resolution of 1 nm.
RS422 Data Output, Ethernet
The selection of output data from
all internally determined values and
from the calculated values from the
computing modules is done separa-
tely for both interfaces. These data
are output in a rigidly defined order.
The selection for Ethernet includes
the signals for the measured value
transfer as well as video data, but
not the online chart.
Selecting the output data
IP Address Assignment
Switch to the Settings > Outputs > Ethernet
settings menu.
1. First, change the gateway setting.
2. Then, enter a new IP address.
Launch the web interface with the new IP address.
Save the new device settings. To do this, use the
Save settings button.

MICRO-EPSILON MESSTECHNIK GmbH & Co. KG
Koenigbacher Str. 15 · 94496 Ortenburg/Germany
Tel. +49 (0) 8542/168-0 · Fax +49 (0) 8542/168-90
[email protected] · www.micro-epsilon.com
Your local contact: www.micro-epsilon.com/contact/worldwide/
X9691367-A012110HDR
MICRO-EPSILON MESSTECHNIK
Liability for Material Defects
All components of the device have been checked and tested for
functionality at the factory. However, if defects occur despite our
careful quality control, MICRO-EPSILON or your dealer must be
notified immediately.
The liability for material defects is 12 months from delivery.
Within this period, defective parts, except for wearing parts, will
be repaired or replaced free of charge, if the device is returned
to MICRO-EPSILON with shipping costs prepaid. Any damage
that is caused by improper handling, the use of force or by
repairs or modifications by third parties is not covered by the
liability for material defects. Repairs are carried out exclusively
by MICRO-EPSILON.
Further claims can not be made. Claims arising from the
purchase contract remain unaffected. In particular, MICRO-
EPSILON shall not be liable for any consequential, special,
indirect or incidental damage. In the interest of further develop-
ment, Micro-Epsilon reserves the right to make design changes
without notification. For translations into other languages, the
German version shall prevail.
Service, Repair
If the sensor, controller or sensor cable is
defective:
- If possible, save the current sensor set-
tings in a parameter set to reload them
into the controller after the repair.
- Please send us the affected parts for
repair or exchange.
If the cause of a fault cannot be clearly
identified, please send the entire measuring
system to:
MICRO-EPSILON MESSTECHNIK
GmbH & Co. KG
Königbacher Straße 15
94496 Ortenburg / Germany
/