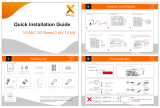
SolaX Power X3-Pro G2 Series Solar Inverter Installation guide
- Type
- Installation guide

X3-PRO G2 Series 8 kW-30 kW
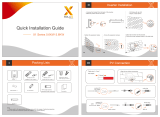
Packing List
Inverter Installation
- Mark the position of three holes. - Drill holes with φ10 drill.
- Depth: at least 60 mm.
- Tighten the expansion tubes.
- Screw the expansion screws. - Match the inverter with the bracket.
Note: Please refer to the appropriate instruction manual for the usage
of Pocket WiFi and optional products.
7.0 mm
Stripping pliers Wire crimper
Wire crimper recommended model:
H4TC0001
manufacturer: Amphenol
Tools:
X3-PRO G2
series inverter 1*
OT terminal *5
Terminal cover *5
PV terminal *8/12
PV pin contact *8/12
M5 inner hexagonal screw *1
Terminal block *1, RJ45 connector *1
Terminal sleeve *1, R-type terminal *1
(Expansion bolt, Gasket,
Self-tapping screw) *3
Bracket 1*
Product manual *1 Quick installation guide *1
Pocket WiFi/
LAN (Optional) /4G (Optional) Meter (Optional)
Torque 1.2 0.1 N·m: ±
- Align the PV connectors.
strip length
X3-PRO G2 Series 8 kW-30 kW
60.00 mm
Φ10 Drill
(Depth: 60 mm)
Expansion bolts
Rubber hammer
Outer hexagonal wrench
cable size: 2.5-4 mm
f )
Inner hexagonal wrench
(Torque:1.2±0.1 N·m)
6
- Use the inner hexagonal wrench to
tighten the inner hexagonal screw on
the right side of the inverter.
AC waterproof cover *1
X3- PRO G2 Se ries
User Manual
8 kW - 30 kW
Copyright Declaration
The copyright of this manual belongs to SolaX Power Network Technology (Zhejiang) Co., Ltd. Any
corporation or individual should not plagiarize, partially or fully copy (including software, etc.),
and no reproduction or distribution of it in any form or by any means shall be allowed. All rights
reserved. SolaX Power Network Technology (Zhejiang) Co., Ltd. reserves the right of final
interpretation.
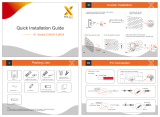
positive PV
pin contact
negative PV
pin contact
cable
cable
clamp contact
clamp contact
tighten nut
male plug
nut female plug
nut
tighten nut
For inverters with two strings of MPPT, there are 4 positive and 4
negative PV terminals and PV pin contacts respectively. For inverters
with three strings of MPPT, there are 6 positive and 6 negative PV
terminals and PV pin contacts respectively.

WiFi Connection
USB Connection (for upgrading)
- For example, insert the Pocket WiFi (from SolaX) into the port named “Dongle” on the bottom of the inverter.
- Tighten the ground screw with an inner hexagonal wrench as shown in the gure below.
- Overview for connection.
Start inverter:
1. Turn on the external AC breaker;
2. Turn on the DC switch to the "ON" position;
3. Inverter will start automatically when PV panels
generate enough energy, the LED will be blue.
614.00631.02
1) Make sure the DC switch is off
and the AC is disconnected with
grid. If the Pocket WiFi is connected
to the port, please remove the
Pocket WiFi at first.
3) Press the “Up” and “Down” button to select ARM or DSP. Then long press “Down” and select the correct update file to confirm the
update. ARM and DSP shall be updated one by one. After the upgrade is completed, please remember to turn off the DC switch or
disconnect the PV connector, then pull off the U-disk, and connect the Pocket WiFi back.
Note:
Please contact our service support to get the update package, and extract it into your U-disk. Do not modify
the program file name! Otherwise it may cause the inverter to stop working!
AC Connection
Note:
For details on the use of Pocket WiFi and other communication modules, please refer to the individually
instruction manual of communication products.
Update
ARM
DSP
U-disk
Dongle port
Earth Connection and Overview
The Pocket WiFi
2) Insert the U-disk into the Dongle port on the bottom of the inverter. Then turn on DC switch and connect the PV connector, the LCD
will show a picture as below.
- This inverter provides a WiFi/LAN connecting port which can collect information from inverter including the status,
performance and updating information to monitoring website via connecting Pocket WiFi (Pocket LAN can be purchased
from the supplier for optional if needed).
Torque 1.2 0.1 N·m:±
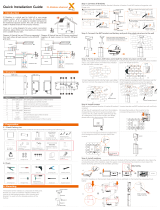
Select appropriate cable according to the power range as
recommended on page 28 of the manual and prepare to
strip the wires as below.
Torque:1.2 0.1 N·m±
1. Fetch the AC waterproof cover from the carton.
2.Unscrew the fastening nut of the AC waterproof cover and
remove the sealing rings. Select appropriate number of the
sealing rings according to the outer diameter of the cable.
Let the cable pass through the fastening nut, the sealing
ring(s) and the waterproof cover in sequence.
3. Strip 82 mm of insulation from the cable ends by using the
stripping pliers.
4. Crimp the cable ends by using the wire crimper.
6. Use the OT terminal crimping tool to press OT terminal.
a
b
Diameter(mm) Sealing ring(s)
a
a+b12~18
18~25
diameter
5. Pull one terminal cover each over conductors L1, L2, L3, N
and the grounding conductor. The terminal cover must be
below the stripped conductor section.
L1 L2 L3 N PE
Torque:1.2 0.1 N·m±
Ⅶ
Ⅵ
L1 L2 L3 N PE
strip length
L1
L2
L3
82 m m
12 m m
12 mm
Stripping pliers Stripping pliers
82 mm
12 mm
70 mm
70 mm
Crimp
70 mm
12 mm
Wire crimper
7. Tighten the screws of the wire ends with a screwdriver.
8. Align the waterproof cover and tighten the four screws with an inner
hexagonal wrench.
-
 1
1
-
 2
2


SolaX Power X3-Pro G2 Series Solar Inverter Installation guide
- Type
- Installation guide
Ask a question and I''ll find the answer in the document
Finding information in a document is now easier with AI
Related papers
-
 SolaX Power G2 Series Installation guide
-
SolaX Power X3 series Installation guide
-
SolaX Power 7.2 kW – 22 kW EV Charger Installation guide
-
 SolaX Power X1 Series 0.6KW-3.6KW Installation guide
-
 SolaX Power X1-0.6-0.7-1.1-1.5 Installation guide
-
SolaX Power X1-G4 User guide
-
 SolaX Power X1-4.2T User guide
-
 SolaX Power X3-30.0-T-N User manual
-
SolaX Power X1 Series User manual
-
SolaX Power A1-G2 ESS User manual


Other documents
-
 Solax X1 Boost Solar Power Inverter User manual
-
 Solax X1 Matebox Advanced Installation guide
-
 SoleX X3-EVC-11K EV Charger 7.2 kW – 22 kW User manual
-
Ningbo Solis-50K-HV Operating instructions
-
Solis Solis-3P10K-4G-LV Operating instructions
-
Sungrow SG15KTL-M User manual
-
 Omnik New Energy Co., Ltd. Omniksol-10k-TL3 User manual
-
 Ningbo Ginlong Technologies Solis 4G Mini Operating instructions
-
 Solax Pocket Wifi 2.0 User manual
-
 Omnik Omniksol-13k-TL3 User manual


