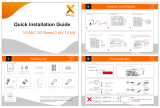
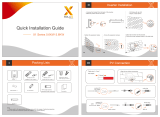
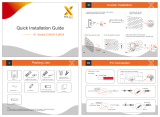
WIFIConnection(optional)
USBConnection (for upgrading)
-Open the WiFi lid on the bottom of the inverter. -Plug the Pocket WiFi (from Solax) into the port named
“WiFi” on inverter, and tighten the four screws as below.
-Screw the ground screw with allen wrench shown as follow.
-Overview for connection.
Startinverter
1.Turn on the external ACand DCconnectors;
2.Turn on the DCswitch to the"ON"position;
3.Inverter will start automatically when PV
panels generate enough energy, the LED
will be blue.
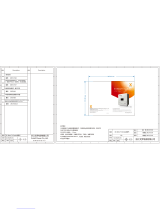
614.00338.01
5 mm
Straight screwdriver
Waterproof lid
1) Make sure the DC switch is
off and the AC is disconnected
with grid. Unscrew the
waterproof lid of Upgrade port
by straight screwdriver as the
picture shows.
Update
ARM
DSP
2) Insert U-disk with upgrade
package* into the USB port on
the bottom of the inverter. Then
turn on DC switch or connect
the PV connector, the LCD will
show picture as below.
U-disk
3) Press “OK” to confirm to update. After the upgrade is complete, please remember to turn off the
DC switch or disconnect the PV connector, then pull off the U-disk, screw the waterproof lid.
* Please contact our service support to get the update package,and extract it into your U-
disk.Do not modify the program file name ! Or it may cause the inverter not work anymore !
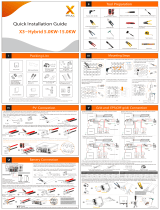
Earth Connection and Overview
(φ4hexagon wrench.torque:1.5±0.2Nm)
(torque:0.6±0.1Nm)
(torque:1.5±0.2Nm)
Note:
Please refer to the appropriate instruction
manual for the usage of Pocket WiFi.
ACConnection
1.Slide the cable nut and
back shell onto the cable.
2.Insert the tripped end of each three
wires into holes in the male insert,
then tighten each screw.
Cable size: 10 AWG
trip length
5. Align the groove of male terminal with the convex of female terminal ,
then tighten the bush in male terminal.
4.Tighten the screw of the back shell and the cable nut.
3.Tighten the screw of the back shell and the male insert.
R
S
T
(Use the accompanying inner hexagon spanner )