Deagostini Spitfire User guide

Type
User guide

Deagostini Spitfire: Build your own iconic aircraft with this step-by-step guide. Experience the thrill of creating a detailed model of the legendary Spitfire fighter plane. Follow the instructions to assemble the plane, from the leading edges and trailing edges to the upper wing plates. Customize your model with the included nails and glue, and enjoy the satisfaction of building a piece of aviation history.

Deagostini Spitfire: Build your own iconic aircraft with this step-by-step guide. Experience the thrill of creating a detailed model of the legendary Spitfire fighter plane. Follow the instructions to assemble the plane, from the leading edges and trailing edges to the upper wing plates. Customize your model with the included nails and glue, and enjoy the satisfaction of building a piece of aviation history.

1
Build the Spitfire: Step-By-Step
Pack 16
Stages 60-63
2
Build the Spitfire: Step-By-Step
60 208-211
61 212-215
63 219-221
Stage PagesParts
1 - Leading edge 4
2 - Leading edge 5
3 - Trailing edge
4 - Nails
62 216-218
1 - Upper wing plate 8
2 - Upper wing plate 10
3 - Upper wing plate 13
4 - Template sheet
1 - Landing gear housing
2 - Housing part 1
3 - Housing part 2
4 - Landing gear housing plate
Contents
1 - Leading edge 1
2 - Leading edge 2
3 - Leading edge 3
4 - Nails
208
Build the Spitfire: Step-By-Step
Test-fit the trailing edge against the right wingtip.
Then, apply glue along the edge of the wingtip
(dotted line).
Glue the trailing edge into position, as shown in
the photo. Hold the edge in place until dry.
1 2
This stages parts You will need
Stage 60
1 - Leading edge 4
2 - Leading edge 5
3 - Trailing edge
4 - Nails
Glue
Knife
Ruler
Spray can
3
4
13
2
209
Build the Spitfire: Step-By-Step
Fit the leading edge into position on the front of
the wing.
5
Check the fit of leading edge 4 along the front of
the left wing, up against leading edge 5. Apply
glue to the contact points.
4
Now take leading edge 5 and glue it to the front of
the wingtip, up against the trailing edge (dotted
line) and the last rib of the wing.
3
Check that your wing looks like the one shown in
the above photo.
6
21
210
Build the Spitfire: Step-By-Step
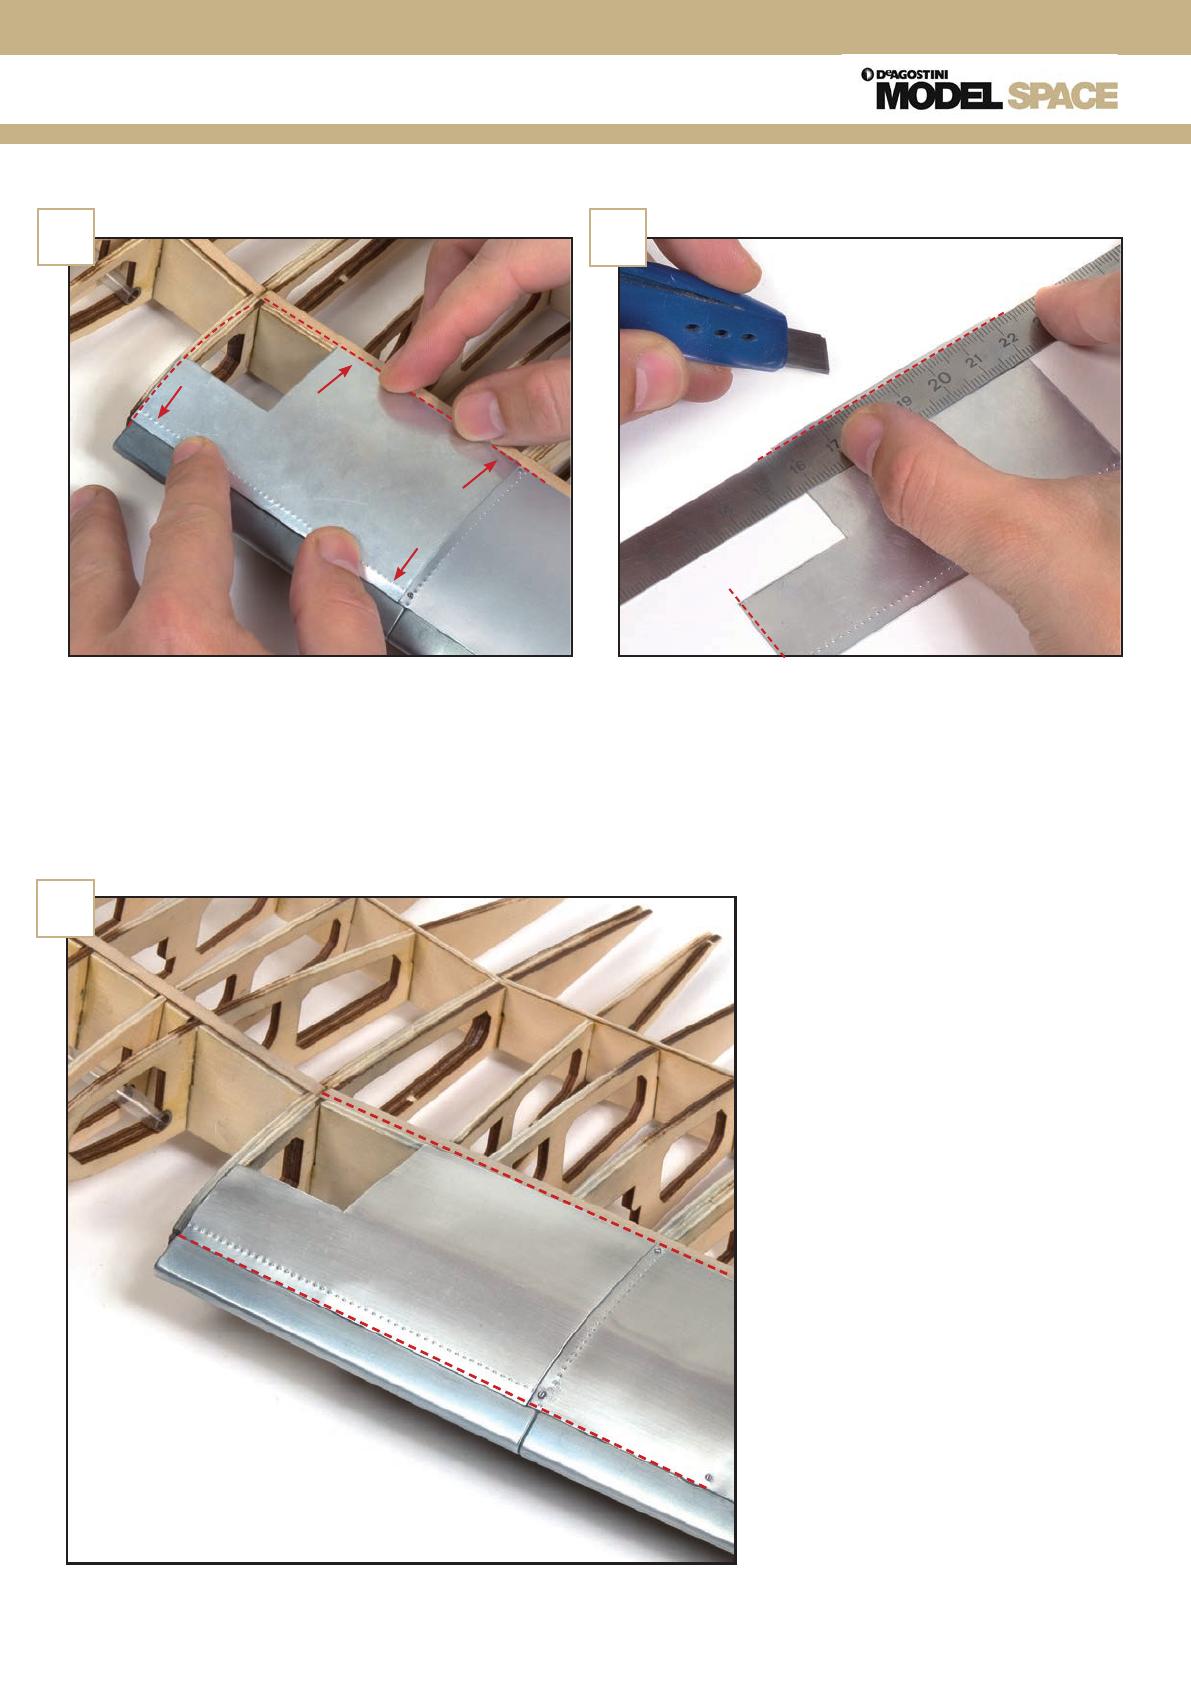
Place wing plate 1 from Stage 57 up against plate
3, which was fixed to the wing in Stage 59. The
front edge of the plate should be up against the
leading edge. The back edge should end at the
edge of the spar and the right edge (shown on the
left) should end at the join between ribs.
Shape the plate to fit the wing in
the same way as on page 205. Glue
into place.
If the edges of the plate don’t end where they are
meant to on the wing, hold a ruler along the edge
and cut away the excess until you have the correct
shape.
7
9
8
211
Build the Spitfire: Step-By-Step
This shows how the edges of the
plates should align with the ribs
and spar.
The wing should now look like this. Keep any
unused parts to one side.
10
11
212
Build the Spitfire: Step-By-Step
Place upper wing plate 5 onto the template (both
from Stage 56) to verify it is the correct plate.
Shape the plate over a spray can to fit the section
on the wing shown in Step 3.
1 2
This stages parts You will need
Stage 61
1 - Landing gear housing
2 - Housing part 1
3 - Housing part 2
4 - Landing gear housing plate
Spray can
Knife
Ruler
Sandpaper
File
Glue
Awl
Hammer
String
41
32
213
Build the Spitfire: Step-By-Step
Smooth the edges of the plate with sandpaper or
a file.
5
Cut away the excess of the plate if necessary.
4
Test-fit the plate in place on the wing, up against
plate 3.
3
Apply glue to the areas of the wing that will be in
contact with the plate and then glue it into place.
6
214
Build the Spitfire: Step-By-Step
Check that the back edges of the plates are
aligned with the spar.
To make holes at the front of the
plate use a piece of string, aligned
with the ribs to mark where the ribs
would appear underneath the plate.
Use the awl to make a hole in the
two corners and the marks aligned
with the ribs.
Use the awl to pierce holes in the corners at the
rear of the plate.
7
9
8
215
Build the Spitfire: Step-By-Step
Hammer a nail into each of the holes.
The wing should now look like this. Keep any
unused parts to one side.
10
11
216
Build the Spitfire: Step-By-Step
Use the template sheet to identify upper wing
plate 7 (Stage 56).
Test-fit plate 7 in position, up against plate 5.
1 2
This stages parts You will need
Stage 62
1 - Upper wing plate 8
2 - Upper wing plate 10
3 - Upper wing plate 13
4 - Template sheet
Spray can
Knife
Ruler
Glue
Awl
Hammer
4
132
217
Build the Spitfire: Step-By-Step
Glue the plate into position, aligned with the
leading edge and the spar.
5
Apply glue to the parts of the wing that will be in
contact with the plate.
4
Prepare plate 7 in the same way as the previous
plates, cutting it to size, if necessary, and shaping
with a spray can.
3
Use the awl to make a hole in the four corners and
along the front, aligned with the ribs.
6
218
Build the Spitfire: Step-By-Step
Gently hammer a nail into each of the holes in
plate 7.
Prepare plate 9 in the same way as the previous
plates and then glue into place up against plate 7.
Identify plate 9 by placing it on the template
(Stage 58).
Make a hole in each of the corners of plate 9 and
then lightly hammer a nail into them.
The wing should now look like this. Keep any
unused parts to one side.
7
9
8
10
11
219
Build the Spitfire: Step-By-Step
Test-fit leading edge 3 against the front of the
wing (dotted lines). Make any adjustments needed
and then glue into place.
Hold in place as the glue dries to ensure the part
doesn’t move.
1 2
This stages parts You will need
Stage 63
1 - Leading edge 1
2 - Leading edge 2
3 - Leading edge 3
4 - Nails
Glue
Sponge
Awl
Hammer
3
4132
220
Build the Spitfire: Step-By-Step
The leading edges and trailing edge are now all
attached to the right half of the wing.
5
Test-fit and glue leading edge 1 to the front of the
wing, up against edge 2.
4
Test-fit and glue leading edge 2 into place, up
against leading edge 3.
3
Carefully work along the edges with a sponge to
polish and smooth them. You can also do this for
the plates.
6
2
1
221
Build the Spitfire: Step-By-Step
Identify plate 11 on the template sheet (Stage 56).
Carefully make a hole in each corner of the plate.
Test-fit, prepare and glue plate 11 to the wing, up
against plate 9.
Gently hammer a nail into each of the four holes
created in the previous step.
The wing should now look like this. Keep any
unused parts to one side.
7
9
8
10
11
  • Page 1 1
  • Page 2 2
  • Page 3 3
  • Page 4 4
  • Page 5 5
  • Page 6 6
  • Page 7 7
  • Page 8 8
  • Page 9 9
  • Page 10 10
  • Page 11 11
  • Page 12 12
  • Page 13 13
  • Page 14 14
  • Page 15 15
  • Page 16 16

Deagostini Spitfire User guide

Type
User guide

Deagostini Spitfire: Build your own iconic aircraft with this step-by-step guide. Experience the thrill of creating a detailed model of the legendary Spitfire fighter plane. Follow the instructions to assemble the plane, from the leading edges and trailing edges to the upper wing plates. Customize your model with the included nails and glue, and enjoy the satisfaction of building a piece of aviation history.

Ask a question and I''ll find the answer in the document

Finding information in a document is now easier with AI