Page is loading ...

Revised by NJT
Updated 13/DEC/01 BRH
2002 Energy Suspension. All rights reserved.
C
May not be reproduced, in any form, or by any means,
without the written consent of Energy Suspension.
1131 VIA CALLEJON, SAN CLEMENTE, CA 92673
R
17126
3-27-02
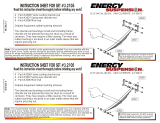
INSTRUCTION SHEET FOR SETS #3.1110, 3.1111 & 3.1112
Read this instruction sheet thoroughly before initiating any work!
1. Properly raise and support vehicle.
2. Remove torque arm bushing and bracket from car.
3. Remove rivets (A) by drilling with 7/32” drill bit or grind head of rivet
off.
4. Remove rubber bushings including metal backing plates (B) from
brackets.
5. Install inner bracket onto transmission.
6. Grease inside of bushing with supplied grease.
7. Install polyurethane bushing onto torque arm with part number facing
rear of vehicle and position in inner bracket.
8. Install outer bracket.
9. Re-torque all fasteners to factory specifications.
Outer Bracket Inner Bracket
Inner/outer Bracket
Polyurethane Bushing
A
A
B
B
A
A
NOTE: Your polyurethane
bushing may vary in shape.
Part number always faces rear
of vehicle.
/


