Page is loading ...

Chapter 1
Getting to Know Your Team Site
In This Chapter
▶ Requesting a new team site and opening it in the browser
▶ Participating in a team site
▶ Changing your team site’s home page
O
ne of the fundamental kinds of Web sites that SharePoint 2010 allows
you to create is a team site. A team site is a SharePoint site that you
can use to collaborate with your coworkers. If the team site is hosted in your
company’s extranet or by a public hosting company, you may even be able to
collaborate with people outside your organization. In most cases, an adminis-
trator will create a team site for you.
Many kinds of teams can use a SharePoint team site to collaborate. For
example:
✓ Department members can use document libraries to upload document
files and enter meetings in a team calendar.
✓ Project members can use a team site home page to post announcements
and track important dates.
✓ Corporate communications can use a team site to store the documents
and track the tasks required for preparing the company’s annual report.
You need to know your way around some of the basic features of a team site,
which is exactly what I show you in this chapter.
Requesting Your Team Site
Most organizations have a process for requesting a team site. I’ve seen
everything from the simple process in which you send an e-mail addressed
to someone in your IT department to very detailed wizards that walk you
through the site creation process. One company requires that you write a
justification for why you want the team site and then submit prototypes.
05_476437-ch01.indd 1105_476437-ch01.indd 11 4/5/10 10:02 AM4/5/10 10:02 AM
COPYRIGHTED MATERIAL

12
Part I: Collaborating with Team Sites
Whatever you have to do to get your SharePoint 2010 team site, get one. At a
minimum, you need to provide your SharePoint administrator with this infor-
mation to get a team site:
✓ The site name: The friendly caption that appears in the header of your
site and in any site directory where your site may be listed.
✓ The site template: The template determines what kind of site SharePoint
makes for you. SharePoint includes dozens of predefined site templates.
Your company may even create its custom site templates. Tell your
administrator you want a team site, which is the most popular of all the
SharePoint 2010 site templates.
✓ The Web address or URL: The unique location where your team site is
hosted. In most organizations, all team sites are located off the same
root Web address. Some examples I’ve seen include
http://intranet.company.com/sites
http://portal/projectsites
http://sharepoint/sites
Your organization may also ask who has permission to access the site. Your
site’s users must be connected physically to your network or have permis-
sion from your network administrator to access your network remotely. Some
companies set up a special kind of deployment for SharePoint, or an extranet,
that provides a secure way for non-employees to log into their SharePoint team
sites without actually being on the internal company network.
Setting up SharePoint in an extranet environment can be done in lots of ways
and is outside the scope of this book. As I like to say, setting up SharePoint in
an extranet environment is a networking problem, not a SharePoint problem.
The good news is that a number of third-party companies host SharePoint
team sites on the Internet for a small monthly fee. If your IT department can’t
support an extranet at this time, you might explore the option of using a
hosted team site instead. These are usually very secure, and you can usually
get your content out of the remote site and into your internal site when that
time comes.
All SharePoint team sites have three basic kinds of users:
✓ Visitors have Read Only permission. They can view your site without
making any contributions.
✓ Members can participate in your team site by uploading and editing
documents or adding tasks or other items.
✓ Owners have Full Control permission to customize the site. As the
person requesting the team site, the SharePoint administrator will likely
assume that you’re the proud owner unless you specifically tell him who
owns the site.
05_476437-ch01.indd 1205_476437-ch01.indd 12 4/5/10 10:02 AM4/5/10 10:02 AM

13
Chapter 1: Getting to Know Your Team Site
Viewing Your Team Site in the Browser
You access your team site using a Web browser, such as Internet Explorer or
Mozilla Firefox. You need the Web address or URL of your team site, which
you can get from your SharePoint administrator. You also need a network
user account with permissions.
In my case, the Web address for my team site is
http://myteamsite
To access your team site:
1. Open your Web browser.
2. Type the Web address for your team site in the address bar and press
Enter.
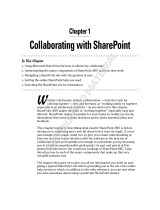
Figure 1-1 shows the home page for a SharePoint team site.
Figure 1-1:
A
SharePoint
team site
home page.
All SharePoint team sites have the same features. If you’re using a new team
site, your site should match the one in Figure 1-1. If your site has been cus-
tomized, it may look slightly different. Never fear: All the same features are
still there. You may just have to hunt a little bit to find them.
05_476437-ch01.indd 1305_476437-ch01.indd 13 4/5/10 10:02 AM4/5/10 10:02 AM

14
Part I: Collaborating with Team Sites
You can think of the SharePoint page as having the following the major sections:
✓ Header: The header spans the entire top of the page. You can think of
the header in a SharePoint page like the menu in a traditional Windows
application, such as Microsoft Word. SharePoint 2010 even features the
Ribbon in the page header, similar to how the Ribbon appears in the top
of many Office applications.
✓ Left navigation pane: The navigation pane provides quick access to the
site’s document libraries, lists, and discussion boards. You can even add
links to content you create, such as documents and Web pages.
✓ Page content: The content displays in the body of the page.
Generally speaking, the header and left navigation pane stay fairly consistent,
whereas the body of the page changes to display the content for the Web
page. This is very similar to how most Web sites work.
Microsoft has spent a lot of money on usability research to determine how
best to lay out the pages in SharePoint. That’s why I usually encourage my
clients to use the layouts provided by Microsoft instead of creating their own
custom layouts.
Contributing to a Team Site
One of the main purposes of a team site is to allow its members to collaborate.
But collaborate on what? Think of all the stuff that you do with Outlook and
e-mail right now — all the documents you send as attachments, contacts you
track, and messages you send with announcements. Now imagine doing all those
same tasks in a Web site you share with your coworkers or project members.
Now take that one step further. Think about any public Web sites you use to
network with other people, such as MySpace, LinkedIn, or Facebook. You can
use your team site along with other features in SharePoint to create a com-
munity of people that you collaborate with at work.
Choosing between IE and Firefox
Which browser should you use with SharePoint?
Firefox and Internet Explorer browsers
have some differences; for instance, some
pages look better in Firefox than in Internet
Explorer. Because Firefox was designed to be
OS-agnostic, it supports Mac users as well as
PC users. If any of your SharePoint user audi-
ence uses Macs, I recommend developing
your SharePoint sites to display in Firefox. (The
Microsoft SharePoint development team even
uses Firefox to check how their sites look!)
05_476437-ch01.indd 1405_476437-ch01.indd 14 4/5/10 10:02 AM4/5/10 10:02 AM

15
Chapter 1: Getting to Know Your Team Site
Uploading documents
Most teams need to share documents. You probably use e-mail to send docu-
ments as attachments. With your new SharePoint 2010 team site, you can upload
your files to the team site and send your team members a link to the document.
SharePoint 2010 uses a special kind of container — a document library —
for storing files. Your team site has a document library dubbed Shared
Documents where you can put documents you want to share with others.
You can create additional document libraries and give them any name you
want. See Chapter 2 for more details on working with files and document
libraries in SharePoint 2010.
To upload a document to the Shared Documents library in your team site:
1. Click the Shared Documents link in the left navigation pane of your
team site.
The Shared Documents library appears.
You can click the All Site Content link in the left navigation pane to view
a list of all the document libraries that you have permission to access.
2. Click the Upload Document button on the Documents tab of the
SharePoint Ribbon.
The Upload Document window appears.
3. Click the Browse button and in the Choose File dialog box, select a file
to upload.
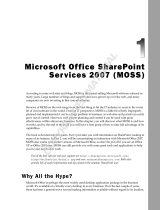
4. Click OK to upload the file to the document library.
When the file is uploaded, SharePoint displays the document’s proper-
ties in a new window, as shown in Figure 1-2.
Figure 1-2:
SharePoint
displays a
document’s
properties
in a new
window.
05_476437-ch01.indd 1505_476437-ch01.indd 15 4/5/10 10:02 AM4/5/10 10:02 AM

16
Part I: Collaborating with Team Sites
5. Type the filename, title, and any keywords that you want to tag the
document with in the Name, Title, and Enterprise Keywords text
boxes, respectively.
See Chapter 2 for details on working with document properties.
6. Click the Save button to save the properties you’ve entered for the
document.
The uploaded document appears in the document library.
Adding calendar items
SharePoint 2010’s team sites provide you with a calendar for tracking your
team events. You can access the calendar by clicking the Calendar link in the
home page’s left navigation pane.
The calendar displays events in the Calendar view. You can use the Ribbon to
change the view from month, to week, or day view and to add new events. To
add a new event to the team calendar:
1. Click the Calendar link in the left navigation pane.
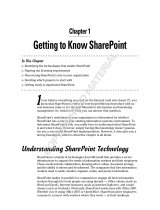
2. Click the Events tab in the Ribbon and then click the New Event button.
A new window appears for you to enter your new calendar item, as
shown in Figure 1-3.
3. Type the information for your event.
The Title, Start Time, and End Time fields have asterisks next to them
indicating they are required fields.
To customize the fields that appear on this form, see Chapter 9.
4. Click the Save button to save the event to the calendar.
You can add tasks, contacts, announcements, and even new discussion topics
just as easily as adding new calendar events. See Chapter 3 for details on this.
Social networking
SharePoint 2010 lets you do some exciting things with social network-
ing, which is a fancy way of referring to ways that people can share ideas,
insights, and information among groups of users, such as sharing links with
your friends on Facebook.
05_476437-ch01.indd 1605_476437-ch01.indd 16 4/5/10 10:02 AM4/5/10 10:02 AM

17
Chapter 1: Getting to Know Your Team Site
Figure 1-3:
Adding
a new
calendar
event to
your team’s
calendar.
For example, SharePoint 2010 lets you tag things so that you can find them later
and that people with whom you share your tags and notes also can see them. So
for example, if you find a document that you like and want to encourage others
in your network to read, you can apply a tag to the document and then that tag
is associated with you so others viewing your profile can see the tag.
Don’t panic: SharePoint 2010 tags and notes can be made private so that only
you can see them, and you can also delete your tags whenever you want.
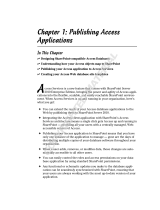
To tag a document:
1. Browse to the library containing the document and then select the
document using the check box in the list view, as shown in Figure 1-4.
Figure 1-4:
Select a
document
to tag.
05_476437-ch01.indd 1705_476437-ch01.indd 17 4/5/10 10:02 AM4/5/10 10:02 AM

18
Part I: Collaborating with Team Sites
2. Click the I Like It button on the Document tab, as shown in Figure 1-5.
SharePoint briefly displays the Add Tag confirmation message, and the
item is saved to your tags and notes, visible to your colleagues in your
profile Tags and Notes tab.
Figure 1-5:
Click the
I Like It
button.
To view your tags and notes:
1. Click the arrow beside your name in the upper-right corner of the
page and choose My Profile from the drop-down list.
Your profile page displays.
2. Click the Tags and Notes tab, as shown in Figure 1-6.
In the Activities For: section of the page, you see an entry for the tag you
just entered.
3. Select the Make Private check box beside any activity so that only you
can see it.
Now only you can see the item you marked as private.
SharePoint 2010 has other social networking features in addition to tags; you
can see some of them by exploring your profile, and I talk a little more about
them in Chapter 7, too.
Why properties?
You may wonder why SharePoint 2010 prompts
you to enter properties for your document. The
properties that you enter — properties like the
filename, title, and keywords — can be used to
make it easier for other site users to find your
document. SharePoint 2010’s search feature
indexes these properties so that users can
search for them. You can also add new properties
to your documents to make them easier to search
for. In addition to search, you can use properties
to create a list of documents that match a certain
property’s value. For example, say you have a set
of documents with a Sales Territory property. You
could display a subset of those documents on
your team site’s home page that match a certain
territory’s name.
05_476437-ch01.indd 1805_476437-ch01.indd 18 4/5/10 10:02 AM4/5/10 10:02 AM

19
Chapter 1: Getting to Know Your Team Site
Figure 1-6:
The Tags
and Notes
profile page.
Customizing Your Team Site
Most teams want to change their team site right away. As the site owner,
you’ll likely be asked to make these changes. Some of the changes you can
make include adding and removing text and images from the home page and
adding new lists and libraries. You can even change the site’s color scheme
and logo, which I discuss how to do in Chapter 19.
For now, stick to changing the home page. Later chapters in this part walk
you through the process of working with lists and libraries.
Introducing the Ribbon
The header of the SharePoint 2010 team site page boasts the Ribbon. The
Ribbon was introduced in Office 2007 and is a convenient way to display
many menu items in a small amount of screen space.
The Ribbon in SharePoint 2010 features menu items that are relevant to the
kind of page you’re viewing, arranged in tabs. For example, the home page
displays three tabs: Browse, Page, and Publish. You find most of the menu
commands you need to use on the Ribbon, and some Ribbon buttons contain
drop-down lists. Figure 1-7 shows the Ribbon with the Page tab active and the
Edit drop-down list displayed.
05_476437-ch01.indd 1905_476437-ch01.indd 19 4/5/10 10:02 AM4/5/10 10:02 AM

20
Part I: Collaborating with Team Sites
Document libraries and lists display commands on the Ribbon that provide
additional configuration options. These commands are contextual because the
commands that appear depend on the context of where you are in the site.
Figure 1-7:
Use the
Ribbon to
access
menu com-
mands.
Modifying the home page
A SharePoint 2010 team site creates a home page that you can modify to
better meet your team’s needs. You can add text or images, or display your
announcements, tasks, or calendar items.
You must be logged into your site as a user with permissions to modify the site’s
pages. That usually means you need to belong to the site’s Members group.
The site’s Members group has contribute permissions by default, which includes
add, edit, and delete. See Chapter 12 for details on managing permissions.
The home page of a team site is a wiki page. Wiki pages provide a richer con-
tent editing experience than Web Part pages. I discuss the kinds of Web pages
in SharePoint in Chapter 9.
To put the home page in Edit mode:
1. Browse to the home page of your team site and then click the Page tab
in the Ribbon.
The Ribbon displays a set of editing options for the Web page.
2. Click the Edit button in the Edit section of the Ribbon.
The page appears in Edit mode.
If you want to lock the page so no one else can edit it at the same time, click
the Check Out button in the Edit section of the Ribbon before placing the page
in Edit mode.
05_476437-ch01.indd 2005_476437-ch01.indd 20 4/5/10 10:02 AM4/5/10 10:02 AM

21
Chapter 1: Getting to Know Your Team Site
With the page in Edit mode, you can place your cursor anywhere inside the
rectangular boxes in the page’s body to edit the content. For example, to
change the default text that appears on the home page, with your page in Edit
mode, do the following:
1. Place your cursor in front of the Welcome . . . text.
2. Delete the placeholder text and type your new text.
3. Use the formatting options displayed in the Ribbon’s Format Text tab
to apply changes to your text, such as changing the font and adding
bullet points.
You can even apply styles, as shown in Figure 1-8.
Figure 1-8:
Apply
formatting
changes to
your text
with the
Ribbon.
SharePoint 2010 provides tools for formatting and editing your text in
the browser. See Chapter 16 for details on using and customizing these
tools.
4. Click the Stop Editing button to save your changes.
If you have your page checked out, click the Check In button when you’re
done making changes.
To add a table, image, link, or Web Part to your home page:
1. Place your page in Edit mode by clicking the Edit button on the Page
tab in the Ribbon.
2. Click the Insert tab on the Ribbon to display your insert options and
then place your cursor on the page where you want to insert an item
from the Ribbon.
You must place your cursor inside one of the rectangular boxes within
the page’s body.
05_476437-ch01.indd 2105_476437-ch01.indd 21 4/5/10 10:02 AM4/5/10 10:02 AM

22
Part I: Collaborating with Team Sites
3. Click the button for the content item you wish to add (see Figure 1-9):
• For a table, click the Table button and then select the number of
rows and columns you want in your table.
• For an image, click the Image button and then select whether
you want to upload the image from your local computer or from
another Web address. See Chapter 21 for more details on working
with images.
• For hyperlinked text, click the Link button to add it to your page.
• For a Web Part, click the Web Part button to add it to your page.
See Chapter 10 for more details on working with Web Parts.
4. Click the Edit tab and then click the Stop Editing button to save your
changes.
Figure 1-9:
Use the
Ribbon to
add links,
images, and
tables.
05_476437-ch01.indd 2205_476437-ch01.indd 22 4/5/10 10:02 AM4/5/10 10:02 AM
/