Page is loading ...

SOLAR INVERTERS
Quick Installation Guide
REACT 2
3.6 to 5.0 kW
—


- 1 -
1. Reference number index 2-4
2. Labels and Symbols 5
3. Lifting and transport 5
4. List of supplied components 6
5. Choice of installation location 6-7
6. Mounting Instructions 7-9
7. Mounting Instruction - multi battery systems 9
8. Connection of the energy meter 10-12
9. Line cable and protection devices 13
10. Output connection (AC) 13-14
11. Backup cable and protection devices 15
12. Backup output connection (AC) 15
13. Input configuration (DC) 16
14. Input connection (DC) 16
15. Connection of the communication and control signals 17-18
16. Description of the synoptic 19-20
17. Commissioning 21-23
18. Characteristics and technical data 24-25
EN
Index

- 2 -
EN
01
REACT2-UNO wall bracket
17
AC output (GRID) connector
38
RS485-PC line termination switch
02
REACT2-UNO
20
REACT2-BATT wall bracket
39
RS485-METER line termination switch
03
Synoptic
21
REACT2-BATT
40
Communication and control signal screw terminal block
04
heat sink
22
Battery communication connector COMM.[B]
41
Multifunctional relay screw terminal block
05
REACT2-UNO front cover
23
Battery power connector POWER [B]
42
AC output (BACKUP) screw terminal block
06
Input connectors MPPT1 (IN1)
24
REACT2-BATT external protective earth [B]
43
AC output (GRID) screw terminal block
07
DC and battery disconnect switch
25
REACT2-BATT external protective earth [A]
44
Cable conduit
08
Battery communication connector COMM.[A]
26
REACT2-BATT wall attachment point
50
Meter ABB B21
09
Battery power connector POWER [A]
30
LAN Ethernet connector (RJ45)
51
REACT-MTR-1PH
10
REACT2-UNO wall attachment point
31
Coin cell
52
Hole for line cable
11
REACT2-UNO external protective earth
32
DC input terminal
53
AC power supply terminal block
12
Input connectors MPPT2 (IN2)
33
Memory card
54
METER RS485 screw terminal block
13
Service cable gland
34
RS485-METER communication card
55
METER ABB B23, B24
14
METER connector
35
RS485-PC communication card
56
Three-phase connection screw terminal block
15
Wi-Fi antenna connector
36
RS485-LOGGER communication card
57
METER RS485 screw terminal block
16
AC output (BACKUP) cable gland
37
RS485-LOGGER line termination switch
REACT2-UNO-3.6/5.0-TL (external view)
IN2
IN2 IN1 IN1
METER-485
CARD
PC-485
CARD
LOGGER-485
CARD
RS485
LOGGER
RS485
METER
RS485
PC
+T/R
-T/R
RTN
+T/R
-T/R
RTN
N.CN.C
C C
N.ON.O
METER-485
CARD
PC-485
CARD
LOGGER-485
CARD
RS485
LOGGER
RS485
METER
RS485
PC
+T/R
-T/R
RTN
+T/R
-T/R
RTN
N.C N.C
C C
N.O N.O
MEMORY
CARD
PV
BATTERY
DC SWITCH
GRIDBACKUP
METER
POWER
COMM.
33
34
35
36
37
38
39
12
13
15
14
16
17
42
43
40
41
44
31
30
32
03
04
05
02
01
08
09
10
11
07
06
REACT2-BATT (external view)
COMM.
[B]
POWER
[B]
COMM.
[A]
POWER
[A]
22
23
09
08
24
26
25
20
21
26
1. Reference number index
(Continue to next page)

- 3 -
EN
REACT2-UNO-3.6/5.0-TL (internal view)
IN2
IN2 IN1 IN1
METER-485
CARD
PC-485
CARD
LOGGER-485
CARD
RS485
LOGGER
RS485
METER
RS485
PC
+T/R
-T/R
RTN
+T/R
-T/R
RTN
N.C N.C
C C
N.O N.O
METER-485
CARD
PC-485
CARD
LOGGER-485
CARD
RS485
LOGGER
RS485
METER
RS485
PC
+T/R
-T/R
RTN
+T/R
-T/R
RTN
N.C N.C
C C
N.O N.O
MEMORY
CARD
PV
BATTERY
DC SWITCH
GRIDBACKUP
METER
POWER
COMM.
33
34
35
36
37
38
39
12
13
15
14
16
17
42
43
40
41
44
31
30
32
03
04
05
02
01
08
09
10
11
07
06
1. Reference number index (continuation)
(Continue to next page)

- 4 -
EN
REACT-MTR-1PH
REACT-MTR-1PH
SUTATS
ERUSAEM
INPUT :
110/230 V
50/60 Hz
10 mA max
54
53
52
51
Meter ABB B21
3
COMM
5
53
54
53
50
Meter ABB B23, B24
56
56 57
55
1. Reference number index (continuation)

- 5 -
EN
The labels on the inverter and on battery unit have the Agency marking, main technical data and identification of the equipment and manufacturer
A4 1:1 1/1
XLP.V31xx.0AL
A.Statuti
G.Iannuzzi
A.Becattini
Pantone
Process Cyan C Process Yellow C
LABEL MATERIAL: 3M type 7331 (UL R/C, PGJI2)
INKS: Refer to UL File MH16411
LABEL CONTENT: Fixed as shown in the picture
SIZE: 105 mm (height) x 90 mm (width)
S.Bindi
DRAFT
V
dc max
I
dc max
V
dc Operating Range
V
dc MPP
I
sc max
V
acr
f
r
I
ac max
P
acr (cos = ±0.9)φ
V
acr
f
r
S
acr
I
ac max
MODEL:
REACT2-UNO-3.6-TL
575 V
90 - 575 V
2 x 12 A
160 - 480 V
2 x 15 A
Made in Italy
PROTECTIVE CLASS: I
230 V 1Ø
50 Hz
3200 W
3600 W
16 A
INVERTERSOLAR
www.abb.com/solar
PROTECTIVE
EARTHING
REQUIRED
230 V 1Ø
50 Hz
3000 VA
13 A
Regulatory Label of REACT2-UNO-3.6-TL
Adj. cosφ
P
acr (cos = 1)
φ
P
ac max
IP65
5 minutes
-20 to + 55 °C
-4 to +131 °F
BACKUP OUTPUT
(1): Over/Under excited
0.1-1
(1)
31/07/2018
31/07/2018
31/07/2018
31/07/2018
BATTERY PORT
V
dc Operating Range
170 - 575 V
I
dc max (charge)
13.5 A
I
dc max (discharge)
10 A
S
max
3600 VA
All
material
used
and finished product, must meet the requirements of the current RoHS
rective
i
Title
Issued
Modified
D
D
esign approved
Elec. Eng. approved
Mfg. approved
Size Scale Dim. in mm Sheet Drawing No. Revision
© Copyright 2018 Power-One Italy Spa. All rights reserved. Reproduction, use or disclosure to third parties without express written authority is strictly forbidden.
e
e
e
a
A4 1:1 1/1
XLP.V31xx.0AL
A.Statuti
G.Iannuzzi
A.Becattini
Pantone
Process Cyan C Process Yellow C
LABEL MATERIAL: 3M type 7331 (UL R/C, PGJI2)
INKS: Refer to UL File MH16411
LABEL CONTENT: Fixed as shown in the picture
SIZE: 105 mm (height) x 90 mm (width)
S.Bindi
DRAFT
V
dc max
I
dc max
V
dc Operating Range
V
dc MPP
I
sc max
V
acr
f
r
I
ac max
P
acr (cos = ±0.9)φ
V
acr
f
r
S
acr
I
ac max
MODEL:
REACT2-UNO-5.0-TL
575 V
90 - 575 V
2 x 13.5 A
195 - 480 V
2 x 15 A
Made in Italy
PROTECTIVE CLASS: I
230 V 1Ø
50 Hz
4500 W
5000 W
22 A
INVERTERSOLAR
www.abb.com/solar
PROTECTIVE
EARTHING
REQUIRED
230 V 1Ø
50 Hz
3000 VA
13 A
Regulatory Label of REACT2-UNO-5.0-TL
Adj. cosφ
P
acr (cos = 1)
φ
P
ac max
IP65
5 minutes
-20 to + 55 °C
-4 to +131 °F
BACKUP OUTPUT
(1): Over/Under excited
0.1-1
(1)
31/07/2018
31/07/2018
31/07/2018
31/07/2018
BATTERY PORT
V
dc Operating Range
170 - 575 V
I
dc max (charge)
13.5 A
I
dc max (discharge)
14 A
S
max
5000 VA
All
material
used
and finished product, must meet the requirements of the current RoHS
rective
i
Title
Issued
Modified
D
D
esign approved
Elec. Eng. approved
Mfg. approved
Size Scale Dim. in mm Sheet Drawing No. Revision
© Copyright 2018 Power-One Italy Spa. All rights reserved. Reproduction, use or disclosure to third parties without express written authority is strictly forbidden.
e
e
e
a
A4 1:1 1/1
Regulatory Label for MODEL REACT2-BATT
AA
Pantone
300 C Process Yellow C
LABEL MATERIAL: 3M type 7331 (UL R/C, PGJI2)
INKS: Refer to UL File MH16411
LABEL CONTENT: Fixed as shown in the picture
SIZE: 125 mm (height) x 80 mm (width)
I
dc max (charge)
4.5 A
Contains Rechargeable Li-ion Battery
- Refer to instruction manual for proper installation.
- Do not remove the cover. No user serviceable parts inside.
- Do not expose the unit to heating sources.
- Do not expose the unit to direct solar irradiation.
- Do not install or operate the unit in potentially explosive
s.atmosphere
WARNING!
www.abb.com/solar
BATTERY UNIT REACT2-BATTMODEL:
PROTECTIVE CLASS: I
Made in Italy
IP54
-20 55 (*)to + °C
-4 31 (*)to +1 °F
XLP.V31xx.0AL
A.Statuti
G.Iannuzzi
A.Becattini
S.Bindi
30/07/2018
30/07/2018
30/07/2018
30/07/2018
V
dc max
575 V
W
hr
4.0 kWh
I
dc max (discharge)
5.6 A
V
dc operating range
170 - 575 V
(*): Out of 0 to +40 °C (+32 to +104 °F) temperature range,power derating occurs
All
material
used
and finished product, must meet the requirements of the current RoHS
rective
i
Title
Issued
Modified
D
D
esign approved
Elec. Eng. approved
Mfg. approved
Size Scale Dim. in mm Sheet Drawing No. Revision
© Copyright 2018 Power-One Italy Spa. All rights reserved. Reproduction, use or disclosure to third parties without express written authority is strictly forbidden.
a
e
MODEL NAME
POWER-ONE ITALY S.p.A
Via S.Giorgio 642, Terranuova Bracciolini (AR), 52028, Italia
P/N:PPPPPPPPPPP
WO:XXXXXXX
SO:SXXXXXXXX Q1
SN:YYWWSSSSSS WK:WWYY
a
b
c d
SN WLAN: SSSSSSSSSS
PN WLAN: PPP.PPPPP.PP
MAC: XX:XX:XX:XX:XX:XX
SN Inverter: SSSSSSSSSS
MAC: XX:XX:XX:XX:XX:XX
PK: KKKK-KKKK-KKKK-KKKK
Remove and apply
on the Quick
installaon guide
f
g
h
i
a
Inverter/battery model
b
Inverter/battery Part Number
c
Inverter/battery Serial Number
d
Week/Year of manufacture
e
Main technical data
f
WLAN embedded board Serial Number
g
WLAN embedded board Part Number
h
MAC address
i
Product Key
The labels attached to the equipment must NOT be removed, damaged, dirtied, hidden,etc...
If the Admin Plus password is requested, the field to be used is the serial number -SN: YYWWSSSSSS-
In the manual and/or in some cases on the equipment, the danger or hazard zones are indicated with signs, labels, symbols or icons.
Always refer to instruction manual
General warning - Important safety
information
Hazardous voltage
IP65
Protection rating of equipment
Temperature range
Without isolation transformer
Positive pole and negative pole of
the input voltage (DC)
Always use safety clothing and/or
personal safety devices
Point of connection for grounding
protection
Direct and alternating currents,
respectively
Hot surfaces
10
Time need to discharge stored
energy
Transport and handling
Transportation of the equipment, especially by road, must be carried out using appropriate vehicles and methods to protect the
components (particularly electronic components) from violent shocks, humidity, vibration, etc.
Note for REACT2-BATT: the road transport is regulated by the ADR international agreement.
Lifting
ABB usually stores and protects individual components by suitable means to make their transport and subsequent handling easier. No-
netheless, as a rule, it is necessary to turn to the experience of specialised staff to take charge of loading and unloading components.
Where indicated and/or available, eyebolts or handles, which can be used as anchorage points, are inserted and/or can be inserted.
The means used for lifting must be suitable to bear the weight of the equipment.
Equipment weight
Device Weight (kg) Lifting points
REACT2-UNO-3.6/5.0-TL < 22 kg 4 (suggested in case of 2 operators)
REACT2-BATT 50 kg 4 (suggested in case of 2 operators)
The number of required operators necessary to lift the equipment must be in accordance to local regula-
tions relating lifting limits per operator
Unpacking and checking
The components of the packaging must be disposed on in accordance with the regulations in force in the country of installation.
When you open the package, check that the equipment is undamaged and make sure all the components are present. If you find any
defects or damage, stop unpacking and consult the carrier, and also promptly inform the Service ABB.
2. Labels and Symbols
3. Lifting and transport

- 6 -
EN
Environmental checks
• See characteristics and technical data paragraph to check the required environmental conditions (protection rating, temperature, humidity,
altitude, etc.)
• The installation location shall be easily accessible
• The inverter operates normally up to 2000 meters; Above 2000 meters the inverter works in derating.
• Never open the REACT2-UNO in the case of rain, snow or a level of humidity >95%.
• Prevent access to the installation location by children
• Installation of the unit in a location exposed to solar rays makes the warranty void as it may cause:
- power limitation phenomena in the inverter and in the battery unit
- premature wear of the electrical/electromechanical components
- premature wear of the mechanical components (gaskets) and of the user interface (synoptic)
- reduction in performance, lifetime and possible damage of the battery unit
• Do not install in small closed rooms where air cannot circulate freely
• Always ensure that the flow of air around the inverter is not blocked so as to prevent overheating.
• Do not install in locations where flammable substances or gases may be present
• Do not install on wooden walls or near flammable substances.
• Do not install in locations with a constant presence of water and/or high humidity level.
• Respect the minimum distances from objects around the REACT2-UNO and REACT2-BATT that could prevent the inverter installation and restrict
or block the air flow.
• The installation must take account of any electrical devices (e.g. lamps, switches, etc.) which must be at least 20cm from the
equipment. These distances must be maintained also to facilitate the circulation of the air needed to cool the unit and to facilita-
te the operations to install/maintain hardware and software which is done by dismantling the covers placed on the front.
• Install vertically with a maximum inclination of 5° (forward or backward).
• For a multiple installation, position the inverters side by side. If the space available does not allow this arrangement, position the inverters in a
staggered arrangement (as shown in the figure) so that heat dissipation is not affected by other inverters:
- Two or more REACT2-BATT can be installed one above the other.
- Do not install the REACT2-BATT above the REACT2-UNO.
• The REACT2-UNO and REACT2-BATT can be installed separately and at greater distances using the “RE-
ACT2-XL-CABLE-KIT” cable kit (2 meter cables length).
Available components for REACT2-UNO Quantity
Bracket for REACT2-UNO wall mounting 1
Connector for connection of the
multifunctionale relay
2
Connector for connecting the communi-
cation and control signals
1
M5 hex nuts , M5 flat washer and M5
serrated lock washers for protective earth
cable installation
1+1+1
Jumpers for configuration of the parallel
input channels
1 (red)
+
1 (black)
EMI filter for AC output (BACKUP) cable
gland
16
1
Wi-Fi antenna 1
AC output (GRID) connector
17
counterpart
1
METER connector
14
counterpart
1
In addition to what is explained in this guide, the safety and installation information provided in the installation manual must be read and followed.
The technical documentation and the interface and management software for the product are available at the website.
XXXXXXXXXXXXXXXXXXX
XXXXXXXXXXXXXXXXXXX
ABB solar inverters
Technical documentation 1
Available components for REACT2-BATT Quantity
Bracket for REACT2-BATT wall mounting 1
REACT2-BATT power connection cable 1
REACT2-BATT signal connection cable 1
Cable lug for earth cable 2
M5 hex nuts , M5 flat washer and M5
serrated lock washers for protective earth
cable installation
1+1+1
In addition to what is explained in this guide, the safety and installation information provided in the installation manual must be read and followed.
The technical documentation and the interface and management software for the product are available at the website.
XXXXXXXXXXXXXXXXXXX
XXXXXXXXXXXXXXXXXXX
ABB solar inverters
Technical documentation 1
20cm
10cm
20cm
10cm
20cm
10cm
20cm
10cm
20cm
10cm
20cm
10cm
REACT2 system REACT2-UNO REACT2-BATT
20cm
10cm
20cm
10cm
20cm
10cm
20cm
10cm
20cm
10cm
20cm
10cm
REACT2 system REACT2-UNO REACT2-BATT
60
cm
60
cm
60cm60cm
BATT
BATT
4. List of supplied components
5. Choice of installation location
(Continue to next page)

- 7 -
EN
• Do not install in rooms where people live or where the prolonged presence of people or animals is expected, because of the noise that
the system produces during operation The level of the sound emission is heavily influenced by where the appliance is installed (for
example: the type of surface around the inverter, the general properties of the room, etc.) and the quality of the electricity supply.
• Avoid electromagnetic interference that can compromise the correct operation of electronic equipment, with the consequent hazards
• The ambient temperature of the installation location should be between 5°C and 30°C to guarantee the optimal operation of the battery unit
(REACT2-BATT). Here below are the functions available from the system on the basis of the ambient temperature:
T1 - Optimal operation of the REACT2 system
T2 - Correct operation of the REACT2 system with possible reduction of power
T3 - Operation limited to the inverter part only. Management of the battery is disabled.
•
-20 -10 0 +5 +30 +40 +55
T1T2T3
°C
T2 T3
• Hardware and software maintenance on REACT2-UNO entails opening the front cover. Check that the correct installation safety distances are
observed in order to allow routine check and maintenance operations.
• Install on a wall or strong structure suitable to bear the weight.
• Install at a height which takes into consideration the weight of the appliance and in a position which is suitable for servicing, unless suitable
means are provided to carry out the operation.
• If possible, install at eye-level so that the synoptic can be seen easily.
• The inverter can be commissioned and monitored using the wireless communication channel. The WLAN uses radio waves to transmit and
receive data, it is therefore important to find a position for the router considering the different materials which the radio signal will have to pass
through:
Material Relative signal reduction
Open field 0% (strength of approximately 40 meters)
Wood / Glass From 0 to 10%
Stone / Plywood From 10 to 40%
Reinforced concrete From 60 to 90%
Metal Up to 100 %
Final installation of the inverter must not compromise access to any externally located disconnection devices.
Wall installation of the REACT2 system
• Position the REACT2-UNO bracket
01
so that it is perfectly le-
vel on the wall and use it as a drilling template.
• It is the installer’s responsibility to choose an appropriate type of screw anchors for the attach-
ment points. The choice must be based on the type of support (wall, frame or other support),
the type of anchors to be used, and their ability to support 4 times the inverter’s weight
(4x22Kg=88Kg).
Depending on the type of anchor chosen, drill the required 2 holes
A
to mount the bracket.
• Install the REACT2-UNO bracket
01
to the support.
The underlying procedure is related to the side-by-side installation of REACT2-BATT.
Alternatively, is possible to install the REACT2-BATT separately and at greater distan-
ces using the “REACT2-XL-CABLE-KIT” cable kit (2 meter cables length).
• Position the REACT2-BATT bracket
20
so that it is perfectly level on the wall and use it as a drilling
template. To aling the two brackets use the reference point and follow the steps as in the picture.
• It is the installer’s responsibility to choose an appropriate type of screw anchors for the attach-
ment points. The choice must be based on the type of support (wall, frame or other support),
the type of anchors to be used, and their ability to support 4 times the inverter’s weight
(4x50Kg=200Kg).
• Depending on the type of anchor chosen, drill the required 2 holes
B
to mount the bracket.
• Install the REACT2-BATT bracket
20
to the support.
01
A
A
2 x Ø 9 mm
01
20
B
B
2 x Ø 9 mm
STEP 1
STEP 2
5. Choice of installation location (continuation)
6. Mounting Instructions
(Continue to next page)

- 8 -
EN
• Lift the REACT2-BATT up to the bracket and insert the heads of two anchor points (present
on the back of the battery unit) into the slots on the bracket
20
.
Risk of injury due to the heavy weight of the equipment.
• Hang up the lower part of the REACT2-BATT to the wall using the
two wall attachment point
26
(holes diameter 11 mm).
• Carefully lift the REACT2-UNO and hook it to the bracket
01
by inserting the two supports in the slots on the inverter.
Risk of injury due to the heavy weight
of the equipment.
• Hang up the lower part of the REACT2-UNO to the wall using the one anchor point (hole
diameter 11mm).
• Remove the caps from the battery and inverter connectors.
- To remove the battery signal connectors
08
simply pull it.
- To remove the battery power connectors
09
press the
latch (highlighted in red) and pull it off.
• Connect the two battery cables between inverter and
battery unit (supplied inside the REACT2-BATT box).
• Give each cable a pull test to confirm the connection is secure.
DC SWITCH
COM.
GRI
D
+
/
-
COMM.
[B]
POWER
[B]
COMM.
[A]
POWER
[A]
08
09
09
08
6. Mounting Instructions (continuation)
(Continue to next page)
Click
Click
Click
COMM.
[B]
POWER
[B]
COMM.
[A]
POWER
[A]
Click
COMM.
[B]
POWER
[B]
COMM.
[A]
POWER
[A]
Click
Click

- 9 -
EN
• Remove the protective cover from the connec-
tor of the Wi-Fi antenna
22
located on the lower
part of the REACT2-UNO
02
and install the Wi-Fi
antenna (supplied inside the REACT2-UNO box)
by screwing it into the specific connector.
• Make the electric connections using personal protec-
tive clothing and/or equipment, such as insulating
gloves.
• Proceed with installation of the ABB energy meter.
The underlying procedure is related to the side-by-side installation of REACT2-BATT. Alternatively, is possible to install the REACT2-
BATT separately and at greater distances using the “REACT2-XL-CABLE-KIT” cable kit (2 meter cables length).
• Position the REACT2-BATT bracket
20
of the second
REACT2-BATT so that it is perfectly level on the wall and use
it as a drilling template. To aling the brackets of the two
REACT2-BATT (in case of side-by-side installation) use the
reference point and follow the steps as in the picture.
• It is the installer’s responsibility to choose an appropriate type
of screw anchors for the attachment points. The choice must be
based on the type of support (wall, frame or other support), the
type of anchors to be used, and their ability to support 4 times the
inverter’s weight (4x50Kg=200Kg).
Depending on the type of anchor chosen, drill the re-
quired 2 holes
B
to mount the bracket.
• Depending on the type of anchor chosen, drill the re-
quired 2 holes
B
to mount the bracket.
• Fix the REACT2-BATT bracket
20
to the support.
• Lift the REACT2-BATT up to the bracket and insert the heads of
two anchor points (present on the back of the battery unit) into
the slots on the bracket
20
.
Risk of injury due to the heavy weight of the
equipment.
• Hang up the lower part of the REACT2-BATT to the wall using
the two wall attachment point
26
(holes diameter 11 mm).
• Remove the caps from the battery units connectors.
- To remove the battery signal connectors
08
22
simply
pull it.
- To remove the battery power connectors
09
23
press the
latch (highlighted in red) and pull it off.
• Connect the two battery cables between inverter and
battery unit (supplied inside the REACT2-BATT box).
• Give each cable a pull test to confirm the connection is
secure.
• Install an earth cable between the protective grounding connection points on the two REACT2-BATTs
To execute all external grounding connection, follow the procedure described below:
1. From among the components supplied, find the M5 nut, M5 flat washer and M5 serrated lock washer and two cable lugs.
Make a jumper earth cable using the two cable lugs supplied (minimum cross-section not less than 4mm²). The cable must be long enough to connect the
REACT2-BATT external protective earth [B]
24
to the REACT2-BATT external protective earth [A]
25
.
2. Connect the cable on REACT2-BATT external protective earth [B]
24
of the first REACT2-BATT installed.
3. Connect the other side of the cable on REACT2-BATT external protective earth [A]
25
.
- For both connection follow the below installation sequence
Installation sequence:
knurled washer
grounding jumper (one side)
Flat washer
M5 nut (torque of 4.1 Nm)
22
22
21
02
20
B
B
2 x Ø 9 mm
STEP 1
STEP 2
25
24
COMM.
[B]
POWER
[B]
COMM.
[A]
POWER
[A]
Click
Click
COMM.
[B]
POWER
[B]
COMM.
[A]
POWER
[A]
Click
Click
6. Mounting Instructions (continuation)
7. Mounting Instruction - multi battery systems

- 10 -
EN
Warning – The meter must always be protected by fuses or circuit breakers on the incoming side. It is recommended that the input
voltage sensing is protected by fuses rated 6A (gL–gG type) or by circuit breakers rated 6A (B/C type) installed near the meter.
To avoid risks of electrical shock, all wiring operations must be carried out with the AC disconnect switch (or the supply meter)
upstream of the meter disconnected.
Management of the storage system in order to optimise the energy self-consumption and self-sufficiency of the REACT2 system is based on the reading of
the power by the meter. On the basis of the type of electric supply the following are available:
REACT-MTR-1PH
54
for single-phase grid up to 30 A.
ABB B21
40
for single-phase grid up to 65 A.
ABB B23
58
for three-phase grid up to 65 A (it can be
used for single-phase grid if correctly installed).
ABB B24
58
for three-phase supplies with an external
current transformer (it can be used for mono-phase
supplies if correctly installed).
The energy meter will communicate with the REACT2
through a dedicated serial line (RS485 METER).
The connection of the RS485 METER line to the REACT2-UNO must be made using the
dedicated METER connector
14
.
In the picture below are described the components of the counterpart connector and the
relative torques:
25mm
5mm
RS485 METER
cable
Clamping ring
Pressing screwGasketHousingMale head
Torque 1Nm
Cable diameter
4 - 6 mm
M2.5 screw
Torque 0.2Nm
0.75mm max.
Mating Torque
0.6Nm
Torque 0.6Nm
2
Follow the procedure to connect the RS485 cable to the counterpart (supplied) of the METER connector
14
:
1. Disassembly the counterpart connector
2. Install all components on the RS485 cable
3. Strip the cable as indicated in the picture
4. Install the wire on the head of the connector following the indication below:
Screw terminal on the counterpart connector RS485 METER signal
1 -T/R
3 +T/R
4 RTN
Turn the M2.5 screw with suitable screwdriver (torque 0.2Nm)
5. Install connector housing (torque 0.6Nm)
6. Install seal, pinch ring, pressing screw
7. Pressing screw should be tightened with torque 1Nm
8. Install the counterpart on the METER connector
14
by screwing the metallic ferrule (torque 0.6Nm). Give a pull test to confirm the connection is secure.
The cable of the cable assembly must remain perpendicular to the connector and avoid an excessively sharp bend radius and
loading. The maximum bend radius of a cable is ±10°.
PV
BATTERY
DC SWITCH
GRIDBACKUP
METER
POWER
COMM.
14
REACT
POWER ALARM GFI ESC UP DOWN ENTER
REACT-UNO
REACT-BATT
PV GENERATOR
REACT2 SYSTEM
DOMESTIC
LOADS
RS485
COMM. LINE
UTILITY
ENERGY METER
ABB METER
UTILITY
GRID
REACT-MTR-1PH
SUTATS
TS
E
T
ERUSAEM
INPUT:
110/230 V
50/60 Hz
10 mA max
8. Connection of the energy meter
(Continue to next page)

- 11 -
EN
Connection of the REACT-MTR-1PH (single-phase):
The energy meter REACT-MTR-1PH
51
is a DIN rail device (3 modules) and must be installed where the electricity supply is single-phase
• Ensure that the AC line has been correctly disconnected upstream from the REACT-MTR-1PH. Check that there is no voltage by using a multimeter.
• Strip 8/10mm of sheathing from the connection cables of the AC power supply and connect the phase (L) and neu-
tral (N) on the specific terminal block
53
set on the upper side of the meter; each individual terminal of the ter-
minal block takes a cable with a maximum section from 0.5 to 4mm² (tightening torque of 0.5Nm).
• Connect the cables of the serial line (+T, -T and RTN) on the terminal block
54
(on the lower part of the REACT-MTR-1PH) respecting the corre-
spondence between the signals of the serial line.
Serial line terminal block of the REACT-MTR-1PH
54
Screw terminal on the counterpart connector
-T 1 (-T/R)
+T 3 (+T/R)
RTN 4 (RTN)
Each individual terminal of the terminal block takes a cable with a section from 0.14 to 1.5mm² (tightening torque of 0.5Nm).
• Subsequently the other side of the cable must be connected to the REACT2-UNO METER connector
14
• Install the device on the DIN rail and ensure to trigger the fixing system on it
• Disconnect the phase cable (L) of the electric supply
• Insert the phase cable (L) through the hole (Ø8mm) on the REACT-MTR-1PH
51
. The arrow
corresponding to the hole for the feeding of the line cable
52
, indicates the direction of insertion
which must be complied with for correct measurement of the current; in fact the direction of
the arrow indicates the supply point of the electric energy (as indicated in the diagram).
• Once the connection stage is finished, the correct installation of the REACT-MTR-1PH must be verified:
- Power the REACT-MTR-1PH while keeping the REACT2 system off
- Action a load (of at least 50W) in the house so that the REACT-MTR-1PH records drawing of current
from the grid
- Check that the LED MEASURE (red) is permanently on. This condition in-
dicates that a drawing from the grid is recorded and so that the reading
of the direction of the current by the REACT-MTR-1PH is correct.
Connection and configuration of the ABB B21 meter (single-phase):
The energy meter ABB B21
50
is a DIN rail device (2 modules) and must be installed where the electricity supply is single-phase.
• Disconnect the AC disconnect switch upstream of the meter.
• Strip the insulation of the cable for the length which is indicated on the meter (13mm).
• Connect the cables of the single-phase line in accordance with the layout printed on the meter (L and N)
to the AC connection terminal block
53
and tighten the screws (tightening torque 3.0 Nm).
• Connect the cables of the serial line A (37), B (36) and C (37) (set on the rear of the ABB B21
50
) respecting the correspondence between the
signals of the serial line and tighten the screws (torque 0.25 Nm):
Serial line terminal block of the meter ABB B21
54
Screw terminal on the counterpart connector
A (37) 1 (-T/R)
B (36) 3 (+T/R)
C (35) 4 (RTN)
• Subsequently the other side of the cable must be connected to the REACT2-UNO METER connector
14
• Install the mater on the DIN rail and ensure to trigger the fixing system on it
• Once the phase of mechanical installation of the METER is finished, it is necessary to configure the METER in order to make it compatible with
the REACT2 system. Set the parameters of the meter as set out in the table:
Parameter Settings
Address 1
Protocol MODBUS
Baudrate 19200
Parity EVEN
The settings are made by using the keypad and the display on the meter:
1. Press for two seconds to access the setup menu of the meter.
6. Press repeatedly until the display shows “Address”.
- Press to access.
- Press to enable the change in the value.
- Press repeatedly and select 1.
- Press to confirm the change.
- Press for two seconds to return to the RS485 menu.
2. Press repeatedly until the display shows “Set”.
- Press to confirm.
3. Press repeatedly until the display shows “RS-485”.
- Press to confirm.
4. Press repeatedly until the display shows “Protocol”.
- Press to access.
- Press to enable the change in the value.
- Press repeatedly until the display shows “Modbus”.
- Press to confirm the change.
- Press for two seconds to return to the RS485 menu.
7. Press repeatedly until the display shows “Modbus”.
- Press to access.
- Press to enable the change in the value.
- Press repeatedly and select even.
- Press to confirm the change.
5. Press repeatedly until the display shows “Baud rate”.
- Press to access.
- Press to enable the change in the value.
- Press repeatedly and select 19200.
- Press to confirm the change.
- Press for two seconds to return to the RS485 menu.
8. Connection of the energy meter (continuation)
(Continue to next page)
REACT-MTR-1PH
SUTATS
ERUSAEM
INPUT :
110/230 V
50/60 Hz
10 mA max

- 12 -
EN
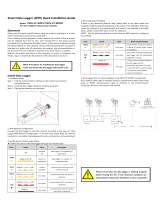
Connection and configuration of the REACT-MTR-3PH (three-phase):
The energy meter
55
is a DIN rail device (4 modules) and must be installed where the electricity supply is three-phase.
• Disconnect the AC disconnect switch upstream of the meter.
• Strip the insulation of the cable for the length which is indicated on the meter (13mm).
• Connect the cables of the three-phase line in accordance with the layout printed on the meter (L1, L2, L3 and N) to the three-phase connection
terminal block
56
and tighten the screws (tightening torque 2.0 Nm).
Take note of the phase to which the REACT2 system is connected; this information will be requested when the system is commis-
sioned.
• Connect the cables of the serial line A (37), B (36) and C (37) on the terminal block
57
set on the rear of the meter
55
respecting the corre-
spondence between the signals of the serial line and tighten the screws (torque 0.25 Nm) and tighten the screws (tightening torque 0.25 Nm):
Serial line terminal block of the meter ABB B23, B24
60
Screw terminal on the counterpart connector
A (37) 1 (-T/R)
B (36) 3 (+T/R)
C (35) 4 (RTN)
• Subsequently the other side of the cable must be connected to the REACT2-UNO METER connector
14
• Install the device on the DIN rail and ensure to trigger the fixing system on it
• Once the phase of mechanical installation of the METER is finished, it is necessary to configure the METER in order to make it compatible with
the REACT2 system. Set the parameters of the meter as set out in the table:
Parameter Settings
Address 1
Protocol MODBUS
Baudrate 19200
Parity EVEN
The settings are made by using the keypad and the display on the meter:
1. Press for two seconds to access the setup menu of the meter.
2. Press repeatedly until the display shows “Set”.
- Press to confirm.
3. Press repeatedly until the display shows “RS-485”.
- Press to confirm.
4. Press repeatedly until the display shows “Protocol”.
- Press to access.
- Press to enable the change in the value.
- Press repeatedly until the display shows “Modbus”.
- Press to confirm the change.
- Press for two seconds to return to the RS485 menu.
5. Press repeatedly until the display shows “Baud rate”.
- Press to access.
- Press to enable the change in the value.
- Press repeatedly and select 19200.
- Press to confirm the change.
- Press for two seconds to return to the RS485 menu.
6. Press repeatedly until the display shows “Address”.
- Press to access.
- Press to enable the change in the value.
- Press repeatedly and select 1.
- Press to confirm the change.
- Press for two seconds to return to the RS485 menu.
7. Press repeatedly until the display shows “Modbus”.
- Press to access.
- Press to enable the change in the value.
- Press repeatedly and select even.
- Press to confirm the change.
8. Connection of the energy meter (continuation)

- 13 -
EN
Load protection breaker (AC disconnect switch) and line cable sizing
To protect the inverter and the AC connection line, a device must be installed to protect against maximum current and leakage to ground, with the following
characteristics:
REACT2-UNO-3.6 REACT2-UNO-5.0
Type Automatic circuit breaker with thermal-magnetic protection
Nominal Voltage 230 Vac
Nominal Current 25 A 32 A
Magnetic protection characteristic B/C
Number of poles 2
Type of differential protection A/AC
Differential sensitivity 300 mA
In case of installation of a residual current protection device must meet the following characteristics:
REACT2-UNO-3.6 REACT2-UNO-5.0
Number of poles 2
Type of differential protection A/AC
Differential sensitivity 300 mA
ABB declares that the ABB transformerless inverters, in terms of their construction, do not inject continuous ground fault currents and therefore there is no
requirement that the differential protection installed downstream of the inverter be type B in accordance with IEC 60755 / A 2.
Characteristics and sizing of the line cable
To connect the inverter to the grid you need 4 connections: ground, neutral, phase and external grounding protection In any case, connection of the inverter
to ground is mandatory.
The connection of the grid cable to the inverter is realised through the dedicated AC output connector
17
by carrying out the following operations:
• Characteristics and sizing of the line cable
• Installation of the cable on the AC output connector counterpart
• Connection of the AC output connector to the inverter
The cross-section of the AC line conductor must be sized in order to prevent unwanted disconnections of the inverter from the grid due to high impedance of
the line that connects the inverter to the power supply point.
In order to allow installation of the grid cable inside the AC output connector
20
, the sizings indicated in the figure must be observed.
The table shows the maximum line conductor length in relation to the section of the conductor itself:
Cross-section of the line conductor (mm²) Maximum length of the line conductor (mt)
Ø10÷14mm
max. 6 mm²
N
L
REACT2-UNO-3.6 REACT2-UNO-5.0
1.5 5 m -
2.5 10 m 6 m
4 16 m 10 m
6 24 m 16 m
The values are calculated in nominal power conditions, taking into account:
1. a power loss of not more than 1% along the line.
2. copper cable, with HEPR rubber insulation, laid in free air
To avoid risks of electrical shock, all wiring operations must be carried out with the disconnect switch downstream of the inverter
(grid side) opened and applying LOTO procedure on it.
Installation of the cable on the AC output connector:
• Remove the head of the connector by pressing on the two
holding clips and subsequently loosen the cable gland.
• Feed the cable through the connector and cut the cable to size.
Ensure that the cable’s radius of curvature is more
than 4 times the diameter of the cable
• Prepare the cable respecting the following measurements. It’s
possible to use both stranded or solid wire but the requirements are
different.
The use of stranded wire with a conductor section va-
lues between 1.5 - 4 mm² are only allowed with the
mandatory use of properly crimped ferrules.
1
2
2a 2b
1
2
N
L
Max 6 mm²
12mm with ferrules*
8mm without ferrules*
X
Ø10÷14mm
X
Y
L,N 25 mm
Y
30mm
z:
10mm max
z
9. Line cable and protection devices
10. Output connection (AC)
(Continue to next page)

- 14 -
EN
• Install the single wires (phase, neutral and ground) on the head
of the connector respecting the indications printed on each of
the three connection terminals (tightening torque 0.8...1Nm)
• Close the connector and tighten the cable gland respecting the tighte-
ning torque (4+1Nm) in order to guarantee the IP65 protection level
• Connection for the AC output connector to the inverter:
For all inverter models, connection to
the electrical grid is carried out using
the AC output connector
17
.
1. Remove the pre-installed protective cover on the
inverter by pressing on the the latch with a flat
screwdriver.
2. Insert the counterpart in the AC output (GRID)
connector
17
being careful to align the referen-
ce points (present on both connectors) which
prevent connection errors.
3. Push the counterpart until you hear “click”
4. Give a pull test to confirm the connection is
secure.
In addition, the connector must not be subject to tensile forces (examples: do not connect weights to the AC cable, do not leave
excess cable windings hanging, etc).
In order to maintain the inverter’s level of IP protection, the corresponding part must be installed with the AC cable connected or
the protective cover, on the AC output connector.
• Installation of the external protective grounding cable:
In addition to the grounding protection previously connected to the AC output connector
17
is necessary to:
- install a second protective grounding cable to the dedicated connection point on the metal frame (lower part) of the REACT2-UNO.
- install a jumper between the protective grounding connection points on REACT2-UNO and REACT2-BATT
To execute all external grounding connection, follow the procedure described below:
1. Make a jumper earth cable using the two cable lugs supplied (minimum cross-section not less than 4mm²). The cable must be long enough to connect
the REACT2-UNO external protective earth
11
to the REACT2-BATT external protective earth [A]
25
.
2. From among the components supplied, find the M5 nut, M5 flat washer and M5 serrated lock washer.
3. Install the earth cables following the below installation sequence
Installation sequence:
knurled washers
external protective earth cable
jumper earth cable
flat washer
M5 nut (torque of 4.1 Nm)
4. Connection on REACT2-BATT external protective earth [A]
25
.
Follow the below installation sequence
Installation sequence:
knurled washers
jumper earth cable
flat washer
M5 nut (torque of 4.1 Nm)
1
2
Click
2
1
3
GRID
GRID
GRID
11
25
10. Output connection (AC) (continuation)

- 15 -
EN
Warning! Before performing any of the operations described below, ensure the AC line downstream the inverter has been correctly
disconnected
Warning! ABB inverters should be earthed (PE) via the terminal with the protective earth label , using a cable with an appropria-
te cross-section of the conductor for the maximum ground fault current that the generating system might experience
The REACT2 system is equipped with an AC BACKUP output that can be activated in different 2 ways:
• Backup Mode: AUTO
Automatic activation in case of loss of main (blackout).
• Backup Mode: External Control
Is used for activating the output:
- External command/signal (Communication and control signal terminal block
16
, terminal 1-3).
The selection of the backup mode is performed during the commissioning wizard.
See the “REACT2-Backup output use” document on the ABB site for more information
To connect the BACKUP output of the inverter, 3 connections are necessary: ground, neutral and phase. In any case, connection of the
inverter to ground is mandatory.
• Install the filter (supplied with the inverter) on the internal side of AC output (BACKUP) cable gland
16
(side inside the
REACT2-UNO).
The installation is carried out:
-
a
position the filter on the internal side of the cable gland
-
b
Screw the filter on the thread of the cable gland
• Insert the backup cable into the REACT2 using the AC output (BACKUP) cable gland
16
(M25 with toroid) and make the connections to the AC output (BACKUP) screw terminal
block
42
.
Use a properly sized tripolar cable and check the tightness of the AC ou-
tput (BACKUP) cable gland
16
at the end of the installation.
For all the models the connection is made with the AC output terminal block
42
.
• Strip 10mm of sheathing from the cables and then insert into the inverter the cable,
making it pass through the AC output (BACKUP) cable gland
16
; the maximum dia-
meter of the cable accepted by the cable gland is from 10 to 17 mm².
• Connect on the AC output (BACKUP) screw terminal block
42
the ground cable (yellow-green) to
protect against contact marked by the symbol , the neutral cable (usually blue) to the terminal
marked by the letter N and the phase cable to the terminal marked by the screen-print L; eve-
ry individual terminal of the terminal block accepts a cable with maximum section of 4 mm² (It is
necessary to fix the AC cables to the terminal block with a tightening torque of at least 1,5 Nm).
• Once the connection to the terminal block has been made, firmly screw the cable gland (7.5 Nm tightening torque) and
check the tightness.
Load protection breaker (AC disconnect switch) and cable sizing (BACKUP output)
To protect the AC connection for the the backup output of the in-
verter, we recommend installing a device for protection against over
current and leakage with the following characteristics:
ABB declares that the ABB transformerless inverters, in terms of
their construction, do not inject continuous ground fault currents
and therefore there is no requirement that the differential protection
installed downstream of the inverter be type B in accordance with
IEC 60755 / A 2.
REACT2-UNO-3.6/5.0
Type Automatic circuit breaker with differential
thermal magnetic protection
Nominal Voltage
230 Vac
Nominal Current
32 A
Magnetic protection characteristic B/C
Number of poles 2
Type of differential protection A/AC
Differential sensitivity 30 mA
Characteristics and sizing of the cable (BACKUP output)
Three-pole cable required. The cross-
section of the AC line conductor must be
sized in order to prevent unwanted discon-
nections of the inverter from the grid due
to high impedance of the line that connects
the inverter to the power supply point.
Cross-section of the
line conductor (mm²)
Maximum length of the
line conductor (mt)
N
L
max 4 mm²
10 ÷ 17 mm
1.5 6 m
2.5 11 m
4 19 m
The values are calculated in nominal power conditions, taking into account:
1. a power loss of not more than 1% along the line.
2. copper cable, with HEPR rubber insulation, laid in free air
a
b
PV
BATTERY
DC SWITCH
GRIDBACKUP
METER
POWER
COMM.
16
16
42
11. Backup cable and protection devices
12. Backup output connection (AC)

- 16 -
EN
All versions of the inverter are equipped with two input channels (therefore with double maximum power point tracker MPPT) independent of each other,
which can however be connected in parallel using a single MPPT.
Independent channel configuration (default configuration)
This configuration uses the two input channels (MPPT) independently.
This means that the jumper (supplied) between the positive poles of the DC
(IN1 and IN2) connectors
32
must not be installed and that the mode which
must be selected during the guided setup for commissioning the system is
“INDEPENDENT”.
32
32
IN2
IN2 IN1 IN1
IN2
IN2 IN1 IN1
Parallel channel configuration
This configuration uses the two input channels (MPPT) connected in parallel.
This means that the jumper (supplied) between the positive poles of the
DC (IN1 and IN2) connectors
32
must be installed and that the mode which
must be selected during the guided setup for commissioning the system is
“PARALLEL”.
32
32
IN2
IN2 IN1 IN1
IN2
IN2 IN1 IN1
Check for correct polarity in the input strings and absence of any leakage to ground in the PV generator. When exposed to sunlight,
the PV panels supply DC direct voltage to the inverter. The inside of the inverter may only be accessed after the equipment has
been disconnected from the grid and from the photovoltaic generator.
Warning! The inverters to which this document relates to are WITHOUT ISOLATION TRANSFORMER (transformer-less). This type
involves the use of insulated photovoltaic panels (IEC61730 Class A Rating) and the need to maintain the photovoltaic generator
floating with respect to earth: no pole of the generator must be connected to earth.
To avoid risks of electrical shock, all wiring operations must be carried out with the DC disconnect switch internal and external (if
present, applying LOTO procedures on it) to OFF position and with the external AC disconnect switch to OFF position (applying
LOTO procedures on it).
For the connections of the strings the quick fit connectors (one for each pole of each string)
located on the lower side of the REACT2-UNO are used.
• Connect all the strings required by the system, always checking the seal of the
connectors.
The number of connections for each input channel is 2 pairs of connectors.
• Give a pull test to confirm the connection is secure.
Connect directly the individual input strings to the REACT2-UNO.
Should it be necessary to make parallel strings outside the inverter,
the maximum current allowed by the individual quick fit connector
must be respected, which is 18A.
Polarity inversion can cause serious damage. Check polarity before
connecting each string!
According to the system configuration, check the correct setting of
the channels to independent or in parallel mode. An incorrect setting
of the input channels can lead to loss of energy production.
• If any string inputs are not required, you must ensure that covers are
installed to the connectors, and install any which are missing. This
is necessary both for the inverter grade IP seal, and to avoid dama-
ge to the free connector which may be used at a later time.
PV
BATTERY
DC SWITCH
GRIDBACKUP
METER
POWER
COMM.
18
19
13. Input configuration (DC)
14. Input connection (DC)

- 17 -
EN
IN2
IN2 IN1 IN1
METER-485
CARD
PC-485
CARD
LOGGER-485
CARD
RS485
LOGGER
RS485
METER
RS485
PC
+T/R
-T/R
RTN
+T/R
-T/R
RTN
N.CN.C
C C
N.ON.O
METER-485
CARD
PC-485
CARD
LOGGER-485
CARD
RS485
LOGGER
RS485
METER
RS485
PC
+T/R
-T/R
RTN
+T/R
-T/R
RTN
N.C N.C
C C
N.O N.O
37
38
39
35
34
33
36
30
40
41
13
44
Terminal name Terminal number
Description of communication and control signal screw terminal block
40
BKP 1, 3 External backup command
REM 2, 4 Remote external ON/OFF command
+5V 5, 6 Auxiliary 5V positive
RS485
METER
7
+T/R RS485 METER (connected on the external meter connector
14
)
9
-T/R RS485 METER (connected on the external meter connector
14
)
11
Reference (RTN) RS485 METER (connected on the external meter connector
14
)
RS485 PC (ABB service use
only)
8 +T/R of the RS485 PC communication line (ABB service use only)
10 -T/R of the RS485 PC communication line (ABB service use only)
12 Reference (RTN) of the RS485 PC communication line (ABB service use only)
RS485
LOGGER
13, 14 +T/R of the RS485 LOGGER communication line
15, 16 -T/R of the RS485 LOGGER communication line
17, 18 Reference (RTN) of the RS485 LOGGER communication line
19, 20 Ground terminal
Terminal name Terminal number
Description of multifunction relay screw terminal block
41
OUTPUT 1
N.C. “Normally closed” terminal of multifunctional relay (OUTPUT 1)
C “Common” terminal of multifunctional relay (OUTPUT 1)
N.O. “Normally open” terminal of multifunctional relay (OUTPUT 1)
OUTPUT 2
N.C. “Normally closed” terminal of multifunctional relay (OUTPUT 2)
C “Common” terminal of multifunctional relay (OUTPUT 2)
N.O. “Normally open” terminal of multifunctional relay (OUTPUT 2)
Terminal name Terminal number
Description of RJ45 (LAN) connectors
30
LAN 1 RJ45 LAN Ethernet connector
LAN 2 RJ45 LAN Ethernet connector
For further information regarding the configuration and use of the communication and control signals terminal block, please
see the manual
External backup command connection
The REACT2 system is equipped with a BACKUP AC output that can be activated in two different ways (Auto or via external control) settable via web server
user interface.
In case of external control (BKP terminals) selection, backup output is activated when terminal 1 is brought to the same potential as terminal 3 (i.e. positioning
a switch to create a short circuit between the two terminals).
Remote control connection (REM)
The connection and disconnection of the inverter to and from the grid can be controlled through an external control.
The function must be enabled via web server user interface. If the remote control function is disabled, the switching on of the inverter is dictated by the
presence of the normal parameters that allow the inverter to connect to the grid.
If the remote control function is on, besides being dictated by the presence of the normal parameters that allow the inverter to connect to the grid, switching
on the inverter also depends on the state of REM terminals (terminal 2 and terminal 4) on the communication and control signal terminal block
40
.
When terminal 2 is brought to the same potential as terminal 4 (i.e. positioning a switch to create a short circuit between the two terminals), the inverter is
disconnected from the grid.
15. Connection of the communication and control signals
(Continue to next page)
A communication and control service cable that must be connected inside the REACT2-UNO
must pass through:
- the service cable gland
13
.
- the cable conduit
44
It is a M25 service cable gland
13
and can take a cable with a diameter of 10 mm to 17 mm
(tightening torque 7.0Nm).

- 18 -
EN
+5V output connection
On the communication and control signal terminal block
21
there is auxiliary voltage of +5V.
The maximum absorption permitted from this auxiliary power supply voltage is 100 mA.
Connection of RS485 LOGGER serial communication line
The RS485 LOGGER serial communication line on the communication and control signal terminal block
40
is reserved for the connection of the inverter to
monitoring devices that communicate with the Modbus communication protocol. On the communication and control signal terminal block
40
there are two
connection points for each serial line signal (+T/R, -T/R and RTN) so as to be able to make a daisy-chain connection (“in-out”) of multiple inverters.
Connection of a monitoring system to the RS485 LOGGER communication line consists of first connecting all the units in the chain in the “daisy-chain” (“in-
out”) configuration, respecting corresponding signals, and then activating the communication line termination resistance in the last element in the chain by
setting the RS485-LOGGER line termination switch
37
(to the ON position).
For long distance connections, it is preferable to use a shielded twisted pair cable with characteristic impedance of Z0=120 Ohm
like the one shown in the following table:
Signal Symbol
-T/R
+T/R
RTN
-T/R
+T/R
RTN
Positive data +T/R
Negative data -T/R
Reference RTN
Shield
Configurable Relay connection (OUTPUT 1 and OUTPUT 2)
The inverter is equipped with 2 multifunction relays with configurable activation. It can be connected with normally open contact (being connected between
the NO terminal and the common contact C) and with normally closed contact (being connected between the NC terminal and the common contact C).
This multifunction relays can be used in different operating configurations that can be selected by accessing the web server user interface
Different types of devices (light, sound, etc.) can be connected to the relay, provided they comply with the following requirements:
- Alternating current
Maximum Voltage: 240 Vac / Maximum Current: 1 A
- Direct current
Maximum Voltage: 30 Vdc / Maximum Current: 0.8 A
- Cable requirements
Conductor cross-section: from 0.14 to 1.5 mm
2
The ALARM contact can be used only with systems that ensure a safety isolating additional at least (supplementary insulation in
relation to the DC input voltage)
Ethernet connection
The ethernet connection allows a direct data transfer to the ABB server for monitoring purpose.
When the inverter will be powered on, network parameters are automatically set and the inverter starts
transmissing telemetry data to the Aurora Vision® CLOUD platform.
The connection of the ethernet communication cable must be made on the specific connectors
30
located
on the communication and control board inside the REACT2-UNO
02
. If the inverters of the plant need to be
connected in daisy chain or ring configuration use both connectors.
The cable should be compliant to the following specification:
- Cable type: Patch or Cross type, 100BaseTx, CAT5e (or higher) with shielding STP or FTP.
- UV-resistant if used outdoors
- Type of plug: metallic shielded RJ45
- The maximum length that can reach these cables is 100 meters, and it is always advisable
not to let them pass by the power cords to avoid interference with data transmission.
- Maximum inverters number connected over one single daisy chain is 40
In order to avoid ground loop (that could create communication issues) the shield of any Ethernet cable must be connected to the
RJ45 plug in only one side, the other side of the shield should be leaved floating. This could be guaranteed by crimping the shield
or the screen of the ethernet cable to the RJ45 connectors only at one end of each cables.
Three topologies of ethernet connection to the router are available:
Ring configuration
ROUTER
Daisy chain configuration
ROUTER
Star configuration
ROUTER
The ring configuration is the preferrable way to connect the units in order to allow reaching inverters in case of single inverter fault.
In case inverters are connected to the networking switch with a ring topology is recommended to enable SPT protocol on the switch
On each configuration of connection the maximum length of the cable must be 100m maximum between inverter – inverter and inverter – switch.
Please refer to Aurora Vision documents available on ABB website for further information how to get an Aurora Vision account for remotely monitoring and
managing the installed solar assets.
METER-485
CARD
PC-485
CARD
LOGGER-485
CARD
RS485
LOGGER
RS485
METER
RS485
PC
+T/R
-T/R
RTN
+T/R
-T/R
RTN
N.C N.C
C C
N.O N.O
30
15. Connection of the communication and control signals (continuation)
/