Page is loading ...

8
Vent Pipe Installation – Excel NE
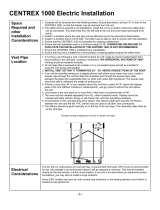
INLET COUPLING: Place the vent inlet coupling into the hole behind
the toilet seat, so that the 1” of smaller diameter pipe is inserted into the
hole on the top of the toilet. This is the first piece of the venting. Once
you have finished assembling the vent, you should run a bead of
silicone around where the inlet coupling meets the top of the toilet to
prevent odour from escaping.
The Excel NE does not have a built in fan and operates with passive
venting. Due to this, bends in the vent stack must be limited to no more
than two 45 degree bends. All additional vent pipes should only be
vertically installed. THERE CAN BE NO HORIZONTAL, FLAT OR
DOWNWARD SECTIONS OF VENT.
*An optional 12 volt fan may be necessary if there are competing
appliances, or due to climactic conditions. This fan is available for
purchase from Sun-Mar.
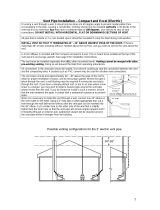
INSTALL VENT SO THAT IT TERMINATES 24” - 30” ABOVE THE
HIGHEST PEAK OF THE ROOF. If there is more than 36” of vent,
including diffusor, needed above the roof line to reach 24-30” above the
highest peak of the roof, use guy wires to secure the vent above the
roof.
The vent must be installed separately from ALL other household
vents. Venting cannot be merged with pre-existing venting. Doing so
will prevent the toilet from operating odourlessly.
All connections in the vent pipe should be sealed. Use silicone
caulking to seal connections closest to the toilet, and ABS glue to seal
any others.
The vent stack should end 24” - 30” above the peak of the roof to allow
for proper ventilation of odour, and to encourage updraft. Where the
pipe is taken through the roof, a roof flashing will be required to seal the
installation.
If you are in an area where snow shear is a danger, you may wish to
install a heavier pipe around the vent pipe where it exits from the roof. If
you do install in this matter, ensure that you seal the area between the
pipes with a waterproof substance to prevent leaks.
Diffusor Installation
The diffusor provided with the toilet is a simple device to be installed at
the top of the vent stack with the larger pipe protruding above the
smaller. To install, simply glue the diffusor vertically on the topmost
section of vent pipe. The diffusor design encourages updraft, and
discourages wind and weather from going down the vent stack. We do
not recommend installing anything else on the top of the vent as it could
impede the venting. Unlike wind turbines, diffusors are less likely to
freeze in winter, and are more effective in calm weather.
/


