Page is loading ...

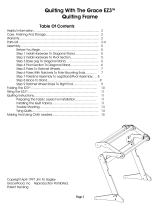
THE GRACE EZ3 FABRI-FAST QUILTING FRAME
TABLE OF CONTENTS
CARE, FINISHING AND STORAGE. . . . . . . . . . . . . . . . . . . . . . . . . . . . . . . . . . . . . . . . . . . . . . . . . . . . . . . 2
WARRANTY . . . . . . . . . . . . . . . . . . . . . . . . . . . . . . . . . . . . . . . . . . . . . . . . . . . . . . . . . . . . . . . . . . . . . . . . . . . . 2
PARTS LIST. . . . . . . . . . . . . . . . . . . . . . . . . . . . . . . . . . . . . . . . . . . . . . . . . . . . . . . . . . . . . . . . . . . . . . . . . . . 3-4
ASSEMBLY STEPS
STEP 1: HARDWARE TO LEG ASSEMBLY. . . . . . . . . . . . . . . . . . . . . . . . . . . . . . . . . . . . . . . . . . 5
STEP 2: HARDWARE TO TILT HEAD. . . . . . . . . . . . . . . . . . . . . . . . . . . . . . . . . . . . . . . . . . . . . . 6
STEP 3: FEET TO LEG ASSEMBLY. . . . . . . . . . . . . . . . . . . . . . . . . . . . . . . . . . . . . . . . . . . . . . . . .7
STEP 4: TILT HEAD TO LEG ASSEMBLY . . . . . . . . . . . . . . . . . . . . . . . . . . . . . . . . . . . . . . . . . . 8
STEP 5: POLE MOUNT END TO TILT HEAD/LEG ASSEMBLY . . . . . . . . . . . . . . . . . . . . . .9
STEP 6: HARDWARE TO BRACE ASSEMBLY. . . . . . . . . . . . . . . . . . . . . . . . . . . . . . . . . . . . . . .10
STEP 7: BRACE ASSEMBLY. . . . . . . . . . . . . . . . . . . . . . . . . . . . . . . . . . . . . . . . . . . . . . . . . . . . . . . 10
STEP 8: BRACE TO RIGHT AND LEFT SIDE ASSEMBLY . . . . . . . . . . . . . . . . . . . . . . . . . . . .11
STEP 9: RATCHET WHEELS AND RAIL ASSEMBLY . . . . . . . . . . . . . . . . . . . . . . . . . . . . . . . . 12
STEP 10: RAIL TO FRAME ASSEMBLY. . . . . . . . . . . . . . . . . . . . . . . . . . . . . . . . . . . . . . . . . … . .13
STEP 11: RATCHET STOP ASSEMBLY. . . . . . . . . . . . . . . . . . . . . . . . . . . . . . . . . . . . . . . . . . . . . .14
TILTING YOUR EZ3 FABRI-FAST . . . . . . . . . . . . . . . . . . . . . . . . . . . . . . . . . . . . . . . . . . . . . . . . . . . . . . 15
FOLDING AND STORING YOUR EZ3 FABRI-FAST . . . . . . . . . . . . . . . . . . . . . . . . . . . . . . . . . . . . . 16
QUILTING INSTRUCTIONS AND TIPS . . . . . . . . . . . . . . . . . . . . . . . . . . . . . . . . . . . . . . . . . . . . . . . . .17
FABRIC INSTALLATION METHOD #1: MAKING AND USING CLOTH LEADERS. . . . . 17
FABRIC INSTALLATION METHOD #2: FABRIC DIRECT TO POLES . . . . . . . . . . . . . . . . . 22
MAKING AND USING THE SIDE TENSION FABRIC. . . . . . . . . . . . . . . . . . . . . . . . . . . . . . . . 23
TROUBLE SHOOTING TIPS. . . . . . . . . . . . . . . . . . . . . . . . . . . . . . . . . . . . . . . . . . . . . . . . . . . . . . . .24
SPECIAL TIPS FOR TYING QUILTS. . . . . . . . . . . . . . . . . . . . . . . . . . . . . . . . . . . . . . . . . . . . . . . . 25
Copyright June 2004
Jim M. Bagley, GraceWood, Inc.
(Reproduction Prohibited)

2
Caring for Your EZ3
TM
Fabri-Fast Quilting Frame
Your EZ3
TM
Fabri-Fast Quilting Frame is a sturdy frame that can be used finished or unfinished. For extra
protection, or to give it a finished look, you may seal, stain and/or finish the frame using a number of different
applications. This is best done BEFORE YOU ASSEMBLE your frame.
To seal the wood, we recommend an application of tung oil that will help preserve the wood and will help
to prevent warping. To add a certain color to your frame, you may use a Danish Oil finish. We recommend the
Deft
TM
or Watco
TM
brands. Some prefer to use a urethane coat to add a more glossy furniture like finish.
Test stain on an inconspicuous place. Many different finishes and/or stains may be suitable for sealing and
beautifying your frame. You may want to consult your local paint retailer for finishes that are easy to apply and dry
hard–not oily.
Use and Storage Tips
--Store frame in a dry place. If not assembled, store with braces in vertical position. (This will prevent floor moisture from seeping into
the Braces).
--Do not carry the assembled frame by the quilting poles. Hold the braces instead.
--Do not drop the frame or let it twist out of square.
Five-Year Limited Warranty
GraceWood, Inc. will replace or repair, at our choosing, any part of the Grace EZ3
TM
Fabri-Fast Quilting
Frame, which may be shown to be defective. This warranty does not cover parts damaged through misuse,
improper storage, improper assembly, loss, natural events and willful or accidental destruction. Defective parts may
be returned only with a valid RMA# which may be obtained by calling
GraceWood, Inc. at 1-800-264-0644.
Warranty card must be filled out, stamped and mailed to th
e address on the card within 30 days of purchase
.
Contact Information
For Technical Support or any other correspondence concerning your EZ3
TM
Fabri-Fast
Quilting
Frame, call
1-800-264-0644 ~
OR
~ E-mail: [email protected] ~
OR ~
Fax: (801) 908-8888 ~
OR ~ Write to:
The Grace Company
P.O. Box 27823
Salt Lake City, UT 84127
For details on accessories and other information, see us online at www.graceframe.com
For shipping of materials to The Grace Company address package (postage prepaid) to: The Grace Company,
2225 South 3200 West, SLC, UT 84119. Materials may be returned only with a valid RMA# or Returned
Merchandise Authorization Number which may be obtained by calling GraceWood, Inc. at
1-800-264-0664.
If you call after business hours (M-F 8:00 a.m. – 5 p.m., MST) be assured that your call will be returned the
next business day if you leave a message. Please report any errors in these instructions or make constructive
comments to the following: [email protected]
Grace Quilting Frames and Hoops: Innovation and Evolution
Grace Quilting Systems have been developed over the past two decades with several original design
innovations. Additionally, because feedback from many of the thousands of quilters who have purchased and use
the GraceFrame
TM
, we have been able to make a frame that will truly enhance the entire process of hand quilting
from beginning to end. If you have any suggestions that will help us to improve our product or service, let us
know, using one of the above contact methods.

3
1-Left Pole Mount End
EZ3 Fabri-Fast Parts List
1-Right Pole Mount End
1-Left Tilt Head 1-Right Tilt Head
1-Left
Leg
1-Right
Leg
1-Left Foot
1-Right Foot
2-Brace
3-Ratchet
Stop
3-Ratchet
Wheel
3-46" Rail
3-6" Rail
3-48" Rail
6-End Cap
Shoulder
3-90" Fabric Retaining Tubing

4
14-5/16" X 2"
Carriage Bolt
2-1/4" X 45mm
Connector Bolt
3-1/4" X 1 1/2"
Truss Bolt
6-7/8" Screw
14-5/16" Flat
Washer
14-1/4" Flat
Washer
2-1/4" Rectangle
Nut
6-5/16" Nylock
Nut
14-5/16" Jamb
Nut
8-5/16" Plastic
Knob
EZ3 Fabri-Fast Hardware
1-4mm Allen Wrench

5
Quilting With the Grace EZ3
TM
Fabri-Fast Quilting Frame
Before You Begin
¾ Using the parts list as a reference, take the parts out of the box and make sure that you have them
all. (If there is something missing or broken, contact The Grace Company at 1-800-264-0644. We will
promptly ship any needed item.)
Tools Needed
¾ To assemble the frame you will need a few common tools. Once the frame is assembled, no tools will be
needed for the use of the frame.
1. One 1/2" wrench
2. One 7/16" wrench (A combination or socket wrench will also work.)
3. Phillips Head Screw Driver
4. Allen Wrench (provided with hardware)
Note: To help you distinguish wood parts, all Left and
Right Side parts are marked with an “L” and “R”
respectively, engraved into the wood on the inside of the
part.
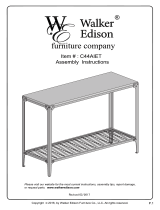
Step 1: Hardware to Leg Assembly
Parts Needed: Right and Left Diagonal Stands
6 - 5/16" x 2" Carriage Bolts
6 - Jamb Nuts
6 - 1/4" Smaller Flat Washers
¾ Note the
direction that
the carriage
bolt goes
through each
part.
¾ Tighten the
jamb nuts on
the carriage
bolt to pull
the square
part of the bolt into the wood until the bolt is completely seated
into the wood part.
5/16" X 2"
Carriage Bolt
1/4" Flat
Washer
5/16" Jamb
Nut
Left Leg Assembly
Inside View
5/16" X 2"
Carriage Bolt
1/4" Flat
Washer
5/16" Jamb
Nut
Right Leg Assembly
Inside View
¾ NOTE! Failing to tighten the Jamb nuts in these initial
steps will lead to assembly problems in further steps. Be
sure to completely tighten
each jamb nut as instructed!

6
Step 2: Hardware to Tilt Head
Parts Needed: Right and Left Tilt Heads
6 - 5/16" x 2" Carriage Bolts
6 – 5/16” Jamb Nuts
6- 1/4" Flat Washers
5/16" X 2"
Carriage Bolt
1/4" Flat
Washer
5/16" Jamb
Nuts
Left Tilt Head Assembly
Inside View
¾ Note the direction of
the carriage bolts in
relation to the Tilt
Heads.
¾ Position the carriage
bolts through both Tilt
Heads as shown in
drawings. Tighten the
jamb nuts over the end
of carriage bolts until
the square part of the
carriage bolt is
completely seated into
the wood.
5/16" Jamb
Nut
1/4" Flat
Washer
5/16" X 2"
Carriage Bolt
Right Tilt Head Assembly
Inside View

7
7
Step 3: Feet to Leg AssemblyStep 3: Feet to Leg Assembly
5/16" Flat
Washer
5/16" Plastic
Knob
5/16" Nylock
Nut
Right Side of Frame
Front Outside View
5/16" Flat
Washer
5/16" Plastic
Knob
5/16" Nylock
Nut
Right Side of Frame
Front Outside View
Parts Needed: Right and Left Feet
1 – Right Leg (w/ Hardware Installed)
1 – Left Leg (w/ Hardware Installed)
2 -- 5/16” Plastic Knobs
5/16" Nylock
Nut
5/16" Plastic
Knob
5/16" Nylock
Nut
Left Side of Frame
Front Inside View
5/16" Nylock
Nut
5/16" Plastic
Knob
5/16" Nylock
Nut
Left Side of Frame
Front Inside View
2 – 5/16” Nylock Nuts
4 -- 5/16"Large Flat Washers
¾ As shown in drawing, position carriage bolt ends
through the holes in each foot.
¾ For ease of tightening, thread flat washers and
Nylock nuts onto the bottom carriage bolts first.
¾ **The nylon side of nylon lock nuts faces out
when threading onto the Bolt end. **
¾ **NOTE! Leave all nylon lock nuts loose enough
to slide the joint. **
¾ Next, thread the washers and plastic knobs on the
top carriage bolts.
¾ REMINDER! The Nylock Nuts look just like
Jamb nuts except for the thin white nylon ring
inside. This keeps the nut from eventually
working itself off of the bolt. When tightening
Nylock Nuts at moveable points like this one,
it
is important not to over tighten!
Tighten the
Nylock Nut just enough to hold the washer
against the wood, but loose enough to allow the
washer to turn with your finger.

8
Step 4: Tilt Head to Legs Assembly
Parts Needed: Right and Left Pivot Sections (w/ Hardware Installed)
2 – 5/16” Plastic Knobs
2 – 5/16” Nylock Nuts
4 - 5/16" Large Flat Washers
¾ Align the carriage bolts that are
already installed on the tilt heads and
the legs, and place them through the
holes as pictured.
¾ Notice that the flat washer and plastic
knobs are threaded onto the end of
the lower carriage bolt toward the
outside of the frame. The washer and
nylon lock nut are loosely threaded
onto the upper carriage bolt toward
the inside of the frame. **Be sure to
not tighten the Nylock Nuts all the
way**
5/16"Flat
Washer
5/16" Nylock
Nut
5/16" Plastic
Knob
Left Side of Frame
Front Inside View
5/16" Plastic
Knob
5/16" Nylock
Nut
5/16" Flat
Washer
Right Side of Frame
Front Outside View

9
Step 5: Pole Mount End to Tilt Head/Leg Assembly
Parts Needed: Right and Left Pole Mount Ends
4 – 5/16” Flat Washers
2 – 5/16” Black Plastic Knobs
2 – 5/16” Nylock Nuts
5/16" Flat
Washer
5/16" Nylock
Nut
5/16" Plastic
Knob
Left Side of Frame
Front Inside View
¾ Fasten the Left Pole Mount End to
the Tilt Head/Leg Assembly by
placing the two carriage bolts through
the Pole Mount End (as shown in
picture) on each side. Then place the
flat washer over the end and threat on
the plastic knob and the Nylock Nut.
Do this one side at a time.
¾ NOTE! Do not over-tighten Lock
Nuts! The washer must be able to
spin freely.
5/16" Plastic
Knob
5/16" Flat
Washer
5/16" Nylock
Nut
Right Side of Frame
Front Outside View

10
Step 6: Hardware to Brace Assembly
Parts Needed: 2 - Braces
2 - 5/16" x 2" Carriage Bolts
2 – ¼” Flat Washers
2 – 5/16” Jamb Nuts
5/16" X 2"
Carriage Bolt
5/16" Jamb
Nut
1/4" Flat
Washer
Brace Sub-assembly
Inside View
¾ Thread one 5/16”x 2” Carriage bolt through the end of each brace section as pictured.
¾ Place the ¼” Washers and 5/16” Jamb Nuts onto each Carriage Bolt as pictured. Tighten the jamb nut all
the way so that the square part on the carriage bolt is drawn completely into the wood.
Step 7: Brace Assembly
Parts Needed: 2 – Braces with
previously installed hardware
Queen Size Brace Assembly
5/16" Plastic
Knob
5/16" Flat
Wa sh e r
2 – 5/16” Flat Washers
2 – 5/16” Plastic Knobs
¾ Align the Braces as shown in the
picture so that the protruding
carriage bolt goes through the
long slots in the braces.
¾ NOTE! Make sure that the
keyed part of the brace ends are
either both on the top side or
both on the bottom side.
¾ Place the 5/16” Flat Washers
over the bolt and thread on the
black plastic knobs for each side
of the brace, as pictured.

11
¾ NOTE! No additional pieces are needed to extend the brace from the Crib Size to the Queen
Size. You can Lengthen or Shorten the brace by loosening the Black plastic knob and sliding the
Braces to the desired position.
5/16" Flat
Washer
5/16" Plastic
Knob
Crib Size Brace Assembly
2 – ¼” Rectangle Nuts
2 – ¼” x 45m
¾
¾
cente
Step 8: Brace to Right and Left Side Assembly
m
Line
the Le
¾
att
pi
pi
¾
¾ P
Slide the ¼” x 45mm Connector Bolt into the hole located in the
r of t
¾ rench Completely tighten the bolt.
Parts Needed: 2 – Assemblies for Right and Left Sides
Completed brace Assembly from Step #7
Connector Bolts
the keyed brace up with the keyed hole on the Leg of one of
ft Side Assembly.
NOTE! Standing at the front of the frame the Brace
ached to the Left Side should be the rear of the two
eces included in the Brace Assembly. See below
cture.
NOTE! The Key should be on top!
lace the Rectangle Nut Into the slot as pictured to the right.
he keyed slot, and start threading it into the rectangle nut.
Using your Alan W

12
1/4" Rectangle
Nut
¾ Repeat the Process for
Step 9: Ratchet Wheels and Rail Assembly
arts Needed: 3 - Ratchet Wheels
1/4" X 45mm
Connector Bolt
the Right Side Assembly.
P
3 – 6” Rails (Crib)
3 – 48” Rails (Crib/Queen)
3 – 46” Rails (Queen)
ur quilt
ration of
age. C n
ere.
¾
¾ Place the Ratchet Wheels onto the end
6" R
of each 48” rail, as shown in the drawing.
Ratchet
Wheel
Crib Rail Assembly
ail
48" Rail
¾ Depending on the size of yo
you will choose the configu
the rails, See both pictures on this
p hoose your size and the
proceed from th
Attach the Rails End for end, sliding
the tapered end of the 48” Rail into
the shorter rail.
Ratchet
Wheel
48" Rail
46" Rail
Q
ueen Rail Assembl
y

13
¾ Note the direction of the ratchet wheel teeth: Be sure they are going the right direct
7/8" Screw
ail to Frame Assembly
: 3 – Previously Assembled Rails
6 – End Cap Shoulders
6 – 7/8” Screws
Position the Rail Ends (on ratchet wheel end) through the three holes in the Right Pole Mount End, as
shown in drawing.
¾ Place the End Cap Shoulder on the Opposite side of the Pole Mount End. As
pictured below.
¾ Thread the 7
ion. (Use the Picture
below as a guide-Front Rail is on the Right)
tep 10: R
S
P
End Cap
Shoulder
arts Needed
¾
/8” Screw
through the End Cap
Shoulder into the
Rail.
¾ Repeat this
process on
Pole
Mount
End.
the Left

14
Step 11: Ratchet Stop Assembly
Parts Needed: 3 – Ratchet Stops
3 – ¼” x 1 ½” Truss Bolts
¾ Thread the Truss Bolt through the Ratchet Stops into the holes on the Pole Mount End as pictured b
¾ NOTE! FINGER TIGHTEN ONLY!!!!!
elow.
You Are Now Finished with The Assembly Of Your EZ3 Fabri-Fast Quilting Frame!!!
1/4" X 1 1/2"
Truss Bolt
Ratchet Wheel
Stop

15
EZ3 Fabri-Fast
The Following is done best one side at a time.
Step 1: Loosen Knob inside front on both ends of the Frame. (As seen in picture below)
Step 2: Standing at back of Frame Slide Pole Assembly forward slightly.
Step 3: Tilt to Desired Angle of 0-45
o
Degrees.
Step 4: Pole Assembly back until both ends rest solid between Teeth in Tilt Arch.
Step 5: Retighten Knobs inside Front on Both Ends of Frame.
Tilting the

16
¾
¾
¾
¾
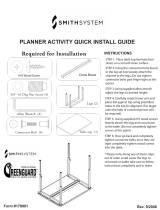
Folding the EZ3 Fabri-Fast
Frame must not be tilted when it is to be folded. (See left picture below.)
Folding feature will not affect the quilt in progress.
Some practice may be required to fold the quilting frame in 20 seconds.
Folded frame is about 6-1/2” wide.
Follow the Steps in order, without variation.
Reverse steps to unfold.
¾
¾
Step 2: Lift at
Step 7: Fram
Step 8: Gently
Step 1: Loosen knobs outside on both sides of frame. (As seen in left picture above)
joint until top releases. (As seen in left picture above in diagram A)
Step 3: Top Pole Section pivots down. (As seen in right picture above in diagram B)
Step 4: Retighten Knobs outside on both ends of Frame. (As seen in right picture above in diagram B)
Step 5: Loosen knobs outside Base Legs on both sides of Frame. (As seen in right picture above in diagram B)
Step 6: Lift Entire Frame from the Brace until legs drop to the joint. (As seen in picture below in diagram C)
e will rotate forward and down. (As seen in picture below in diagram C)
lay Frame Flat. (As seen in picture below in diagram C)
Step 9: Retighten Knobs on Base Legs. (As seen in picture below in diagram C)
Loosen knobs on
outside on both
sides of frame
Lift at joint
Top pole section
pivots down
Retighten knob outside
on both sides of frame
Loosen knob outside
base leg sides of frame
until top releases
Retighten knobs
e leon bas
g
s

17
Q
Pre n
¾ M abric the correct size and has straight edges and square corners. The short time
26"
uilting on the
NM
-EZ3
TM
paring the Fabric Laye
ake sure that each layer of f is
rs For Installatio
and small effort that you spend measuring and squa
process.
¾ If the lining or backing has a seam running down the middl
seam and press the seam open over the entire length.
¾ Bonded batting is strongly recommended.
¾ PLEASE READ THE FOLLOWING INSTALLA
CHOOSING YOUR METHOD AND PROCEEDING!
Installing the Quilt Fabric Layers
METHOD #1: MAKING AND USIN
ring will result in much time saved later in the quilting
e, then be sure to cut the salvage edge off at the
TION METHODS COMPLETELY BEFORE
G CLOTH LEADERS
14"
Attach to Back Pole
e
B
Cut Along Lin
¾ This is the preferred method for installing your fabric, and is especially recommended when quilting a pieced
top or a backing made with multiple pieces.
Though it will take a little more time in the
beginning, in the long run it will be a time-
saver, preventing you from having detach
and re-attach your quilt as you near
completion.
¾ MATERIAL: We recommend using
unbleached muslin or mattress ticking.
¾ Cut your material to the dimensions
specified above. Pieces “B”, “M”, and “F”
correspond to the Back Middle and Front
B
M
F
Put a 1/2" Hem in each Leader Cloth
rails.
7"
5"
Attach to Middle Pole
M
Cut Along Line
Attach to Front Pole F

18
red here.
¾
¾ ALTERNATIVE: Instead of making a hem or casing, you may also draw or sew a straight line in your fabric,
½” from the edge of the leader cloth. Use this line as a guide to line up your fabric retaining tube.
¾ Now push your tubing with fabric into the slot of
the corresponding rail. Insert the 14” leader into
the back rail, the 7” leader to the middle, and the
5” to the front.
¾ Now you are ready to install your fabric layers to
¾ Next, make a ¾” casing or hem in each leader as pictu
Slide the plastic retention tubing into this hem or casing (pictured below).
Fabric Retai ng Tni ubing
Leader Cloth
the quilting frame, attaching each layer to the
corresponding cloth leader.
1. Backing Fabric
¾ A. Proper Sizing: The first fabric that will be
applied to the quilting frame is the Backing. The
Backing is also known as the lining fabric. This
piece of fabric will be the under side of the
finished quilt. It is recommended that this piece
of fabric be larger than the top, on all four sides,
especially if your top is a pieced top. (A piec
top may stretch out and become larger than
backing if you do not make this allowance)
Backing fabric can be one continuous piece
fabric or can
e
th
. T
o
be made by sewing fabric togeth
d
e
he
f
er.
have back fabrics that are not one continuous piece of fabric and
th a seam down the middle or three fabric pieces with two seams
e you piece the back fabric together. The selvedge is woven more
ve the same give as the rest of the fabric. This may cause the
ser machine stitch than normal in sewing/piecing the lengths of
our back fabrics together using crosswise piecing.
Mark the center of Backing Fabric with a pin or pencil mark.
dle Pole. (The Backing Fabric is put on with the wrong side of
Back Rail
Middle Rail
Front Rail
Push tubing in the leader hem
into the channel in the rail
¾ B. Piecing the Backing fabric:
Man
are pieced together using two fabric piec
having been sewn. Cut the selvedge off
y quilts
es wi
befor
won’t ha
o
y
C. Backing fabric to Middle Pole
tightly than the rest of the fabric and
seam to be too tight. Use a slightly larger, lo
the back fabric together. You also can sew
¾ :
¾ the center of the Mid
.)
Place the center mark to
the fabric up and visible

19
Lay the Fabric naturally and evenly along the straight line of the cloth leader. Do not stretch the Fabric
at has been stitched or marked.
Note: flat flower pins work great for this, and roll well against the pole
¾ D. Rolling Fabric onto Middle Pole:
¾
from side to side. Start pinning the fabric onto the leader along the line th
Next, roll
the quilt backing onto the Middle Pole. To do
this properly, be sure to roll the pole counter-
clockwise as you look at the frame from the view
below (toward the ratchet wheels). The fabric
needs to roll from off the top of the pole and
toward the front pole (see below).
¾ Roll the material onto the Middle Pole, making a
smooth roll. Be sure that no wrinkles are present.
¾
edges of the Pole as it is being rolled. At this
Backing Fabric
Smooth the Quilt from the center to the outside
point do not roll the Fabric tightly, just nicely
smooth and even.
Backing
Backing

20
¾ E. Opposite end of Backing Fabric to Front Pole: Place the other end of the Backing Fabric to the Fro
Quilting Pole cloth leader, centering with the mark as directed on the Front Pole (the same way as the first
pole).
acking Fabric to the Fro
Quilting Pole cloth leader, centering with the mark as directed on the Front Pole (the same way as the first
pole).
nt
Place the center mark to the center of the Front Pole leader. Lay the Fabric naturally and evenly along the
Fabric. Pin the fabric to the leader cloth.
¾ e edges of the Fabric to the End Boards is the same on all
¾ est results, use as little tension as possible without letting
¾¾
straight line of the leader cloth. Do not stretch the
Make sure that the amount of pole showing at th
Poles.
*Note* Fabrics should never be tight. For b
the Quilt sag.
straight line of the leader cloth. Do not stretch the
Make sure that the amount of pole showing at th
Poles.
*Note* Fabrics should never be tight. For b
the Quilt sag.
2. B
nt
Place the center mark to the center of the Front Pole leader. Lay the Fabric naturally and evenly along the
Fabric. Pin the fabric to the leader cloth.
¾ e edges of the Fabric to the End Boards is the same on all
¾ est results, use as little tension as possible without letting
atting and Quilt Topatting and Quilt Top
2. B
¾ Lay the Quilt Top face down on the floor and lin
Line up the edge of the Quilt Top/Batting to B
Line the center th
e your batting directly over it. Mark the center of the Top.
¾ ack Pole cloth leader as pictured.
¾ e Top/Batting to the center of the rear pole. Pin fabric to the cloth leader.
Roll the Top/Batting onto the rear pole by rolling t
sure it rolls smoothly, with no wrinkles.
When you reach the end of the fabric, pull the loose end
the front rail.
Completely pin the Batti
he rail counter-clockwise, as you did the middle pole. Make
of the Top/Batting over the backing and line it up on
ng and Quilt Top moving from the center out to each corner.
Top Fabric
Batting
Backing
¾
¾
¾
/