Page is loading ...

04/2022
P/N 045913 Rev. A
Worldwide Headquarters | USA
Lutron Electronics Co., Inc.
7200 Suter Road, Coopersburg, PA 18036-1299 USA
Customer Assistance: 1.844.LUTRON1 (588-7661)
lutron.com/help | support@lutron.com
EEA | Netherlands
Lutron NL B.V.
Herengracht 466
1017 CA Netherlands
(Importer)
United Kingdom
Lutron EA Ltd
125 Finsbury Pavement, 4th floor, London EC2A 1NQ, UK
TEL: +44.(0)20.7702.0657 | FAX: +44.(0)20.7480.6899
Technical Support: +44.(0)20.7680.4481 | FREEPHONE: 0800.282.107
The Lutron logo and Palladiom are trademarks of Lutron Electronics Co., Inc., registered in the U.S. and other countries
Lutron Electronics Co., Inc. 7200 Suter Road, Coopersburg, PA 18036-1299, U.S.A.
Duracell is a registered trademark of Duracell U.S. Operations, Inc., RAYOVAC is a registered trademark of Spectrum Brands, Inc.
Wire-Free Roller Shade, Models LBMRJ-C, LBMRK-C
Chassis Installation & Setup Guide please read before installing
! WARNING: Important safety instructions
FCC / IC INFORMATION
This device complies with part 15 of the FCC Rules and Industry Canada license-exempt
RSS standard(s). Operation is subject to the following two conditions:
(1) This device may not cause interference.
(2) This device must accept any interference, including interference that may cause
undesired operation.
Modifications not expressly approved by Lutron Electronics Co., Inc. could void the user’s
authority to operate this equipment.
NOTE: This equipment has been tested and found to comply with the limits for a Class B
digital device, pursuant to part 15 of the FCC Rules. These limits are designed to provide
reasonable protection against harmful interference in a residential installation. This equipment
generates, uses and can radiate radio frequency energy and, if not installed and used in
accordance with the instructions, may cause harmful interference to radio communications.
However, there is no guarantee that interference will not occur in a particular installation.
If this equipment does cause harmful interference to radio or television reception, which
can be determined by turning the equipment off and on, the user is encouraged to try to
correct the interference by one or more of the following measures:
- Reorient or relocate the receiving antenna
- Increase the separation between the equipment and receiver
- Connect the equipment into an outlet on a circuit different from that to which the receiver
is connected
- Consult the dealer or an experienced radio/TV technician for help
This Class B digital apparatus complies with Canadian ICES-003.
Power Drill / Driver Level or Laser Level
D-Cell Alkaline Batteries
(3, 4, or 6 depending on shade size;
available separately)
Lutron recommends
Duracell® or RAYOVAC®
#2 Phillips Driver Bit
Magnetic #1 Phillips Screwdriver
1/8 in (#31) Drill Bit
(correct pilot hole size for the
included mounting screws)
Tape Measure
Pencil
TOOLS NEEDED:
*
IMPORTANT: A shade ordered
with a center bracket specified
on the right side (for ganged
installation) will include only
the bracket specified for the
left side. The center bracket
will be included as the left
bracket for the next shade
(to the right) in the ganged
installation. Refer to section
1.2 for additional information.
Bracket Kit
(1) Left Bracket & (1) Right Bracket*, according to configuration ordered
each bracket includes one 1 shim; wall and ceiling brackets include foot cover(s)
Jamb
Operator Idler
Ceiling / Door
Operator Idler Center *
Wall
Mounting
Screws
quantity varies
Wall / Ceiling / Door
Bracket Foot Covers
Quantity and type varies
with included brackets
Operator Bracket
Slide Ring
Ceiling /
Door
Jamb
Wall
Operator Idler Center *
COMPONENTS:
PALLADIOM Wire-Free Roller Shade
10 Operation Cycles Rated
Models:
Shade Electronic Drive Unit (EDU)
LBMRJ-C QSFC-EDU-BP-C 4.5 – 9.0 V-
5 W 6 in-lb (0,68 N•m)
QSSC-EDU-PLDM-C
QSFCJ-EDU-6D-RPL 9.0 V-
QSFCJ-EDU-4D-RPL 6.0 V-
QSFCJ-EDU-3D-RPL 4.5 V-
LBMRK-C QSSC-EDU-PLDM-C 4.5 – 9.0 V-
5 W 6 in-lb (0,68 N•m)
QSFCK-EDU-6D-RPL 9.0 V-
QSFCK-EDU-4D-RPL 6.0 V-
QSFCK-EDU-3D-RPL 4.5 V-
FCC ID: JPZ0137 IC: 2851A-JPZ0137 HVIN: RFB-A
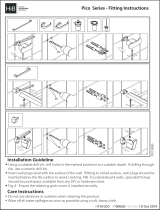
Remove the socket plate screw and separate the socket plate from the
mounting plate, then align on the marks and secure with 2 screws.
Reinstall the socket plate and secure it with the socket plate screw.
Align the outside edge
of the bracket on the
BtoB mark and secure
with 2 screws
Align the outside edge of the bracket on the
BtoB mark and secure with 4 screws
Align the center of the bracket on the BtoB
mark and secure with 4 screws
Align the center of the
bracket foot on the
BtoB mark and secure
with 4 screws
MOUNT THE SHADE BRACKETS:
2
End Bracket End BracketCenter Bracket Center Bracket Jamb BracketJamb Bracket
B. Mount the Operator Bracket
Align the operator bracket with the bracket location mark(s) at the operator side of the window, and mark the mounting hole locations. Pre-drill pilot
holes if appropriate, and fasten the bracket using the mounting screws provided or other fasteners appropriate for the mounting surface.
Socket
Plate
Height Mark Height Mark
BtoB Mark BtoB Mark BtoB Mark
BtoB
Mark
BtoB
Mark
BtoB Mark BtoB Mark
BtoB Mark
Depth
Mark
Depth
Mark
Mounting
Plate
Room RoomWindow Window
! CAUTION:
RISK OF FALLING OBJECTS. Read and follow all instructions for mounting the shade system. Failure to follow these instructions could result in minor to moderate injury.
A. Mount the Idler Bracket
Align the idler bracket with the bracket location mark(s) at the idler side of the window, and mark the mounting hole
locations. Pre-drill pilot holes if appropriate, and fasten the bracket using the mounting screws provided or other fasteners
appropriate for the mounting surface.
NOTE: The mounting holes in all brackets are elongated to allow for adjustment. Confirm that brackets are level and aligned (add shims if necessary), and verify the correct bracket-to-bracket width before tightening the mounting screws.
MEASURE AND MARK FOR A SINGLE SHADE:
1.1
MEASURE AND MARK FOR GANGED SHADES (3-shade example):
1. 2
Ganged Shades Example:
1. Shade BtoB is measured to/from the centerline of
center brackets
2. Individual shade BtoB tolerance is ± 1⁄8 in (3 mm)
3. Inside mount shown - measure-and-mark
procedure is the same for outside mount
4. All inside mounting depth, height, and clearance
information presented in section 1.1 above is
applicable to inside-mounted ganged shades
5. Wall-mount center brackets are operator-side
reversible - ceiling mount center brackets are not
1. Measure across the window at the top, and make a mark at the
half-way point.
2. Note the correct bracket-to-bracket width (BtoB), on the shade box label.
3. Measuring from the window center to the left, mark a distance equal to:
BtoB / 2.
4. Repeat the process, measuring from the window center to the right, to
mark the opposite bracket location.
5. Measure from mark to mark, verifying the distance is equal to BtoB,
±1/8 in (3 mm).
B. Inside Mount – Ceiling
1. Note the correct bracket-to-
bracket width (BtoB), on the
shade box label.
2. Measure from jamb to jamb at
the top of the window opening,
verifying the distance is equal to BtoB, ± 1⁄8 in (3 mm).
3. Measuring from the front edge of the window opening toward the window glass, mark the
mounting surface at the desired bracket mounting depth.
C. Inside Mount – Jamb
1. Note the correct bracket-to-
bracket width (BtoB), on the shade
box label.
2. Measure from jamb to jamb at the
top of the window opening, verifying the distance is equal to BtoB, ± 1⁄8 in (3 mm).
3. Measuring down from the top of the window opening, mark each jamb at the desired bracket
mounting height.*
4. Measuring from the front edge of the jamb toward the window glass, mark each jamb at the
desired bracket mounting depth.*
1. Measure across the window at the top, and make a mark at the half-way point
(Window Center).
2. Note the correct bracket-to-bracket width (BtoB), on each shade box label, then add
the widths together to get the Total System Width (TSW).
3. Measuring from the window center on a level line to the left, mark a distance equal to:
TSW / 2.
4. Measuring from the mark made in Step 3 on a level line to the right, mark a distance
equal to Shade 1 BtoB.
5. Measuring from the mark made in Step 4 on a level line to the right, mark a distance
equal to Shade 2 BtoB.
6. Measure from end-mark to end-mark, verifying the distance is equal to the TSW,
calculated at Step 2.
PALLADIOM
Architectural
full-wrap & half-wrap Sealed
Designer
ROLLUP RADIUS (RR): Measure the fabric roll diameter (Rollup Diameter; also listed on
the original shade quote). RR = Rollup Diameter / 2.
JAMB BRACKET MOUNTING HEIGHT: To ensure adequate fabric roll clearance, jamb
brackets must be mounted at a distance from the top of the jamb equal to or greater than
the Rollup Radius (RR) minus 1/2 in (13 mm).
MOUNTING DEPTH: To allow
free access to the battery
compartment, the mounting
depth must be 5/8 in (16 mm)
or less.
Brackets may be mounted
deeper than 5/8 in (16 mm),
but battery access will require
full removal of the shade from
the brackets.
** BOTTOM BAR CLEARANCE: To ensure adequate clearance for the PALLADIOM
bottom bar, the distance from the rear of the bracket to the window must be equal to or
greater than the Rollup Radius (RR) minus 1-1/8 in (29 mm).
For all other bottom bar types (Architectural, Designer, Sealed), the distance from the
rear of the bracket to the window must be equal to or greater than the Rollup Radius
(RR) minus 1-5/8 in (41 mm).
* Important Inside-Mount Clearance Information
Shade 1 Shade 2
Window Center
Shade 3
Shade 1 BtoB
Total System Width / 2
Shade 2 BtoB Shade 3 BtoB
Shade 1
left bracket
Shade 3
right bracket
Shade 1
right bracket
(center bracket;
packaged with Shade 2)
Shade 2
right bracket
(center bracket;
packaged with Shade 3)
Shade 2
left bracket
Shade 3
left bracket
A. Outside Mount – Wall, Ceiling, or Door
Room
Jamb
5/8 in
(16 mm)
max.
Window
Ceiling
Bracket
** ** Jamb
Mounting Depth
5/8 in (16 mm) max.
Mounting Height
RR – 1/2 in (13 mm)
min.
RoomWindow
Jamb
Bracket
Align the Jamb Bracket
on the marks and secure
with 2 screws.
wall mount wall mount
door mount door mount
ceiling
mount
ceiling
mount
ceiling mount shown ceiling mount shown
Important Installation Notes:
A. Plan the installation to maintain sufficient clearance between the shade and any other object, including
window or door trim, ceilings, corners, hardware, cranks, lock levers, other shades, and drapery.
B. This product is not suitable for mounting in a pocket or recess.
C. This product is battery powered and requires specific installation clearances to allow battery changes
without demounting.
Please refer to the Product Specification Submittal, PN 085708, and Application Note #802 (both
available for download at Lutron.com) for detailed installation limitations and restrictions.
D. For safety, shades over 48 in (1219 mm) must be installed by two people.
E. The shade system must be mounted to blocking or other suitable structural material. It is the
responsibility of the installer to choose and install fasteners that are appropriate for the mounting surface
such that each shade bracket can support 400 lbs (181.4 kg).
For safe installation and operation of this product, follow and save these important
safety instructions.
•
This device is not intended for use by persons
(including children) with reduced physical, sensory,
or mental capabilities, or lack of experience and
knowledge, unless they have been given supervision
or instruction concerning use of the device by a
person responsible for their safety. Children must
be supervised to ensure that they do not play with
the device.
•
DO NOT allow children to play with device controls.
Keep remote controls away from children.
•
Frequently examine the installation for imbalance
and signs of wear or damage to cables, springs,
and fixings. DO NOT operate the device if repair or
adjustment is necessary.
• This device is powered by D size, alkaline batteries
only; DO NOT mix battery types.
•
Install new batteries only; DO NOT mix new and
used batteries.
• DO NOT install damaged or modified batteries.
• DO NOT install rechargeable batteries.
• Remove depleted batteries promptly and dispose
of them responsibly in accordance with local laws
and policies. Recycle if possible.
•
Wear hand and face protection when removing
batteries found to be leaking, and dispose of leaking
batteries responsibly in accordance with local laws
and policies.
• Remove all batteries from the device:
—
when maintenance is being performed in the vicinity.
— when the device will be unused or stored for an
extended period of time.
•
DO NOT expose the device or its batteries to
extreme temperature.
•
Metal objects in the area of the batteries and battery
terminals may cause a short circuit and device failure;
keep foreign objects away from the batteries and
battery compartment.
• This product is rated for 10 operation cycles.

1
2
3
04/2022
P/N 045913 Rev. A
The Lutron logo and Palladiom are trademarks of Lutron Electronics Co., Inc., registered in the U.S. and other countries
Lutron Electronics Co., Inc. 7200 Suter Road, Coopersburg, PA 18036-1299, U.S.A.
Duracell is a registered trademark of Duracell U.S. Operations, Inc., RAYOVAC is a registered trademark of Spectrum Brands, Inc.
WIRE−FREE SHADING SYSTEM Roller Shade Chassis Installation & Setup Guide
Wall or Jamb - Right Operator
HANG THE SHADE IN THE BRACKETS:
5
INSTALL BATTERIES:
6
FINAL SHADE SETUP:
7
! CAUTION:
RISK OF FALLING OBJECTS. Read and follow all instructions for hanging the shade. Failure to follow these instructions could result in minor to moderate injury.
! CAUTION:
RISK OF FALLING OBJECTS. Read and follow all instructions for securing the Slide Ring to the shade using the Retention Clip. Failure to follow these instructions could result in minor to moderate injury.
A. Insert the Idler
1. Insert the shade idler into the idler bracket socket as shown. The idler will
land with an audible “CLICK” when it is fully seated. Wall mount shown.
2. Pull back on the shade gently to verify there is resistance, confirming the
idler is engaged in the bracket.
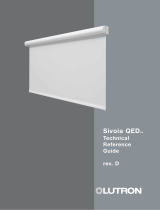
A. Open the Battery Door
B. Engage the Operator End
Align the channels on the backside of the Slide Ring with the with the tracks on the operator bracket, and slide the shade into the bracket. Continue sliding the shade all the way back
into the bracket as far as it will go until it seats with an audible “CLICK”. Remove any packaging material that is still on the fabric roll.
Wall / Jamb Ceiling Door
1. From the backside of the Slide Ring,
loosen the two (2) Retention Clip screws.
Leave one screw loosened, and remove
the other completely.
2. Orient the operator end of the
shade as shown.
3. Align the (4) ribs on the Slide Ring
with the grooves on the shade and
snap the Slide Ring onto the shade.
4. Swing the Retention Clip back into its
original position and reinstall the second
screw. Tighten both screws firmly.
INSTALL THE SLIDE RING ON THE SHADE:
4
INSTALL FOOT COVERS
3
Retention Clip
Battery
Door
Battery
Door
Grooves (4)
Ribbon
Cable wall mount - right operator Slide Ring shownwall mount - right operator Slide Ring shown
wall mount - right operator bracket shown
Retention Clip
Retention Clip
Shade Orientation - Operator End
Ribbon CableRibbon Cable
Ribbon
Cable
Ceiling / Door Mount - Left Operator
IMPORTANT: Wall and jamb brackets are operator-side reversible, and factory-
configured for RIGHT OPERATOR shades. When installing a LEFT OPERATOR
shade with wall or jamb brackets, you must reverse the Retention Clip position as
shown below.
When installing a RIGHT OPERATOR shade, or when the operator bracket is
ceiling-mounted, SKIP THIS STEP and proceed directly to Step B.
IMPORTANT: Before attaching
the Slide Ring to the shade,
refer to the pictures at right for
correct Slide Ring orientation
according to the bracket
type and operator side.
Note the position of the
Retention Clip
(always on top,
always opposite
the Ribbon Cable)
IMPORTANT: Before proceeding, confirm all
brackets are located properly and securely
mounted, ensuring that the installed shade(s)
will be level and unobstructed. Make any final
bracket position adjustments needed before
installing bracket foot covers.
1. From the backside of the Slide Ring,
remove the two (2) Retention Clip
screws and move the Retention Clip
to the opposite side of the Slide Ring.
2. Install only one (1) screw, and do not
tighten it completely.
3. Keep the second screw nearby, and
proceed directly to step 4B.2.
Retention Clip
(default position
for right operator) Retention Clip
(repositioned
for left operator)
A. Convert to Left Operator, if applicable B. Attach the Slide Ring to the Shade
Position a cover on the mounting surface as shown,
and slide it over the bracket foot to conceal the
fastener heads. Repeat for the remaining brackets.
2. Push in, then up on the Battery Door to release it from
the shade.
3. The open Battery Door allows access to the Battery Sleeve.
IMPORTANT: DO NOT pull the Battery Door away from the shade. The Battery Door is attached to the shade by the
Ribbon Cable. Allow the door to hang below the battery opening as shown, and do not allow the Ribbon Cable to twist.
1. To access the Battery Door, grasp the fabric roll at
the drive end and pull it out, away from the bracket.
B. Load the Batteries*
1. Use a finger to reach into the battery opening and pull
out the Battery Sleeve. Pull the sleeve all the way out
and away from the shade.
2. Load the Battery Sleeve with NEW 1.5 V Alkaline,
D-Cell batteries. Information on the sleeve indicates
quantity and direction.
3. Slide the loaded Battery Sleeve back into the shade as
far as it will go.
• Swing the Battery Door up into the battery opening. Push it
in and then down to secure it back in its original position.
• The shade LED will flash a multi-color sequence when
battery contact is made, confirming the shade is powered.
B. Assign a Pico Control*A. Power the Shade
• Tap the shade button. The shade LED will light steady GREEN.
• Press and hold the Close button on the Pico for 10 seconds.
The shade button LED and the Pico LED will both flash rapidly,
then turn off, confirming the assignment.
* To assign control of the shade within a system, refer to the
setup guide supplied with the system.
C. Set the Open Limit
• Tap the shade button. The LED will light steady GREEN.
• Press and hold the Open and Raise buttons on the Pico remote control for 10 seconds.
• The LED will flash rapidly, then turn steady GREEN.
• Use the Raise / Lower to move the shade to the desired open limit, then press and hold
the Open button for 10 seconds. The shade button LED and the Pico LED will both flash
rapidly, then turn off, confirming the open limit is set.
D. Set the Close Limit
• Tap the shade button. The LED will light steady GREEN.
• Press and hold the Open and Raise buttons on the Pico remote control for 10 seconds.
• The LED will flash rapidly, then turn steady GREEN.
• Use the Raise / Lower buttons to move the shade to the desired close limit, then press
and hold the Close button for 10 seconds. The shade button LED and the Pico LED will
both flash rapidly, then turn off, confirming the close limit is set.
• Slide the shade fully back into the bracket as shown in Step 5B.
Shade
Button
BATTERIES: Install NEW 1.5 V Alkaline, D-Cell batteries. Do not mix brands or types. Lutron
recommends Duracell® or RAYOVAC® batteries. The Battery Sleeve indicates correct orientation.
BATTERY LIFE: Battery life varies with shade size, fabric weight, and daily usage patterns. Estimated
battery life will be calculated in the shade ordering tool based on size and fabric selections.
FLEXIBLE BATTERY SLEEVE: If an adjacent object or structure obstructs full removal of the Battery
Sleeve, but is at least 3 in (76 mm) away from the Battery Door, the Battery Sleeve may be cut at the
locations shown to add flexibility and allow removal and installation of batteries one-by-one.
CLOSE-QUARTERS INSTALLATIONS: If the shade was mounted in a location or at an inside-mount
depth that allows less than 3 in (76 mm) of clearance for Battery Sleeve removal, the shade must be
removed from the brackets to install or change batteries.
TO REMOVE THE SHADE FROM THE BRACKETS:
Extend the operator bracket Slide Ring, then press the
Slide Ring release (behind the shade) to release the
shade. Pull the idler end of the shade out of the idler
bracket socket.
* Important Battery Information
Battery Door Ribbon Cable
Battery Sleeve
Slide Ring
Release
CUT HERE
CUT HERE
CUT HERE
Retention Clip
Ribbon Cable
Wall or Jamb - Left Operator
Retention Clip
Ribbon Cable
Ceiling / Door Mount - Right Operator
/