Page is loading ...

10
AC Connector Connection
AC Connector Assembly
08
04
DC Connector Assembly Procedure
05
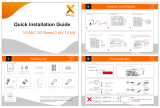
Bracket Dimensions
03
Ground Terminal×1AC Terminal×1
QUICK INSTALLATION GUIDE
Sunways Technologies Co.,Ltd.
S11-00033-00
Packing List
Mounting the Inverter
Figure 1 Packing list
01
Installation Spacing
02
06
DC Connector Connection
Ground Terminal Connection
07
09
Wall Bracket×1 Expansion Bolt×4
500mm
500mm
300mm300mm
Figure 3 Front view
Figure 2 Installation spacing(Single Inverter)
410mm
360mm
Logo
Display
220mm
10mm
110mm 110mm
104mm
Figure 4 Dimensions of wall bracket Figure 5 Mark the holes on the wall
Use the wall bracket as the template to mark the position of 4 holes on the wall.
Strip off the AC cable sheath for 50mm,
and strip off the end of L/N/PE each
cable for 8mm.
Insert the positive and negative
connectors into the inverter PV
connectors respectively.
Note:1. Disconnect the AC breaker on the grid
side when connecting the PV connectors.
2. The DC switch must be switched to "OFF"
position.
Note:Inverter must be well-grounded for resisting
surge voltage shock and improving EMI
performance.
Note: Check the local standards for more details.
Insert the expansion tubes into the holes and tighten them, then fix the bracket
: Insert the expansion tubes into the holes and tighten them, then fix the bracket onto the wall with
expansion screws by using a cross screwdriver, as shown in Figure 4-6:
4.2.2 Mounting the inverter
Lift up the inverter with both hands, hang the back rail on the fixed wall bracket carefully, see Figure 4-7 for
details:
onto the wall with expansion screws by using a cross screwdriver. Lift up the
: Insert the expansion tubes into the holes and tighten them, then fix the bracket onto the wall with
expansion screws by using a cross screwdriver, as shown in Figure 4-6:
4.2.2 Mounting the inverter
Lift up the inverter with both hands, hang the back rail on the fixed wall bracket carefully, see Figure 4-7 for
details:
inverter with both hands, hang the back rail on the fixed wall bracket carefully.
: Insert the expansion tubes into the holes and tighten them, then fix the bracket onto the wall with
expansion screws by using a cross screwdriver, as shown in Figure 4-6:
4.2.2 Mounting the inverter
Lift up the inverter with both hands, hang the back rail on the fixed wall bracket carefully, see Figure 4-7 for
details:
Figure 6 Fix the wall bracket Figure 7 Mounting the inverter
Grid Connection Steps
1. Check whether all connectors are correctly connected.
2. Switch the AC breaker on.
3. Turn the DC Switch to "ON" position.
4. The inverter starts self-checking and the screen displays “checking”.
5. After self-checking is completed, the inverter will start to generate power.
The power indicator will be light up and the real-time power will be
displayed on the screen.
Figure 8 Strip off the cable sheath Figure 9 Press the metal terminal
Figure 10 Tighten the DC connector
Figure 11 DC connector connection
Figure 12 Ground terminal connection
Figure 13 Recommended AC cable info Figure 14 AC connector assembly
Wire Diameter:10-14mm
Cable cross-setional area:2.5-4.0mm²
50mm
8mm
Figure 15 AC connector connection
2.5-4.0mm² Length:7mm
+
_
16mm
150mm
PV Terminal×2
Allen-key
20A
25A
32A
32A
40A
40A
4mm²
4mm²
4mm²
4mm²
6mm²
6mm²
Model Copper wire Breaker
STS-3KTL
STS-3.6KTL
STS-4.2KTL
STS-4.6KTL
STS-5KTL
STS-6KTL
3Pin Terminal×1
6Pin Terminal
×1
STS 3~6kW Series
Grid-connected PV Inverter
Single Phase Dual MPPT
Insert the stripped end of L/N/PE cable
into the AC terminal head. Tighten the
screws in the terminal with an Allen-key
to ensure a reliable connection.
An AC breaker must be connected on the AC side of the inverter. The
recommended AC cable and breaker for Sunways STS 3-6kW series
single-phase inverters are shown in the following table:
Connect the AC connector to the inverter AC terminal, and the slight “click”
represents the connection is in place.
Use a 2.5-4mm² PV cable, strip off the cable sheath for 7mm, insert the stripped
head into the metal terminal and use a crimping plier to press it tight, insert the
metal terminal into the corresponding PV connector and tighten the nut.
Inverter×1
Monitoring
Device × 1 (Optional)
①
②
Export limit & control version 2pcs; RS485 and DRED version 1pcs (This
connector is already pre-installed inside the inverter).
DRED version only (This connector is already pre-installed inside the inverter).
Note
①
②
User Manual×1
Quick Guide×1
Inspection Report×1
Quick
Guide
User
Manual
Inspection
Report

WiFi module configuration guide
Monitoring Device Installation
01
02
Monitoring Device Configuration Guide
Insert the module into the COM port at the inverter bottom and pay attention
to the direction of the module when assembling (the side with indicator light
is facing up). A "click" sound heard represents the assembly is in place.
1. WiFi module configuration.
2. Open the Website http://10.10.100.254, see the following picture,
the username and password are all “admin” and click “Sign in”.
Figure 16
Monitoring device installation
Figure 17
Figure 18
Figure 19 Figure 20
A. Insert the WiFi module into the COM
port at the bottom of the inverter and
power on the inverter.
B. Using a laptop or Smartphone and
turn on the WLAN connection.
C. Search for the WiFi name
“sunways-WiFi********” (*represents
the last 8 numbers of the inverter SN)
and click the WiFi name.
D. WiFi connection succeeded as
shown in Figure 17.
For first time use, the WiFi module needs to be configured. Follow-
ing the "WiFi Configuration Guide" below. If the WiFi password has
changed. The WiFi dongle will need to be reconfigured.
Sign in
9. After the reboot, the green indicator on the WiFi module will be always on.
8. The system will show “ Saved Successfully! ”,
click “Restart” to complete the WiFi
configuration.
Figure 21 Figure 22
Figure 23 Figure 24
Figure 25 Figure 26
Figure 27
3. Log in to the "System" interface.
Note: Click the “Chinese/English” in the upper
right corner to switch the interface language.
4. Select "STA setting" and click "Scan".
A list of WiFi network will show up.
5. Select the household's WiFi name and
click "OK".
Note: Only support 2.4GHz WiFi.
6. In the pop-up window, click "OK" to key
in the WiFi password.
7. Input the password in the blank and
click “Save”.
Note: Password is case sensitive.
中文 | English
STA Setting
Scan
OK
Restart
Save
OK
GRID-CONNECTED PV INVERTER
WeChat
admin
SunwaysProSunwaysHome Sunways LinkedIn Sunways
PC Monitor
Suntech Australia
Sunways Technologies Co.,Ltd.
Sunways AU Support:
Phone: +61 2 8188 2450
Website: www.suntech-power.com.au
Email: services@suntech-power.com.au
Address: Suite 1203, Level 12, Tower 2, 475 Victoria Avenue, Chatswood,
NSW 2067 Australia
+61 2 8188 2450
/