Page is loading ...

SOLARFOX® Solar Display Systems Tel. +49 (0) 6058 - 91638-0 Version: 02/2018
Karl-Gross-Str. 3 - 63584 Gründau – Germany Web: www.solar-fox.com
Seite
1/14
INSTALLATION INSTRUCTIONS FOR THE PLANNING
AND INSTALLATION OF A SOLARFOX® DISPLAY
The following information will provide a brief overview for installing a Solarfox® displays. The instructions are
aimed particularly at installers and planners.
Table of contents
1. Time and cost estimate ................................................................................................................................................................................................ 2
2. Work steps ........................................................................................................................................................................................................................... 2
3. Assembly variants in indoor and outdoor applications ............................................................................................................................... 3
4. Connectors ........................................................................................................................................................................................................................... 3
5. Data communication and network integration ................................................................................................................................................ 5
6. Checklist ................................................................................................................................................................................................................................ 6
7. Technical specification for wall mounting and dimensions ..................................................................................................................... 7
8. Interfaces / compatible monitoring systems - version: 03-2016 .................................................................................................... 12
9. Connection of old systems and photovoltaic systems with no data logger .................................................................................. 13
10. Display commissioning with subsequent commissioning of the data source ............................................................................ 14
11. Connection of additional systems and data sources .................................................................................................................................. 14
12. Timing and power saving feature .......................................................................................................................................................................... 14
13. Maintenance ...................................................................................................................................................................................................................... 14
14. Warranty .............................................................................................................................................................................................................................. 14
INSTALLATION INSTRUCTIONS

SOLARFOX® Solar Display Systems Tel. +49 (0) 6058 - 91638-0 Version: 02/2018
Karl-Gross-Str. 3 - 63584 Gründau – Germany Web: www.solar-fox.com
Seite
2/14
1. Time and cost estimate
The following calculation helps you calculate the cost of installing a Solarfox® display and plan. The following
calculation assumes that electricity and network connection (LAN or WLAN) are already available at the
installation location.
Operation
Time
1) Drill four holes and attach the anchor
ca. 10 min
2) Installation of the wall mount plate
ca. 5 min
3) Installation of the display and connection of the power and LAN cables
ca. 5 min
4) Registration of the display under http://setup.solar-fox.com (it
should be performed on any computer via the Web form even before
installation) the access data is immediately sent to you
from the system via email.
ca. 5-10 min
5) Implementation of display setup and configuration of the Solarfox®
display using a USB keyboard
5 min
Summe
ca. 30-35 min
For a quick and smooth installation and commissioning of the Solarfox® display we recommend an
installation in advance to coordinate all necessary information with the IT managers (Administrator). To do
this, use our Checklist (point 11). This ensures that an Internet
connection and all the necessary data are available on site.
2. Work steps
For the installation of a Solarfox® display we recommend the following steps:
1) Registration of the display under http://setup.solar-fox.de with the serial number
2) Preparation of the connections to the installation location
3) Installation of the display
4) Configuration of the display
5) User can access the online management of the display from any computer with Internet access

SOLARFOX® Solar Display Systems Tel. +49 (0) 6058 - 91638-0 Version: 02/2018
Karl-Gross-Str. 3 - 63584 Gründau – Germany Web: www.solar-fox.com
Seite
3/14
3. Assembly variants in indoor and outdoor applications
I) On-site installation options for indoor Solarfox® SF-300 displays:
(1) Wall mounting by a tilting wall mount (included)
(2) Ceiling mounting using a ceiling mount (accessory)
(3) Two leg or one leg stand foot - height 180 cm (accessory)
(4) Stands for display placement E.g. shelf or sideboard (accessory)
(5) Installation in a window - with ceiling or floor stand (accessory)
(6) Mounting with a swivel holder which can be adjusted horizontally and vertically (accessory)
II) On-site installation options for outdoor Solarfox® SF-400 displays:
(1) Wall mounting with wall holder (optional 0 ° or 15 ° angle of inclination)
(2) Display orientation: East, West, North, (southern exposure only with shading)
4. Connectors
• 2 x power socket (230V) (It is also possible to use a multiple socket outlet)
• 1 x RJ45 network (Ethernet) connection (cable: CAT5e)
Instead of a network connection via Ethernet cable, it is possible to use a Wi-Fi network. To do this, Solarfox®
offers an optional WLAN stick with an antenna.
Alternatively, a UMTS router can also be used for a mobile radio connection. A flat rate is required. The traffic
depends on the content and the refresh rate of your slideshow. We recommend therefore a flat rate or a rate
with 1-2 GB volume. (Please check reception quality on the spot!)
The sockets can be provided behind the display in an outlet area of the wall bracket, we recommend two lower
wall sockets. The recess is to install sufficient to the sockets in this way invisible to the wall or behind the
display. On the spot only a wall outlet or power supply connection should exist, the second line can be
powered using a standard extension (PDU).

SOLARFOX® Solar Display Systems Tel. +49 (0) 6058 - 91638-0 Version: 02/2018
Karl-Gross-Str. 3 - 63584 Gründau – Germany Web: www.solar-fox.com
Seite
4/14
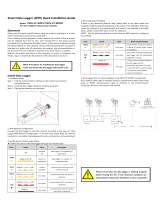
Connection plan Solarfox® display (example)
INTERNET
DATALOGGER OR
INVERTER
Local network
Router & Firewall
Network-Switch
Solarfox-Display
RJ45
(Ethernet)
RJ45 OR WIFI
(Ethernet)
230V Stromanschluß
(bauseits)
DATALOGGER
OR INVERTER
Router
DATALOGGER
OR INVERTER
Router
PV SYSTEM
PV SYSTEM
OPTIONAL ADDITIONAL PV SYSTEMS
The data connection to the photovoltaic system is always done via the Web interface. By so doing, you are
completely independent of location and very flexible as well. (See section 5)

SOLARFOX® Solar Display Systems Tel. +49 (0) 6058 - 91638-0 Version: 02/2018
Karl-Gross-Str. 3 - 63584 Gründau – Germany Web: www.solar-fox.com
Seite
5/14
5. Data communication and network integration
An Internet connection is required for the operation of the Solarfox® display. In order to do this, the display
gets of yield data from the Solarfox® Web server at regular intervals. You will find below all information that
are important for the data connection in company or agency networks. Please ensure a corresponding port
forwarding or port sharing for the listed IP addresses. Other firewall rules are not required. There is only a
data retrieval. A data upload is not on the device. If you change the display content is the data modification on
the part of the Web server. The Solarfox® display gets data from the Internet or from the Solarfox® Web
server only. This ensures high reliability.
Information for the network integration
Network:
LAN, WLAN, UMTS (3G)
Connectivity:
Dynamic IP-Address (DHCP) or static IP-Address
URL:
show.solarshow.net
IP:
212.224.82.131 (Solarfox® Slideshow 2.x)
212.224.82.132 (Solarfox® Slideshow 2.x - Status)
212.224.82.155 (Solarfox® Update Service - Firmware)
Port:
80, 443
Proxy server:
optional

SOLARFOX® Solar Display Systems Tel. +49 (0) 6058 - 91638-0 Version: 02/2018
Karl-Gross-Str. 3 - 63584 Gründau – Germany Web: www.solar-fox.com
Seite
6/14
6. Checklist
Checklist for installing Solarfox® display systems
The following checklist can be used to clarify important framework data, requirements and questions in
advance before installing a Solarfox® display.
Date:
1) General information about the property / building:
Name of the property:
Property number:
Street:
Postal code and city:
Contact person:
Tel:
E-Mail:
2) Information about existing connections for the Solarfox® display
Yes
No
Is there a possibility of accessing the Internet? (LAN/WLAN/etc.)
☐
☐
Does it consist of a power connector with 2 Sockets at installation?
☐
☐
3) Data supervision / monitoring
What energy sources should be visualized? What data loggers / counters are available?
Renewable energy system (PV, wind, cogeneration, etc.)
Power kW
Photovoltaic system:
4) Installation of display and data logger
Yes
No
Has a data logger / monitoring already been installed?
☐
☐
Does the data logger transfer data on the Internet already?
☐
☐
Which data logger or monitoring system is concerned?

SOLARFOX® Solar Display Systems Tel. +49 (0) 6058 - 91638-0 Version: 02/2018
Karl-Gross-Str. 3 - 63584 Gründau – Germany Web: www.solar-fox.com
Seite
7/14
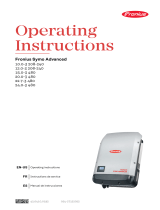
7. Technical specification for wall mounting and dimensions
Wall panel‘s wall mount for Solarfox® SF100 / SF-300 24“ and 32“
The carrier plate is wall mounted and then holds on the display with the inclinable carrier. Please select the
appropriate screws and anchors for your wall (Please pay attention to the weight (see table). These are not
included in delivery.
The compact dimensions of the wall mount allows for an easy and flexible installation of electrical outlets in
the side portion of the mount and thus behind the display, so that they are no longer visible after the display
assembly.
Wall plate’s wall mount for Solarfox® SF-300 43“ to 65“
The carrier plate is wall mounted and then holds the display with inclinable carriers. Please select the
appropriate screws and anchors for your wall. Please pay attention to the weight (see table). These are not
included in delivery. Flush sockets (1 x LAN, 2 x 230 V) can be placed in the two middle free surfaces.
Dimensions in mm

SOLARFOX® Solar Display Systems Tel. +49 (0) 6058 - 91638-0 Version: 02/2018
Karl-Gross-Str. 3 - 63584 Gründau – Germany Web: www.solar-fox.com
Seite
8/14
Solarfox® SF-100 Serie: display dimensions and weight
Display
Length
Width
Depth without
Wall mount
Depth with
Wall mount
Weight
SF-100 24“
554 mm
332 mm
59 mm
79 mm
3,5 kg
SF-100 32“
740 mm
435 mm
84 mm
135 mm
6,5 kg
Solarfox® SF-300 Series: display dimensions and weight
Display
Length
Width
Depth without
Wall mount
Depth with
Wall mount
Weight
SF-300 24“
554 mm
332 mm
59 mm
79 mm
3,6 kg
SF-300 32“
729 mm
429 mm
56 mm
104mm
6,8 kg
SF-300 43“
970 mm
564 mm
39 mm
92 mm
12,4 kg
SF-300 49“
1102 mm
636 mm
39mm
89 mm
17,3 kg
SF-300 55“
1238 mm
715 mm
38,6 mm
97 mm
19,2 kg
SF-300 65“
1457 mm
838 mm
41 mm
90 mm
31,2 kg
SF-300 75“
1682 mm
960 mm
58 mm
108 mm
45,5 kg
Solarfox® SF-400 Series: display- dimensions and weight
Display
Length
Width
Depth without
Wall mount
Depth with
Wall mount *
Weight
SF-300 32“
898 mm
592 mm
170 mm
274 mm
31,8 kg
SF-300 42“
1141 mm
729 mm
170 mm
274 mm
52,4 kg
SF-300 55“
1410 mm
880 mm
170 mm
285 mm
74,2 kg
* The fan covers are also attached on the back. These have the same depth as the wall mountings but are not
shown in the drawings below. They each put 40 mm at the top left and right.
Caution: In case you plan to place the display on a wall, you should check the exact dimensions once again
with our sales. Due to model changes, slight deviations of components may occur temporally.


SOLARFOX® Solar Display Systems Tel. +49 (0) 6058 - 91638-0 Version: 02/2018
Karl-Gross-Str. 3 - 63584 Gründau – Germany Web: www.solar-fox.com
Seite
12/14
8. Interfaces / compatible monitoring systems version: 02-2018
Manufacturer
Datalogger / Monitoring system
Interface via
webportal /
Internet / http
Interface
via FTP
Interface
via email-push
ABB / Power One
All types
Advanced Energy
All types
AS Solar / Enerserve
AS Portal / Enerserve Portal
be4energy
be4unity, be4vision
Benning Solar
Monitoring Portal
CC Log
Monitoring Portal
Danfoss GmbH
Danfoss ComLynx Datalogger (All types)
Ecodata GmbH PowerDog
All types
Enerserve
e.manager
Enphase Energy
Enphase Monitoring Portal
E3/DC
E3/DC Portal
Fronius International GmbH
Fronius Datalogger Web
GreenPowerMonitor
GreenPowerMonitor Platform
Growatt
Growatt Monitoring Portal (All types)
GoodWe
Goodwe Monitoring Portal (All types)
Huawei
Huawei (alle Modelle)
IBC SOLAR AG
IBC Solar SolControl (All types)
KACO new energy GmbH
Powador proLOG (All types)
KOSTAL Solar Electric GmbH
Kostal PIKO (All types)
Mage Solar AG
Mage Securtec (All types)
Meier-NT
ADL-MXS ADL-MXSmini
Meteocontrol GmbH
Web'log (All types)
Oelmaier Technology GmbH
Oelmaier logPAC (All types)
POWER ONE / ABB
POWER-ONE Aurora CDD
PVOutput
Monitoring Portal
QOS Energy
Qantum® web platform
REFUsol GmbH / Advanced Energy
REFUlog (All types)
relatio RT Süd GmbH
Relatio fieldLog (All types)
SAJ Solar
All types
Schueco Sunalyzer
Schueco Sunalyzer Web PR
Siemens AG
Siemens Sinvert PVM 17
Skytron Energy Gmbh
Skylog
SMA AG
Sunny Portal (All types)

SOLARFOX® Solar Display Systems Tel. +49 (0) 6058 - 91638-0 Version: 02/2018
Karl-Gross-Str. 3 - 63584 Gründau – Germany Web: www.solar-fox.com
Seite
13/14
Smart 1
Smart 1 (All types)
Smartblue AG
Smart Control Portal
Solar Edge
Monitoring Portal
Solare Datensysteme GmbH
Solar-Log (All types)
Solarmax
Solarmax MaxWeb XP
Solarworld AG
Solarworld Suntrol Datalogger
Sonnenbatterie
Monitoring Portal
Sunways AG
Sunways (All types)
SynaptiQ / 3E
Monitoring Portal
Tigo Energy
Monitoring Portal
Zeversolar
Monitoring Portal
Attention: All Solarfox® data interface are basically free of charge. There are running costs or fees by
Solarfox®. Portal operators for monitoring expenses depending on the manufacturer and portal. However,
this does not affect the Solarfox® displays. Solarfox® does not charge any ongoing portal fees.
9. Connection of old systems and photovoltaic systems with no data logger
In some cases, there is no connection point of the display on the photovoltaic system in
the desired location or no data can be provided by the system. This can have the following reasons for
example:
1) There is no data logger available
2) There is an old data logger without Internet available
3) The data logger is not fitted with an Internet connection
4) The data logger is the property of system operator and no data access allowed
In the case of the above mentioned constellations, the system data can be simulated also. In this case,
Solarfox® draws on regional radiation values or plant data of a comparable plant and approximately calculates
the yield of your system using an algorithm. Accordingly, we need only the plant size and alignment of the
concerned units. Then the Solarfox® even without a connection to your system can approximately display the
yield data. The deviation of income moves only in the lower single digits. The data can be adapted at any time
but also in our system online identified deviations and edited.

SOLARFOX® Solar Display Systems Tel. +49 (0) 6058 - 91638-0 Version: 02/2018
Karl-Gross-Str. 3 - 63584 Gründau – Germany Web: www.solar-fox.com
Seite
14/14
10. Display commissioning with subsequent commissioning of the data
source
We recommend the installation or online registration of the Solarfox® display only after the data logger has
been put into operation, and if the photovoltaic system has once had to transfer data. This speeds up the
installation process. You can also independently register the Solarfox® display no data source and first unlock
this without data source. Transitional can operate the display no data source or unlock a demo system and
unhide.
11. Connection of additional systems and data sources
After commissioning, you can add any more data sources to a Solarfox® display. You need only an appropriate
data sources package, which must be unlocked. In this way, photovoltaic systems, wind power plants, CHP or
other equipment can be added.
12. Timing and power saving feature
Solarfox® displays have a built-in timer, which allows individual day at a certain time to turn on the display and
turn off at a specified time. In this way the appliance can be adapted energy-efficient to the desired service life.
13. Maintenance
If you are mounting the display on a ceiling or higher than 2 m, you should provide a USB extension cable.
Connect it to the control computer and attach these in form coiled up behind the display. You can use them in
case of a service for connecting a keyboard.
14. Warranty
The warranty is 36 months. Depending on the warranty, a replacement or the processing by Pick-Up & return
service is carried out. More information, please refer to our warranty conditions.
/