30 31
Password
1111
6.3 AC Output Boost for STS-5KTL Inverter
The maxium output power of the residencial single-phase solar system is 5kVA in most of the
states in Australia. Check the local DNSPs or authorities if they allow AC output more than 5kVA.
6.4 Power Quality Response Modes
6.4.1 Power derating for voltage variation (Volt-Watt mode)
This mode can be enabled via the conguration software. Please contact Sunways Technical
Support at service@sunways-tech.com for more information.
6.4.2 Reactive power regulation for voltage variation (Volt-VAr mode)
This mode can be enabled via the conguration software. Please contact Sunways Technical
Support at service@sunways-tech.com for more information.
6.5 Country Code (Safety Code) Setting
Please set "Country code (Safety code)" under the menu "Safety Set" in "Advanced Settings".
6.6 Online Monitoring APP
Customers can check their inverters real-time power, warnings and status through the
App“SunwaysHome”anytime anywhere.
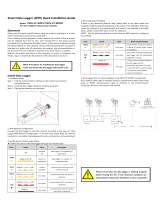
Please follow this ow chart to enable 10% AC output boost:
Advanced
Settings
PV Voltage
PV Current
Export Limit
OFF
OverLoad(AU)
ON
Main Windows
Setting OK
Short press(1s), switch window
Long press(3s), enter the
lower Menu
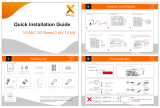
7. Troubleshooting
7.1 Error Message
Sunways STS 3~6kW series single phase inverter is designed in accordance with grid operation
standards, and conform to the requirements of safety and EMC. The inverter had passed a
series of rigorous tests to ensure it runs sustainably and reliably before shipment.
When a fault occurs, the corresponding error message will be shown on the OLED display,
and in this case, the inverter might stop feeding into grid. The fault messages and their
corresponding troubleshooting methods are listed below:
Error Message Troubleshooting
No Display 1. Check whether cables are all rmly connected and DC switch is on.
2. Check whether the input voltage meets the working voltage.
Mains Lost 1. Check whether the mains supply is lost.
2. Check whether the AC breaker and terminals are well connected.
Grid Voltage Fault
1. Check whether the safety regulation setting is correct.
2. Check the voltage of the grid. If the grid voltage exceeds the allowed range of
inverter protection parameters, please contact the local grid company to resolve.
3. Check whether the impendence of the AC cable is too high. Replace with a
thicker AC cable if that is the case.
Grid Frequency Fault
1. Check whether the safety regulation settings are correct.
2. Check the frequency of the grid. If the grid frequency exceeds the allowed range
of inverter protection parameters, please contact the local grid company to resolve.
ISO Over Limitation
1. Check whether the PV panels, cables, and connectors are broken or water
leaked.
2. Check whether there is a reliable inverter grounding line.
GFCI Fault 1. The ground current is too high.
2. Check whether the PV cable has a short circuit to ground.
PV Over Voltage
1. Input voltage is too high.
2. Reduce the number of PV panels to make sure the open-circuit voltage of each
string is lower than the inverter max allowed input voltage.
Inverter Over
Temperature
1. Check whether the inverter is directly exposed to the sunlight.
2. Reduce ambient temperature.
DCI Fault
1. Restart the inverter, wait a moment for inverter recovery.
2. If the fault occurs repeatedly, please contact Sunways.
Bus Voltage Fault
SCI Fault
SPI Fault
E2 Fault
GFCI Device Fault
AC Transducer Fault
Relay Check Fail
Flash Fault
1. Advanced settings can only be changed by qualied professionals with
relevant certications.
2. Check requirements with local NSP before activating 10% AC output boost.
3. Only STS - 5KTL has the option to enable/disable the 10% AC output boost.
4. The default password to access the advanced settings is 1111, applicable to
all on-grid inverters.
Note
Veried OK