Page is loading ...

INSTALLATION INSTRUCTIONS
800.533.3948 • www.barronltg.com
IMPORTANT SAFEGUARDS
READ AND FOLLOW ALL SAFETY INSTRUCTIONS.
When using electrical equipment, basic safety precautions should always be followed including the following:
• DISCONNECT AC POWER SUPPLY BEFORE SERVICING.
• Installation and servicing of this equipment should be performed by qualified service personnel only.
• Ensure that the electrical wiring conforms to the National Electrical Code NEC® and local regulations if applicable.
• Do not mount near gas or electrical heaters.
• Equipment should be mounted in locations and at heights where it will not readily be subjected to tampering by
unauthorized personnel.
• The use of accessory equipment not recommended by the manufacturer may cause an unsafe condition. Any
modification or use of non-original components will void the warranty and product liability.
• Do not use this equipment for other than intended use.
SAVE THESE INSTRUCTIONS!
RCL Series
20070124 REV 1 - 04/18
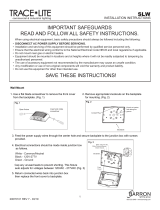
Black Line
White Neutral
Green/Yellow Ground
1. Loosen the screws
on both side of the
mounting plate to
release it.
2. Install the mounting
plate to the ceiling and
route wires through
center hole.
3. Hang fixture from
mounting plate
using the safety clip
then make electrical
connections as shown.
4. Slide fixture back
onto the mounting
plate and re-install
both screws to secure
canopy to the ceiling.
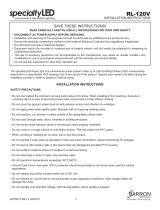
1. Loosen the screws
on both side of the
mounting plate to
release it.
2. Route wires thru 3/4” conduit then
make electrical connections as
shown. Attached pendant
hardware (provided by other) to
fixture.
3. Secure pendant to junction box.
Surface-mounted with recessed junction box
Pendent installation with 3/4” conduit
Line
Neutral
Green/Yellow Ground
Black
White
Mounting plate
Mounting plate

RCL Series
INSTALLATION INSTRUCTIONS
800.533.3948 • www.barronltg.com
20070124 REV 1 - 04/18
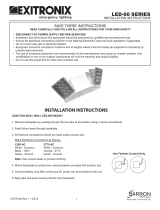
1. Remove lens and metal cover from
unit and set aside. 2. Disconnect wires coming out of
3/4” hole and seal hole with
provided plug. Drill 4 holes in
desired surface area and fix unit
securely with suitable screws.
3. Remove desired 1/2” knockout
and connect conduit.
4. Route wires through 1/2” hole and conduit.
Make electrical connections as shown. 5. Re-install metal cover and lens. Make sure no
wires are pinched or exposed.
Line
Neutral
Green/Yellow Ground
Black
White
1. Remove lens and set aside. 2. Adjust DIP switches according
to programing needs. Refer to
Sensor settings.
3. Re-install lens and test.
Surface-mounted with side-wiring conduit
Sensor set-up

RCL Series
INSTALLATION INSTRUCTIONS
800.533.3948 • www.barronltg.com
20070124 REV 1 - 04/18
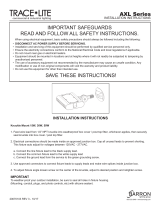
ON
ON
ON
ON
Sensor settings
By selecting the combination on the DIP switches, sensor data can be precisely set for each specific application.
Detection area
Detection area can be reduced by selecting the combination on the DIP switches to fit
precisely each application. Default set at 100%
Hold time
Refers to the time period the lamp remains at 100% illumination after no motion detected.
Default set at 30 seconds.
Stand-by period
Refers to the time period the lamp remains at a low light level before it completely switches
off in the long absence of people. When set to“ ”mode, the low light is maintained until
motion is detected. Default set to 5 minutes.
Daylight sensor
The sensor can be set to only allow the lamp to illuminate below a defined ambient bright-
ness threshold. When set to Disable mode, the daylight sensor will switch on the lamp when
motion is detected regardless of ambient light level. 50lux, 30lux: twilight operation, 10lux,
5lux: darkness operation only. Default set to disable.
Note that daylight sensor is active only when lamp totally switches off.
Stand-by dimming level
The low light level you would like to have after the hold time in the long absence of people.
Default set as 30%.
/