Page is loading ...

INSTALLATION INSTRUCTIONS
800.533.3948 • www.barronltg.com
IMPORTANT SAFEGUARDS
READ AND FOLLOW ALL SAFETY INSTRUCTIONS.
When using electrical equipment, basic safety precautions should always be followed including the following:
• DISCONNECT AC POWER SUPPLY BEFORE SERVICING.
• Installation and servicing of this equipment should be performed by qualified service personnel only.
• Ensure the electricity connections conform to the National Electrical Code and local regulations if applicable.
• Do not mount near gas or electric heaters.
• Equipment should be mounted in locations and at heights where it will not be readily subjected to tampering by
unauthorized personnel.
• The use of accessory equipment not recommended by the manufacturer may cause an unsafe condition.
• Any modification or use of non-original components will void the warranty and product liability.
• Do not use this equipment for other than intended use.
SAVE THESE INSTRUCTIONS!
BAW Series
20070122 REV 2 - 02/19
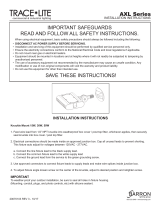
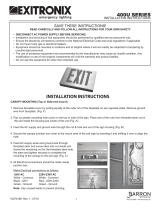
Installation using a Wall Mounted J-box
1. Remove mounting plate from
luminaire. Begin by loosening the
mounting plate set screws at the
bottom of the luminaire housing
(Fig. 1).
2. After loosening the mounting plate
set screws, remove the mounting
plate from the back of the luminaire
housing (Fig. 2).
3. Position the mounting plate over
the existing J-box and attach the
mounting plate to the J-box. If the
mounting plate holes are not aligned
with the J-box holes, drill additional
holes in the mounting plate (Fig. 3).
Mounting plate set
screws
Mounting plate
J-box
Mounting
Plate Drill holes if required
Fig. 1 Fig. 2 Fig. 3
IMPORTANT: Weatherproof your outdoor installation, be sure to seal all holes in the fixture’s housing such as the
mounting, conduit, plugs, sensors, photocontrols, etc. with silicone sealant.

BAW Series
INSTALLATION INSTRUCTIONS
800.533.3948 • www.barronltg.com
20070122 REV 2 - 02/19
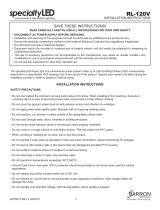
4. To achieve a watertight seal, attach
the luminaire gasket to the back of the
mounting plate. (Fig. 4).
5. After attaching the mounting plate
to the J-box, pull the incoming power
wires through the hole in the
mounting plate (Fig. 5).
6. Connect the incoming supply wires
to the luminaire power wires and then
push them inside the J-box. Refer to
the Wiring Diagram. (Fig. 6)
7. Mount the luminaire housing on the top slots of the
mounting plate, and then retighten the mounting plate
set screws (Fig. 7).
8. Rotate the LED module to the desired position, and
then tighten the LED module set screws (Fig. 8).
Black (-)
Red (+)
LED Driver
Line (Hot)
Neutral
Black
White
Green
Fig. 4 Fig. 6
Fig. 7 Fig. 8
360°
Wiring Diagram
Fig. 5
up
IMPORTANT: Weatherproof your outdoor installation, be sure to seal all holes in the fixture’s housing such as the
mounting, conduit, plugs, sensors, photocontrols, etc. with silicone sealant.
Warning: Forcing the rotation of the LED module in any direction over
360° from the directional stoping point could damage the internal stop
and wire harnesses.

INSTALLATION INSTRUCTIONS
800.533.3948 • www.barronltg.com
20070122 REV 2 - 02/19
BAW Series
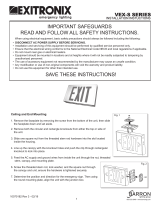
Note: To meet the requirements of DLC certification, the LED modules must be positioned in the same direction.
Luminaires installed with LED modules positioned in different directions will not meet DLC requirements.
Correct Incorrect
Incorrect
/