Page is loading ...

InstallatIon GuIde
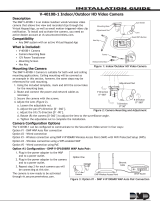
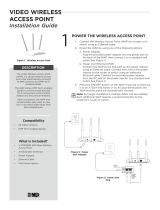
V-4020C-1 Indoor HD Video Camera
Description
The DMP V-4020C-1 is an indoor wired/wireless video
camera that allows live view and recorded clips through
the Virtual Keypad App, as well as email motion-
triggered video clip notication. To install and activate
the camera, you need an active dealer account at
vk.securecomwireless.com.
Compatibility
• Any DMP system with an active Virtual Keypad App
What is Included:
• V-4020C-1 Camera
• 3-Axis Bracket
• 12V Power Transformer
• Mounting Screws
Mounting the Camera
The DMP V-4020C-1 Camera is suitable for both wall and
ceiling mounting applications. Ceiling mounting will be
covered as an example in this section, however, the
same steps may be referenced for wall mounting.
Stand Mount
1. Assemble the 3-Axis bracket.
2. Align the camera body to the bracket, and rotate
the camera body to connect it to the bracket.
Wall or Ceiling Mount
1. Using the included template, mark and drill the
screw holes for the mounting plate.
2. Install the xed plate with the supplied screws.
3. Install the mounting base to the xed plate.
4. Install the camera to the bracket.
5. Adjust the camera angle.
a. Loosen the knob to adjust the pan and tilt angle.
b. After adjusting the camera to the desired
position, tighten the knob (Figure 2).
Camera Conguration Options
The V-4020C-1 can be congured to communicate to the SecureCom Video server in four ways:
Option #1 - DMP WAP Auto Pair connection
Option #2 - Wired connection
Option #3 - Wireless connection using DMP V-IP1006RR Wireless Access Point (WAP) with WiFi Protected Setup (WPS)
Option #4 - Wireless connection using a WPS enabled WAP
Option #5 - Wired connection using PoE
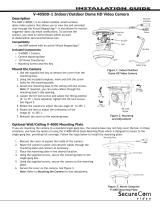
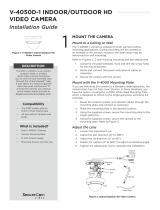
Option #1 Conguration - DMP
V-IP1006RR WAP Auto Pair
:
1. Plug in the power adapter to the WAP
and to a power outlet.
2. Plug in the power adapter to the camera
and to a power outlet.
3. Repeat step 2 for each camera you will
be connecting at this site.
The camera is now ready to be activated
through vk.securecomwireless.com.
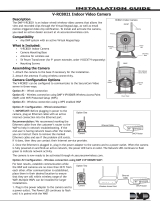
Front View
Rear View
Lens
3-Axis
Bracket
IR LED
WPS/Reset
Button
Ethernet/PoE
Interface
12Vdc
Connection
PIR
Sensor
360°
Figure 2: Camera Mounting and Adjustment
Figure 1: Indoor HD Video Camera
WA
N
LAN4
LA
N3
L
A
N
2
L
AN
1
RESET
DC 3.3V
Ethernet Cable
Option Two
Camera
DHCP Router
WA
N
LAN4
LA
N3
L
A
N
2
L
AN
1
RESET
DC 3.3V
Ethernet
Cable
DHCP Router
Option Three
Option Four
WA
N
LAN4
LA
N3
L
A
N
2
L
AN
1
RESET
DC 3.3V
DHCP & WPS
Router
Camera
Camera
Option Five
Camera
WA
N
LAN4
LA
N3
L
A
N
2
L
AN
1
RESET
DC 3.3V
PoE Switch
Router
1
2
3
4
PoE
Network
WA
N
LAN4
LA
N3
L
A
N
2
L
AN
1
RESET
DC 3.3V
Ethernet
Cable
DHCP Router
Option One
Camera
DMP Wireless Access Point
DMP Wireless Access Point
Figure 3: Option #1 - DMP V-IP1006RR WAP Auto Pair Connection

Digital Monitoring Products V-4020C-I Indoor HD Video Camera Installation Guide
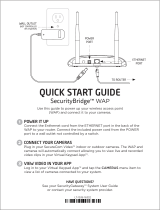
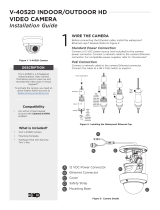
Option #2 Conguration - Wired connection:
1. IMPORTANT: Before plugging in power to the
camera, plug an Ethernet cable with an active
internet connection into the Ethernet port.
Recommendation: It is recommended marking the
Ethernet cable from the customer’s router to the WAP
to help in network troubleshooting. If the end-user
is having network issues after the install, you can
instruct them to remove the marked Ethernet cable
and see if the problem still exists. If it does, then
they can contact their Internet service provider.
2. Once the Ethernet is plugged in, plug in the power adapter to the camera and to the power outlet.
The camera is now ready to be activated through vk.securecomwireless.com.
Option #3 Conguration -
Wireless connection using DMP V-IP1006RR WAP
:
For best results, establish communication while the WAP and cameras are no more than 20 ft from each other. After
communication is established, place them in their desired location to ensure that they are still within wireless range
of the WAP. Multiple WAPs can be installed for larger installations.
1. Plug in the power adapter to the camera and
to a power outlet.
2. Press the WPS button on the back of the WAP
for up to 1.5 seconds. The Security LED will
ash to indicate that the WAP is sending a
security key to the wireless camera.
3. Within 1 minute of pressing the WPS button
on the WAP, press and hold the WPS button for
three seconds on the back of the camera. Once
the camera and router are fully connected, the WPS LED on the WAP turns on solid.
4. Repeat steps 1-3 for each camera you will be connecting at this site.
Note: If using DMP WAP, the cameras will pair automatically. If the cameras do not join, your dealer can use the WPS
steps to pair the camera.
Note: All cameras must be paired with the WAP individually.
The camera is now ready to be activated through vk.securecomwireless.com.
Option #4 Conguration - Wireless connection using a WPS supported router or WAP:
1. Plug in the power adapter to the camera and to a power
outlet.
2. If using a non-DMP WPS-enabled router, refer to the
router’s instruction manual for sending a security key to
the camera.
3. Within 1 minute of sending a security key, press and hold
for three seconds the WPS button on the back of the
camera.
4. Repeat steps 1-3 for each camera you will be connecting at
this site.
Note: All cameras must be paired with the WAP individually.
The camera is now ready to be activated through vk.securecomwireless.com.
Option #5 Conguration - Wired connection using PoE:
Connect the camera to a PoE switch and the PoE switch
to the router.
The camera is now ready to be activated through
vk.securecomwireless.com.
WA
N
LAN4
LA
N3
L
A
N
2
L
AN
1
RESET
DC 3.3V
Ethernet Cable
Option Two
Camera
DHCP Router
WA
N
LAN4
LA
N3
L
A
N
2
L
AN
1
RESET
DC 3.3V
Ethernet
Cable
DHCP Router
Option Three
Option Four
WA
N
LAN4
LA
N3
L
A
N
2
L
AN
1
RESET
DC 3.3V
DHCP & WPS
Router
Camera
Camera
Option Five
Camera
WA
N
LAN4
LA
N3
L
A
N
2
L
AN
1
RESET
DC 3.3V
PoE Switch
Router
1
2
3
4
PoE
Network
WA
N
LAN4
LA
N3
L
A
N
2
L
AN
1
RESET
DC 3.3V
Ethernet
Cable
DHCP Router
Option One
Camera
DMP Wireless Access Point
DMP Wireless Access Point
Figure 5: Option #3 - DMP V-IP1006RR WAP Connection
WA
N
LAN4
LA
N3
L
A
N
2
L
AN
1
RESET
DC 3.3V
Ethernet Cable
Option Two
Camera
DHCP Router
WA
N
LAN4
LA
N3
L
A
N
2
L
AN
1
RESET
DC 3.3V
Ethernet
Cable
DHCP Router
Option Three
Option Four
WA
N
LAN4
LA
N3
L
A
N
2
L
AN
1
RESET
DC 3.3V
DHCP & WPS
Router
Camera
Camera
Option Five
Camera
WA
N
LAN4
LA
N3
L
A
N
2
L
AN
1
RESET
DC 3.3V
PoE Switch
Router
1
2
3
4
PoE
Network
WA
N
LAN4
LA
N3
L
A
N
2
L
AN
1
RESET
DC 3.3V
Ethernet
Cable
DHCP Router
Option One
Camera
DMP Wireless Access Point
DMP Wireless Access Point
Figure 7: Option #5 - Wired Connection using PoE
WA
N
LAN4
LA
N3
L
A
N
2
L
AN
1
RESET
DC 3.3V
Ethernet Cable
Option Two
Camera
DHCP Router
WA
N
LAN4
LA
N3
L
A
N
2
L
AN
1
RESET
DC 3.3V
Ethernet
Cable
DHCP Router
Option Three
Option Four
WA
N
LAN4
LA
N3
L
A
N
2
L
AN
1
RESET
DC 3.3V
DHCP & WPS
Router
Camera
Camera
Option Five
Camera
WA
N
LAN4
LA
N3
L
A
N
2
L
AN
1
RESET
DC 3.3V
PoE Switch
Router
1
2
3
4
PoE
Network
WA
N
LAN4
LA
N3
L
A
N
2
L
AN
1
RESET
DC 3.3V
Ethernet
Cable
DHCP Router
Option One
Camera
DMP Wireless Access Point
DMP Wireless Access Point
Figure 6: Option #4 - Non-DMP WAP Connection
WA
N
LAN4
LA
N3
L
A
N
2
L
AN
1
RESET
DC 3.3V
Ethernet Cable
Option Two
Camera
DHCP Router
WA
N
LAN4
LA
N3
L
A
N
2
L
AN
1
RESET
DC 3.3V
Ethernet
Cable
DHCP Router
Option Three
Option Four
WA
N
LAN4
LA
N3
L
A
N
2
L
AN
1
RESET
DC 3.3V
DHCP & WPS
Router
Camera
Camera
Option Five
Camera
WA
N
LAN4
LA
N3
L
A
N
2
L
AN
1
RESET
DC 3.3V
PoE Switch
Router
1
2
3
4
PoE
Network
WA
N
LAN4
LA
N3
L
A
N
2
L
AN
1
RESET
DC 3.3V
Ethernet
Cable
DHCP Router
Option One
Camera
DMP Wireless Access Point
DMP Wireless Access Point
Figure 4: Option #2 - Wired Connection

V-4020C-I Indoor HD Video Camera Installation Guide Digital Monitoring Products
3
Activating a Camera through SecureCom Wireless
Once communication has been established, a camera can be activated
at vk.securecomwireless.com.
1. Login with your dealer login information at vk.securecomwireless.
com and choose the correct customer.
2. Enable video on the Customer’s system by clicking the edit button to
the right of the account number of that system (Figure 8).
This takes you to the system editing screen (Figure 9). Enable video by
checking the Video checkbox and the Video Verication checkbox also
displays. Click Save and the System Information screen displays.
3. From the System Information screen, press Add New Camera. The
New Camera screen (Figure 10) displays to enter the following
information:
Name: The camera name that displays in the user’s app as well as the
video feed. This can be 16 characters long.
Server Name or MAC Address: This information can be found on the
back of the camera. If the MAC Address is listed, the 12 characters
that can be entered in this eld. If the Server Name is listed, the 8
characters beginning with SC can be entered in this eld.
Time Zone: Select the time zone of the camera location. This is used to
indicate times of the clips.
Flip Image?: Select Yes if the camera image needs to be inverted due to
the mounting position of the camera.
Clips: Enable Clips to allow this camera to record motion-triggered
video clips to the SecureCom Video server.
• Choose Off if you only want this camera to offer a live camera
view through the Virtual Keypad app.
• Choose On if you want this camera to record video clips
any time it detects motion.
• Choose Only When Armed if you want the camera to
record motion-triggered clips only when the system is
armed. When the system is disarmed no clips will be
recorded. This option displays when NO is selected in
Record on alarm.
• Choose Scheduled if you want the camera to record
motion-triggered clips using a time schedule. This
allows you to add a schedule. You can choose to add one
schedule for each day, or you can choose ‘Everyday’ or ‘Weekday’.
Record on alarm: When YES is selected the DMP video camera will
record video clips continuously during the rst minute after the system
is in alarm.
Shortest Time Between Video Clips: Each DMP video camera can record
a video clip as frequently as every 0 minutes (no pause between clips).
To change from the 3-minute default, you can choose the 4 ,5, or 15
minute option.
Once you have chosen the desired settings, clicking Save begins the
activation process for this camera. You will see a status of ‘Activating’
next to the camera name. Press the refresh button to display the
latest status. When the camera is active and communicating with the
SecureCom Video Server, it will have a status of Active.
Figure 8: Customer Information Screen
Figure 9: System Editing Screen
Figure 10: New Camera Screen

800-641-4282
www.dmp.com 2500 North Partnership Boulevard
LT-1415 © 2015 Digital Monitoring Products, Inc.
15435
Figure 12: Editing User Screen
Viewing the Camera
To view the camera during installation, select
the camera name on the Camera Prole Screen
(Figure 11) to display a live video feed for 60
minutes. This is to allow positioning of the
camera to the user’s desired location. Once the
60 minutes has past, the camera feed can only
be seen through the user’s Virtual Keypad App.
Emailing Clips
If the user would like to be emailed video clips,
enable this option in the Editing User screen
(Figure 12). From the Customer Information
Screen (Figure 8) click on the email address
to go to the Editing User screen. Checking
the Email video clips box sends emails with a
video clip attachment to the App user any time
the video camera records a video clip to the
SecureCom video server.
Specications
Sensor and Lens:
Image Sensor 1/3” CMOS Sensor
PIR Sensor Direction Range 32.5 feet
Video Compression H.264, M-JPEG
Resolution 720p (1280 x 960)
Frame Rate Up to 30 frames per
second.
Network:
Wireless IEEE 802.11b/g/n;
WEP64/128 bit,
WPA/WPA2 Personal, WPS
Hardware:
Power Consumption 12V DC / Max 8W
Dimensions (HxWxD):
Camera with stand 2.85” x 3.60” x 5.17”
Weight:
Camera with stand 14.1 oz
Figure 11: Camera Prole Screen
/