Page is loading ...


© 2016 Digital Monitoring Products, Inc.
Information furnished by DMP Video is believed to be accurate and reliable.
This information is subject to change without notice.
FCC Information
FCC compliance: Please take attention that changes or modication not expressly approved by the party responsible for
compliance could void the user’s authority to operate the equipment.
Note: This product has been tested and found to comply with the limits for a Class B digital device, pursuant to Part 15 of the
FCC Rules. These limits are designed to provide reasonable protection against harmful interference in a residential installation.
This product generates, uses, and can radiate radio frequency energy and, if not installed and used in accordance with the
instruction, may cause harmful interference to radio communications. If this product does cause harmful interference to radio
or television reception, which can be determined by turning the equipment off and on, the user is encouraged to try to correct
the interference by one or more of the following measures:
- Reorient or relocate the receiving antenna.
- Increase the separation between the equipment and receiver.
- Connect the equipment into an outlet on a circuit different than that to which the receiver
is connected.
- Consult the dealer or an experienced radio/TV technician for help.
This equipment should be installed and operated with a minimum distance 20cm between the radiator
and your body.

SecureCom Video 8-Channel NVR User Guide i
V-4408D SecureCom Video 8-Channel NVR User Guide
Table of Contents
Section Page
Introduction ..............................................................1
What is an SecureCom Video 8-Channel NVR .........................1
Live View ...................................................................2
Quick Setting Toolbar ................................................3
Right-click Menu Options ..........................................4
Menu ..................................................................................6
Playback ..............................................................................6
Export .................................................................................8
Manual ..............................................................................10
Conguration .....................................................................10
Maintenance ......................................................................10

ii SecureCom Video 8-Channel NVR User Guide

SecureCom Video 8-Channel NVR User Guide 1
Introduction
What is an SecureCom Video 8-Channel NVR
The SecureCom Video 8-Channel NVR is a Network Video Recording device with 1 TB of video storage. The eight channels
represent eight network/IP SecureCom Video or ONVIF compatible cameras.
Power up the SecureCom Video 8-Channel NVR. Live View displays what each camera is viewing, providing you with the
latest in computer technology to create the most advanced, user friendly, wireless/wired security camera system available.
With a monitor and mouse plugged into your NVR, you can view exactly what your cameras are recording in real time. You
can zoom in using the Digital Image tool to get a closer look at what might seem suspicious.
Live View can be set to auto-switch so the Live View viewing monitor can cycle through all the cameras and display each
camera view on a monitor. Clips can be created and exported and sent to interested persons.
As part of our commitment to reducing false alarms, we would like to encourage you to read this guide thoroughly. All the
information contained here can help you quickly, and comfortably, learn the SecureCom Video 8-Channel NVR operation.

2 SecureCom Video 8-Channel NVR User Guide
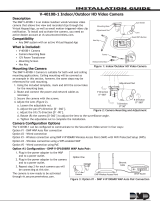
Live View
• Live View is the rst display you see when the NVR powers
up.
• All cameras connected to the NVR whether wireless or wired,
will display immediately.
• The default live view screen is 1+7 multi screen view (see
below).
• Live View displays each camera in real time. One or more
camera screens may be displayed at one time.
• Right click using your mouse to view the Right-click Menu
options. Right Click Menu options provide a way for you to
change the layout of your Live View screen. See the Right
Click Menu options sections for a ful list of options.
• In Live View, when you click on a camera window a Quick
Setting toolbar displays at the bottom or top of the window.
Figure 1: Live View

SecureCom Video 8-Channel NVR User Guide 3
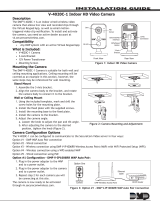
Quick Setting Toolbar
The Quick Setting toolbar displays when a left-click on mouse is made on the Live View camera viewing window. The toolbar
displays at the top or bottom of the selected camera screen. The tools when clicked controls the current active window.
Tools that are unavailable will be grayed out.
Start and Stop Recording
Starts and stops continuous recording manually on the active camera. While watching a live camera view, you can start or
stop recording on individual cameras. All recordings are available to view in Playback from the Right-Click Menu. When the
camera is recording, the Recording icon will turn red. Click the icon again to stop recording and the icon turns gray.
Instant Playback
Click on the Instant Playback button to view up to ve minutes of instant playback of the camera recording. Only recording
les recorded during the last ve minutes on the camera will be played back. If no recording is found, it means the camera
was not recording during the last ve minutes. The Instant Playback Slider toolbar (See Figure 3 above) takes the place of
the Quick Setting Toolbar. The slider can be moved forward or backward to move the recording forward and backward for
the last ve minutes of recorded video. Place the mouse over the slider and hold down the left mouse button to move the
slider on the Instant Playback Slider bar.
Digital Zoom
Digital Zoom expands the camera to a full window with a picture in picture window in the bottom right-hand corner of the
screen. In the picture in picture window is a zoom box, that can be moved by holding down the left mouse button and
dragging the box to a specic area. Right-click to return back to Live View.
Close
Closes the Live View toolbar.
Figure 2: Quick Setting Toolbar Figure 3: Instant Playback Slider

4 SecureCom Video 8-Channel NVR User Guide
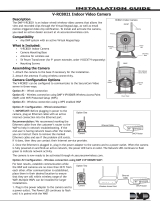
Right-click Menu Options
Right-click on the mouse anywhere on the Live View screen and the Right-click Menu displays as shown in Figure 4.
Menu Option Description
Menu Displays a menu window with the following available options:
Playback, Export, Manual, Maintenance and Shutdown. These options
can control one or more cameras at the same time.
The following Right-click Menu items changes the Live View viewing window. All
camera displays are in real time live view.
Single Screen Single full screen window of the selected camera from the drop-
down list.
Multi-screen Displays multiple camera views for live-viewing.
2 * 2 = First four cameras are displayed in the four corners of the
screen. Two along the top half of the monitor screen and two along
the bottom half.
1 + 5 = One camera display is larger than the other ve camera
displays on the same screen of the monitor.
1 + 7 = One camera display is larger than the other 7 camera
displays on the same screen of the monitor.
3 * 3 = First six cameras are displayed. Three along the top half
of the monitor screen and three along the bottom half.
Previous Screen Changes from the current Live View camera to the previous camera in the list. If you have 8 cameras and
you are watching 4 (2*2 multi-screen view) the previous 4 cameras will display.
Next Screen Changes from the current active camera to the next camera in the list.
Start Auto-Switch Enables or disables the auto-switch cycles of viewing of the active cameras.
Figure 4: Right-Click Menu Options

SecureCom Video 8-Channel NVR User Guide 5
Playback Short cut to the Menu>Playback option. Allows playback of previous recordings of one or more cameras
set for a specied date and time. See Playback in the Menu Section.
PTZ Control Only available on Pan and Tilt cameras. A set of controls will display providing the ability to move the
camera view up, down, right and left. Clicking on the light bulb icon will toggle turning on or off the
camera LED light if the camera supports a light.
Output Mode Four options in viewing Live View cameras on your monitor is supported:
• Standard
• Bright
• Gentle
• Vivid
Figure 5: PTZ Controls for Pan and Tilt Cameras

6 SecureCom Video 8-Channel NVR User Guide
Menu
The Menu displays with the following available options: Playback, Export, Manual, Conguration, Maintenance, and Shutdown.
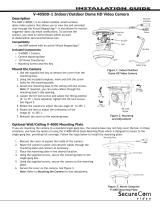
Playback
Playback menu option plays back video recorded on the NVR by each camera. You can view one or all
cameras simultaneously by marking the check boxes of the cameras from the list on the right hand side
of the screen. The timeline bar along the bottom displays a blue indicator of when the camera(s) were
recording on that specic day.
The bottom right hand side of the playback screen is a calendar. Each highlighted date on the
calendar, a recording is available of the selected cameras for playback. Use the mouse to click any
point of the timeline bar or drag the timeline bar to locate a specic time.
Two tool bars are located along the bottom of the playback screen just below the timeline.
Figure 6: Menu
Figure 7: Playback Menu
Figure 8: Camera list and
calendar of recordings
Figure 9: Playback video toolbar and controls

SecureCom Video 8-Channel NVR User Guide 7
Playback Toolbar Detailed Explanation:
Start/Stop Clipping
This icon toggles to start and stop clipping creation. Click once to start the clipping then click it again to
stop the clipping. When you leave the playback camera view, an Attention displays a message “There are
some video clips to be saved. Do you want to save them now? Yes No”
Choose Yes and the export menu opens to save the clips to an external USB ash or hard disk drive (HDD)
device. You can name the clips prior to saving.
Digital Zoom
Opens the Digital Zoom camera window. Use the mouse to draw a red triangle and the image within it
will be enlarged up to 16 times.
Reverse Playback
Plays the selected video in reverse.
Stop Click to stop playback of video.
Pause Pause playback of video.
30 Secs Playback The video goes back 30 seconds and begins playing.
30 Secs Forward The video moves forward 30 seconds and begins playing.
Speed Down Click to slow down the speed of the play back of the video recording.
Speed Up
Click to speed up the play back of the video recording.
Previous Day Click to view previous day of recorded video.
Next Day Click to view the next day of recorded video.

8 SecureCom Video 8-Channel NVR User Guide
Export
Recorded clips can be exported to USB ash drives and hard disk drives (HDD). Enter the search criteria to nd the recordings
to export then click Export.
IP Camera Click the check box next to IP Camera to select or deselect all cameras. Click the check box
next each camera to select or deselect each camera individually.
Record Type All - All types of recordings on the NVR
Continuous - Camera is continuously recording 24/7
Motion - Camera is only recording if motion is detected
Manual - Camera started recording when you clicked on record from Live View.
Figure 10: Export

SecureCom Video 8-Channel NVR User Guide 9
File Type All - All recordings of the camera
Unlocked - Only unlocked recordings
Locked - Only locked recordings
Start Time Start date and time of the recording you are searching for on the NVR
End Time End date and time of the recording you are searching for on the NVR
Click on Search at the bottom of the screen. A list of all the recordings meeting the selected criteria will be listed a.
Check mark the recorded clips then click on Quick Export to choose a USB device and export le type to save the
selected clip(s).
Figure 11: USB Device Options and Export As File Type

10 SecureCom Video 8-Channel NVR User Guide
Manual
Allows you to turn on and off recording for each or all cameras. In Figure 12, next to IP Camera, the setting is set to OFF.
This button can be toggled on and off for manual recording for all cameras. The button next to a camera number such as
D1, D2, etc. displays the status of each camera. The bright green ON means the camera is recording by a schedule. The
bright yellow ON means the camera is recording manually. OFF means the camera is not recording.
Configuration
Password option allows you to change the password temporarily. When the NVR connects to SecureCom Wireless dealer
admin site, the password will change back to the password created by the dealer.
Maintenance
System Info - Lists information about the NVR for viewing purposes only.
Device Info - Lists Device Name, Model, Serial Number, and Firmware Version of the NVR.
Camera - Lists the camera number and name, status, motion detection, video tamper and video loss.
Record - Lists camera number and name, recording status, stream type, frame rate, bit rate, resolution,
record type, encoding parameters, and redundant record.
Alarm - NO. (IP address), Alarm Name:, Alarm Type, and Triggered Camera
WIFI - Lists SSID, Working Channel, Security Mode, Default Gateway, Version
LAN - Lists the NIC, LAN, and IPv4 Subnet Mask settings
Figure 12: Manual Recording Controls
Figure 13: Maintenance>System Info Header

SecureCom Video 8-Channel NVR User Guide 11
Log Information - A log of operation, exception and information of the NVR are stored in log les, which can be
viewed and exported at any time. Log Information helps you search for log les with the listed criteria check
marked.
1. Set the search conditions to rene your search, including Start Time, End Time, Major Type and Minor Type.
2. Click Search to start search log les.
3. The matched log les will be displayed. Click the Green check mark button or double click to view its detailed
information. You can also click the play button on the tool bar along the bottom to view the les if available.
Figure 14: Log Search Criteria

12 SecureCom Video 8-Channel NVR User Guide
Net Detect
NetTrafc - You can view the sending rate and receiving rate information on the monitor. The trafc data is
refreshed every second.
Network Detection - You can obtain network connecting status of the NVR through the network detection
function, including network delay, packet loss, etc.
1. Click the Network Detection tab to enter the Network Detection menu.
2. Enter the destination address in the text eld of Destination Address.
3. Click Test button to start testing network delay and packet loss. The testing result pops up on the
window. If the testing is failed, the error message box will pop up as will.
Network Status - You can also check the network status and quick set the network parameters.
Figure 15: Network Detection Test

SecureCom Video 8-Channel NVR User Guide 13
Network Stat.
1. Check the bandwidth of IP Camera, bandwidth of Net Receive Idle and bandwidth of Net Send Idle.
2. You can click Refresh to get the newest status.
Figure 16: Network Status Information on the NVR

14 SecureCom Video 8-Channel NVR User Guide

SecureCom Video 8-Channel NVR User Guide 15

LT-1461
16525
/