Page is loading ...

V-4030PT-1 INDOOR PAN/TILT
VIDEO CAMERA
Installation Guide
DESCRIPTION
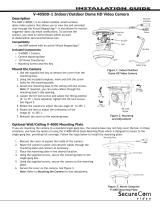
Figure 1: Pan/Tilt
HD Video Camera
Using a DMP Wireless Access Point (WAP)
Wireless Connection
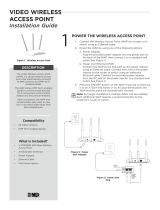
1. Plug the 5V power supply into the port on the
back of the camera, then connect it to a power
outlet.
2. Press and hold the WPS button on the back of
the WAP for 2 seconds.
3. Press and hold the WPS button on the side of the
camera for three seconds. Once the camera and
WAP are connected, the LED on the WAP turns
on steady.
Auto Pair
1. Verify the WAP is powered.
2. Plug the 5V power supply into the port on the
back of the camera, then connect it to a power
outlet. Auto-pairing begins immediately. Once
the camera and WAP are connected, the LED on
the WAP turns on steady.
1
The DMP V-4030PT-1 is an indoor
video camera that allows for
viewing live and recorded video
clips using the Virtual Keypad
TM
App
and VirtualKeypad.com. The camera
can be connected using Wi-Fi or a
wired connection.
The camera can be set up to
automatically record when armed,
when motion is detected, or when
the system is in alarm, giving
immediate notification to the user.
Compatibility
All DMP systems. Users should have
the Virtual Keypad App or should be
using VirtualKeypad.com.
What is Included?
• V-4030PT-1 Camera
• Camera Mounting Base
• Hardware Pack and Mounting
Template
• 5V Power Supply
• V-IP1006RR WAP (Optional)
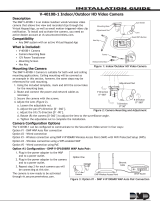
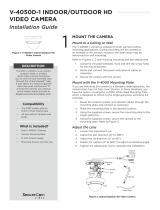
MOUNT THE CAMERA
1. Use the included template to mark the screw holes for
the camera mounting base.
2. Secure the camera mounting base onto the surface
using the supplied screws.
3. Route any power and network cables through the
mounting base and connected them as necessary.
4. Secure the camera to the mounting base. See Figure 2.
POWER AND CONNECT THE CAMERA
2
Pan
Tilt
Figure 2: Mount the Camera
Open
Lock
Mounting
Base

Designed, engineered,
and manufactured in
Springfield, Missouri using
U.S. and global components.
LT-1416 17525
INTRUSION • FIRE • ACCESS • NETWORKS
2500 North Partnership Boulevard
Springfield, Missouri 65803-8877
1-866-266-2826 | dmp.com
Specifications
Sensor and Lens
• Image Sensor 1/3” CMOS Sensor
• PIR Sensor Direction Range 30 - 60 ft.
• Video Compression H.264, Mpeg4/M-JPEG
• Resolution 720p (1280 x 960)
• Frame Rate Up to 30 frames per second
Wireless Network
• IEEE 802.11b/g/n
• WEP64/128 bit
• WPA/WPA2 Personal, WPS
Hardware
• Power Consumption 5VDC / Max 8W
• Dimensions (Camera with stand) 5.51” H x 4.49” W
Weight
Camera with stand 3.09 lbs
Using a Non-DMP WAP
1. Plug the 5V power supply into the port on the back of the camera, then connect it to a power outlet.
2. Refer to the non-DMP WAP’s instruction manual to place the WAP in WPS mode.
3. After placing the non-DMP WAP in WPS mode, press and hold the WPS button on the side of the
camera for three seconds. Refer to the non-DMP WAP for connection confirmation information.
Using a Hard-Wired Connection
1. Ensure there is Internet connection.
2. Plug an Ethernet cable into the LAN port on the back of the camera, then connect the other end to the
router or switch.
3. Plug the 5V power supply into the port on the back of the camera, then connect it to a power outlet.
3
1. Once the camera is online, log in to the Dealer Admin Site (dealeradmin.securecomwireless.
com).
2. Click Customers in the navigation menu and select the customer’s system account number.
3. Click Edit at the bottom of the screen.
4. Click the Video checkbox to enable video, and click Save.
5. Click Add New Camera on the System Information screen.
6. Enter the 12-digit MAC Address found on the camera.
7. Click Next and enter in the following information:
• Name: Enter the name the user wants displayed in the app and video feed.
• Time Zone: Select the time zone of the installation location.
• Daylight Savings Time (DST): Enable to observe daylight savings time changes.
• Flip Image?: Enable if the camera image needs to be inverted due to the mounting
position of the camera.
• Video Quality: Change for low-bandwidth installations to allow for increased reliability
of video streaming.
• Record on Alarm: Enable to allow the camera to record video clips continuously during
the first minute of an alarm.
• Clips: Select to allow the camera to record motion-triggered video clips to SecureCom.
The user’s options are described below:
Never Record Motion: The camera displays a live feed through the Virtual Keypad
TM
App, but will not automatically record clips.
Always Record Motion: The camera records video clips any time it detects motion.
Record Motion When Armed: The camera records motion-triggered clips only when
the system is armed. When the system is disarmed, no clips will be automatically
recorded.
8. Click Save. When the camera is active and communicating with SecureCom, it will have an
Active status.
ACTIVATE THE CAMERA
/