Digital Monitoring Products V-4022C Indoor Cube Camera Installation & Programming Guides
- Category
- Bridges & repeaters
- Type
- Installation & Programming Guides
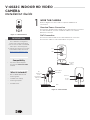
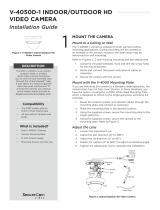
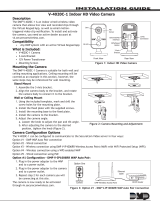
Digital Monitoring Products V-4022C Indoor Cube Camera is a high-definition video camera that allows users to view live and recorded video clips in Virtual Keypad™. The camera is easy to install and can be mounted on a wall or ceiling. It also has a built-in microphone and speaker, so you can use it for two-way communication.
The V-4022C Indoor Cube Camera is a great way to keep an eye on your home or business. It can be used to deter crime, monitor activity, and even communicate with visitors. The camera is also compatible with any active Virtual Keypad account, so you can view your camera feed from anywhere with an internet connection.


-
 1
1
-
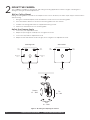 2
2
-
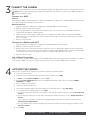 3
3
-
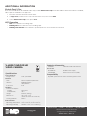 4
4


Digital Monitoring Products V-4022C Indoor Cube Camera Installation & Programming Guides
- Category
- Bridges & repeaters
- Type
- Installation & Programming Guides
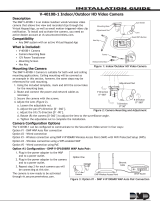
Digital Monitoring Products V-4022C Indoor Cube Camera is a high-definition video camera that allows users to view live and recorded video clips in Virtual Keypad™. The camera is easy to install and can be mounted on a wall or ceiling. It also has a built-in microphone and speaker, so you can use it for two-way communication.
The V-4022C Indoor Cube Camera is a great way to keep an eye on your home or business. It can be used to deter crime, monitor activity, and even communicate with visitors. The camera is also compatible with any active Virtual Keypad account, so you can view your camera feed from anywhere with an internet connection.
Ask a question and I''ll find the answer in the document
Finding information in a document is now easier with AI
Related papers
-
 Digital Monitoring Products V4050D-1 Installation guide
-
 Digital Monitoring Products WAP Quick start guide
-
 Digital Monitoring Products Wireless Access Point Installation & Programming Guides
-
 Digital Monitoring Products V-4052D Dome Camera Installation & Programming Guides
-
 DMP Electronics VRC8221 Installation guide
-
 DMP Electronics V-OC810 Installation guide
-
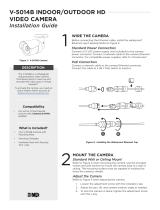 Digital Monitoring Products V‐5014B Indoor/Outdoor HD Video Camera Installation & Programming Guides
-
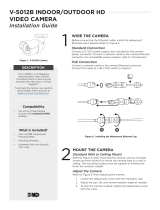 Digital Monitoring Products V-5012B Indoor/Outdoor HD Video Camera Installation & Programming Guides
-
 Digital Monitoring Products V-6022WC Wireless Cube Camera Installation & Programming Guides
-
 DMP Electronics V-RC8021 Installation guide


Other documents
-
 DMP Electronics V-4050D-1 Installation guide
-
 DMP Electronics V-4020C-1 Installation guide
-
 DMP Electronics V-4010B-1 Installation guide
-
 DMP V-6022WC User guide
-
DMP V-6052WD User guide
-
 DMP Electronics V-4030PT-1 Installation guide
-
D-Link DCS-5222L User manual
-
-
-
D-Link DCS-5010L User manual


