Page is loading ...

V‑4052D INDOOR/OUTDOOR HD
VIDEO CAMERA
Installation Guide
DESCRIPTION
The V‑4052Dis a 2Megapixel
indoor/outdoor video camera
that allows users to view live and
recorded HD video clips in Virtual
Keypad™.
To activate the camera, you need an
active Dealer Admin account at
dealer.securecomwireless.com.
Compatibility
• Any active Virtual Keypad
account with Cameras & NVRs
enabled
What is Included?
• One V‑4052D Camera
• Mounting Template
• Hardware Pack with Security
Torx L‑Key
1WIRE THE CAMERA
Before connecting the Ethernet cable, install the waterproof
Ethernet cap if desired. Refer to Figure 2.
Standard Power Connection
Connect a 12 VDC power source (not included) to the camera
power connector. Connect a network cable to the camera Ethernet
connector. For compatible power supplies, refer to “Accessories”.
PoE Connection
Connect a network cable to the camera Ethernet connector.
Connect the cable to a 48 V PoE switch or injector.
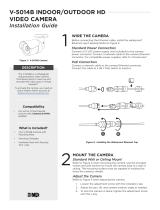
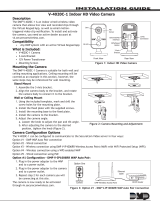
Figure 1: V‑4052D Camera
A
B
D
E
C
A
B
C
D
E
12 VDC Power Connector
Ethernet Connector
Cover
Safety Strap
Mounting Base
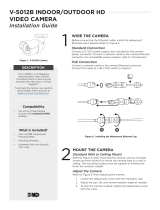
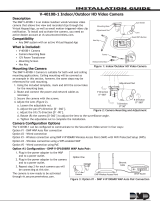
Figure 2: Installing the Waterproof Ethernet Cap
1/4
Turn
Turn
until
tight
Wire
and
crimp,
then
plug in
to camera
Ethernet
connector
Seat
o-Ring
between
cover and
Ethernet
connector,
then slip
cover over
connector
O-Ring
Cover
End Cap
From router/switch
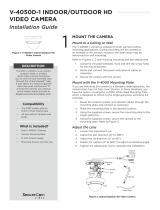
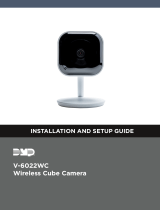
Figure 3: Camera Details

2 V‑4052D INSTALLATION GUIDE | DIGITAL MONITORING PRODUCTS
Pan
0° - 355°
Tilt
0° - 75°
Figure 4: Standard Mounting
MOUNT THE CAMERA
2Refer to Figure 4 during mounting.
1. Use a the included L‑key to remove the camera’s cover.
2. Secure the camera to a wall or ceiling with the included screws.
3. Use the camera’s 3‑axis gimbal to adjust the pan and tilt angle as needed.
4. Reattach the cover.
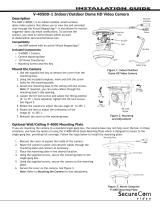
Adjust the Camera
Refer to Figure 5 when adjusting the camera.
1. If necessary, use a the included L‑key to remove the camera’s cover.
2. Use the camera’s 3‑axis gimbal to adjust the pan and tilt angle as needed.
3. Reattach the cover.
Figure 5: Adjusting the Camera

V‑4052D INSTALLATION GUIDE | DIGITAL MONITORING PRODUCTS 3
ADDITIONAL INFORMATION
Enable Email Clips
If the user would like to be emailed video clips, enable Email Video Clips in Dealer Admin. When this feature is enabled,
video clips are emailed to the app user.
1. Find the customer and select their name.
2. In App Users, find the user’s row, select the More icon, then select Edit.
3. Select Email Video Clips, then press Save.
ACTIVATE THE CAMERA
After you’ve connected the camera to the network, activate it in Dealer Admin.
1. Log in to Dealer Admin.
2. Find the customer and select the relevant account number. Select Edit.
3. In Video, enable Cameras & NVR, then press Save.
4. On the System Information page, press the Add Camera button and enter the camera’s SERIAL
NUMBER. Press Next.
5. Enter a name for the camera.
6. Select the camera’s time zone.
7. If the camera image needs to be inverted due to mounting position, toggle Flip Image.
8. To configure clip recording options, select Clips.
a. If you don’t want this camera to record video clips any time it detects motion, choose Never Record
Motion.
b. If you want this camera to record video clips any time it detects motion, choose Always Record on
Motion.
c. If you want the camera to record motion‑triggered clips only when the system is armed, choose
Record Motion When Armed.
d. To record video clips continuously during the first minute after the system triggers an alarm, select
Record on Alarm.
9. Press Save.
3

LT-2176 22212
V-4052D INDOOR/
OUTDOOR HD VIDEO
CAMERA
Specifications
Sensor and Lens
Image Sensor 2MP, 1/2.8” CMOS
Network
LAN 802.3 compliant 10/100 LAN
IP Protocol IPv4
Hardware
Power Consumption
12 VDC Max 6.5 W
PoE (802.3af) 48 V
Weight 1.30 lbs (0.61 kg)
Dimensions 4.37” x 3.24” (11.1 cm x 8.24 cm)
Housing Material Impact Resistant Aluminum
Environmental
Operating Temperature -22 °F to 140 °F (-30 °C to 60 °C)
Operating Humidity Less than 95% RH, non-condensing
Ordering Information
V-4052D 2MP Indoor/Outdoor HD Video Camera
Accessories
371-500B-W 12 VDC Power Supply
Compatibility
Any DMP system with an active Virtual Keypad™ account
INTRUSION • FIRE • ACCESS • NETWORKS
2500 North Partnership Boulevard
Springfield, Missouri 65803-8877
800.641.4282 | DMP.com
© 2022
/