
Datacard
®
SR200 & SR300 Card Printers
and LM200 & LM300 Laminators
User’s Guide
March 2014
Part No. 527473-001, Rev. A

ii
Notice
Pleasedonotattempttooperateorrepairthisequipmentwithoutadequatetraining.
Anyuse,operationorrepairyouperformthatisnotinaccordancewiththeinformation
containedinthisdocumentationisatyourownrisk.
TheseproductsconformtoregulatoryrequirementsasspecifiedinNorthAmerica,
Europe,andAsia.
Referto “ComplianceStatements”onpageiiiformoreinformation.
Trademark Acknowledgments
DatacardisaregisteredtrademarkandservicemarkofDataCardCorporationinthe
UnitedStatesandothercountries.
MasterCardisaregisteredtrademarkofMasterCardInternationalIncorporated.
VisaisaregisteredtrademarkofVisaInternationalServiceAssociation.
AdobeandReaderareregisteredtrademarksofAdobeSystemsIncorporated.
Windowsisaregisteredtrademarkof
MicrosoftCorporation.
Allotherproductnamesarethepropertyoftheirrespectiveowners.
Proprietary Notice
ThedesignandinformationcontainedinthesematerialsareprotectedbyUSand
internationalcopyrightlaws.
AlldrawingsandinformationhereinarethepropertyofDataCardCorporation.All
unauthorizeduseandreproductionisprohibited.
DatacardGroup
11111BrenRoa dWest
Minnetonka,MN55343‐9015
Phone:952‐933‐1223
Fax:952‐933‐7971
www.datacard.com
©2014DataCardCorporation.Allrightsres e r ved .

iii
Compliance Statements
Liability Statement
TheWARNINGandCAUTIONlabelshavebeenplacedontheequipmentforyoursafety.Pleasedo
notattempttooperateorrepairthisequipmentwithoutadequatetraining.Anyuse,operationor
repairincontraventionofthisdocumentisatyourownrisk.
Safety
AllDatacard®productsarebuilttostrictsafetyspecificationsinaccordancewithCSA/UL60950‐1
requirementsandtheLowVo ltageDirective2006/95/EC.
Therefore,safetyissuespertainingtooperationandrepairofDatacard®equipmentareprimarily
environmentalandhumaninterface.
Thefollowingbasicsafetytipsaregiventoensuresafeinstallation,operationand
maintenanceof
Datacard®equipment.
• Connectequipmenttoagroundedpowersource.Donotdefeatorbypassthegroundlead.
• Placetheequipmentonastablesurface(table)andensurefloorsintheworkareaaredryand
non‐slip.
• Knowthelocationofequipmentbranchcircuitinterruptersorcircuitbreakersandhowtoturn
themonandoffincaseofemergency.
• Knowthelocationoffireextinguishersandhowtousethem.ABCtypeextinguishersmaybe
usedonelectricalfires.
• Knowlocalproceduresforfirstaidandemergencyassistanceatthecustomerfacility.
• Useadequatelightingattheequipmentlocation.
• Maintaintherecommendedtemperatureandhumidityrangeintheequipmentarea.

iv
Regulatory Compliance
Notice for USA (FCC notice)
ThisequipmenthasbeentestedandfoundtocomplywiththelimitsforClassAcomputing
devices,pursuanttoPart15ofFCCrules.Theselimitsaredesignedtoprovidereasonable
protectionagainstharmfulinterferencewhentheequipmentisoperatedinacommercial
environment.Thisequipmentgenerates,uses,andcanradiate
radiofrequencyenergy.Ifthis
equipmentisnotinstalledandusedinaccordancewiththisinstructionmanual,itmaycause
harmfulinterferencetoradiocommunications.Operationofthisequipmentinaresidentialarea
islikelytocauseharmfulinterferenceinwhichcasetheuserwillberequiredtocorrectthe
interferenceattheirownexpense.Changesormodificationsnotexpresslyapprovedbytheparty
responsibleforcompliancecouldvoidtheuser'sauthoritytooperatetheequipment.
Notice for Canada
ThisDevicecomplieswithIndustryCanadaLicense‐exemptRSSstandard(s).Operationissubject
tothefollowingtwoconditions:1)thisdevicemaynotcauseinterference,and2)thisdevice
mustacceptanyinterference,includinginterferencethatmaycauseundesiredoperationofthe
device.
CetappareilestconformeavecIndustrieCanadaRSS
standardexemptesdelicence(s).Son
fonctionnementestsoumisauxdeuxconditionssuivantes:1)cedispositifnepeutcauserdes
interférences,et2)cetappareildoitacceptertouteinterférence,ycomprislesinterférencesqui
peuventcauserunmauvaisfonctionnementdudispositif.
Notice for Europe
TheEUDeclarationofConformitycanbefoundonDatacard.com
WeherebycertifythatthisprintercomplieswithEMCDirective2004/108/EC,R&TTEDirective
1999/5/EC,andtheEURoHSDirectiveEUDirective2011/65/EC.ThisprinterconformstoClassAof
EN55022andtoEN301489‐5.Operationofthisequipment
inaresidentialenvironmentmay
possiblycauseinterference.Intheeventofinterference,theusers,attheir
ownexpense,willbe
requiredtotakewhatevermea sur esarenecessarytocorrecttheproblem.
Notice for China (Simplified Chinese)
为 级产 环
该产 线
这
对

v
Notice for Taiwan (Traditional Chinese)
Notice for Japan
JapaneseVoluntaryControlCouncilforInterference(VCCI)classAstatement
Korea Communications Commission (KCC) statement
California Proposition 65 Compliance
WARNING: This product contains chemicals, including lead, known to the State of California to
cause cancer, and birth defects or other reproductive harm. Wash hands after handling.

vi
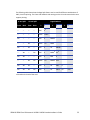
Revision Log
Datacard
®
SR200 & SR300 Card Printers and
LM200 & LM300 Laminators User’s Guide
Revision Date DescriptionofChanges
AMarch2014 Firstreleaseofthisdocument

vii
Table of Contents
Chapter 1: Introduction. . . . . . . . . . . . . . . . . . . . . . . . . . . . . . . . . . . . . . . . . . . . . . . . . . . . . 1
About This Manual . . . . . . . . . . . . . . . . . . . . . . . . . . . . . . . . . . . . . . . . . . . . . . . . . . . . . . . . . . . . . 1
Related Documentation. . . . . . . . . . . . . . . . . . . . . . . . . . . . . . . . . . . . . . . . . . . . . . . . . . . . . . . . . 1
Whom to Call for Assistance . . . . . . . . . . . . . . . . . . . . . . . . . . . . . . . . . . . . . . . . . . . . . . . . . . . . . 2
About the Card Printers . . . . . . . . . . . . . . . . . . . . . . . . . . . . . . . . . . . . . . . . . . . . . . . . . . . . . . . . . 2
The Front and Right Side of the Card Printer . . . . . . . . . . . . . . . . . . . . . . . . . . . . . . . . . . . . . 3
The Back of the Card Printer . . . . . . . . . . . . . . . . . . . . . . . . . . . . . . . . . . . . . . . . . . . . . . . . . .4
The Inside and Left Side of the Card Printer. . . . . . . . . . . . . . . . . . . . . . . . . . . . . . . . . . . . . . 5
Card Printer LCD Panel. . . . . . . . . . . . . . . . . . . . . . . . . . . . . . . . . . . . . . . . . . . . . . . . . . . . . . . 6
About the Laminators . . . . . . . . . . . . . . . . . . . . . . . . . . . . . . . . . . . . . . . . . . . . . . . . . . . . . . . . . . . 7
The Front and Rear of the Laminator . . . . . . . . . . . . . . . . . . . . . . . . . . . . . . . . . . . . . . . . . . . 7
The Left and Right Sides of the Laminator . . . . . . . . . . . . . . . . . . . . . . . . . . . . . . . . . . . . . . . 8
The Inside of the Laminator . . . . . . . . . . . . . . . . . . . . . . . . . . . . . . . . . . . . . . . . . . . . . . . . . . .9
Laminator Operator Panel . . . . . . . . . . . . . . . . . . . . . . . . . . . . . . . . . . . . . . . . . . . . . . . . . . . 10
Chapter 2: Using the Printer and Laminator . . . . . . . . . . . . . . . . . . . . . . . . . . . . . . . . . . . 11
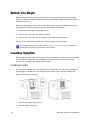
Before You Begin. . . . . . . . . . . . . . . . . . . . . . . . . . . . . . . . . . . . . . . . . . . . . . . . . . . . . . . . . . . . . . 12
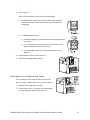
Loading Supplies. . . . . . . . . . . . . . . . . . . . . . . . . . . . . . . . . . . . . . . . . . . . . . . . . . . . . . . . . . . . . . 12
Loading Cards . . . . . . . . . . . . . . . . . . . . . . . . . . . . . . . . . . . . . . . . . . . . . . . . . . . . . . . . . . . . . 12
Removing the Card Hopper and Cards. . . . . . . . . . . . . . . . . . . . . . . . . . . . . . . . . . . . . 13
Replacing the Card Hopper . . . . . . . . . . . . . . . . . . . . . . . . . . . . . . . . . . . . . . . . . . . . . . 14
Adjusting Card Thickness . . . . . . . . . . . . . . . . . . . . . . . . . . . . . . . . . . . . . . . . . . . . . . . . . 14
Loading an Ink Ribbon . . . . . . . . . . . . . . . . . . . . . . . . . . . . . . . . . . . . . . . . . . . . . . . . . . . . . .15
Loading Retransfer Film. . . . . . . . . . . . . . . . . . . . . . . . . . . . . . . . . . . . . . . . . . . . . . . . . . . . . . 16
Loading Top-Side Laminate Film . . . . . . . . . . . . . . . . . . . . . . . . . . . . . . . . . . . . . . . . . . . . . . 17
Loading Bottom-Side Laminate Film . . . . . . . . . . . . . . . . . . . . . . . . . . . . . . . . . . . . . . . . . . . 18
Powering On . . . . . . . . . . . . . . . . . . . . . . . . . . . . . . . . . . . . . . . . . . . . . . . . . . . . . . . . . . . . . . . . . 19
Checking the PC Connection . . . . . . . . . . . . . . . . . . . . . . . . . . . . . . . . . . . . . . . . . . . . . . . . 19
Checking the Laminator Connection. . . . . . . . . . . . . . . . . . . . . . . . . . . . . . . . . . . . . . . . . . 20
Powering On the Laminator. . . . . . . . . . . . . . . . . . . . . . . . . . . . . . . . . . . . . . . . . . . . . . . . . . 20
Powering On the Printer . . . . . . . . . . . . . . . . . . . . . . . . . . . . . . . . . . . . . . . . . . . . . . . . . . . . .21
Initializing the Ink Ribbon and Retransfer Film . . . . . . . . . . . . . . . . . . . . . . . . . . . . . . . . . . . 22
Printing Cards . . . . . . . . . . . . . . . . . . . . . . . . . . . . . . . . . . . . . . . . . . . . . . . . . . . . . . . . . . . . . . . . 22
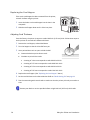
Printing Cards Using ID Software . . . . . . . . . . . . . . . . . . . . . . . . . . . . . . . . . . . . . . . . . . . . . . 23
Printing Cards From a PC Application. . . . . . . . . . . . . . . . . . . . . . . . . . . . . . . . . . . . . . . . . . 23
Chapter 3: Printer and Laminator Settings. . . . . . . . . . . . . . . . . . . . . . . . . . . . . . . . . . . . . 25
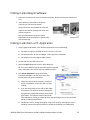
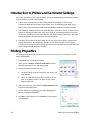
Introduction to Printer and Laminator Settings. . . . . . . . . . . . . . . . . . . . . . . . . . . . . . . . . . . . . . 26
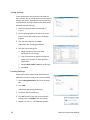
Printing Properties . . . . . . . . . . . . . . . . . . . . . . . . . . . . . . . . . . . . . . . . . . . . . . . . . . . . . . . . . . . . . 26
Printing Preferences . . . . . . . . . . . . . . . . . . . . . . . . . . . . . . . . . . . . . . . . . . . . . . . . . . . . . . . . . . . 27
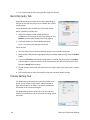
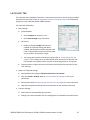
Setup Tab . . . . . . . . . . . . . . . . . . . . . . . . . . . . . . . . . . . . . . . . . . . . . . . . . . . . . . . . . . . . . . . . . 27
Saving Settings. . . . . . . . . . . . . . . . . . . . . . . . . . . . . . . . . . . . . . . . . . . . . . . . . . . . . . . . . . 28

viii
Loading Settings . . . . . . . . . . . . . . . . . . . . . . . . . . . . . . . . . . . . . . . . . . . . . . . . . . . . . . . .28
Print Tab . . . . . . . . . . . . . . . . . . . . . . . . . . . . . . . . . . . . . . . . . . . . . . . . . . . . . . . . . . . . . . . . . . 29
Look Up Table . . . . . . . . . . . . . . . . . . . . . . . . . . . . . . . . . . . . . . . . . . . . . . . . . . . . . . . . . .29
Color Adjustment . . . . . . . . . . . . . . . . . . . . . . . . . . . . . . . . . . . . . . . . . . . . . . . . . . . . . . . 30
UV Ink . . . . . . . . . . . . . . . . . . . . . . . . . . . . . . . . . . . . . . . . . . . . . . . . . . . . . . . . . . . . . . . . . 30
Priority of Data. . . . . . . . . . . . . . . . . . . . . . . . . . . . . . . . . . . . . . . . . . . . . . . . . . . . . . . . . . 32
Page Split . . . . . . . . . . . . . . . . . . . . . . . . . . . . . . . . . . . . . . . . . . . . . . . . . . . . . . . . . . . . . . 32
Security Erase. . . . . . . . . . . . . . . . . . . . . . . . . . . . . . . . . . . . . . . . . . . . . . . . . . . . . . . . . . . 34
Printing Area Settings . . . . . . . . . . . . . . . . . . . . . . . . . . . . . . . . . . . . . . . . . . . . . . . . . . . . 35
Printer Settings . . . . . . . . . . . . . . . . . . . . . . . . . . . . . . . . . . . . . . . . . . . . . . . . . . . . . . . . . . 36
Encode Tab . . . . . . . . . . . . . . . . . . . . . . . . . . . . . . . . . . . . . . . . . . . . . . . . . . . . . . . . . . . . . . . 36
Laminate Tab. . . . . . . . . . . . . . . . . . . . . . . . . . . . . . . . . . . . . . . . . . . . . . . . . . . . . . . . . . . . . . 36
Configuration Tab . . . . . . . . . . . . . . . . . . . . . . . . . . . . . . . . . . . . . . . . . . . . . . . . . . . . . . . . . . 37
Version Tab. . . . . . . . . . . . . . . . . . . . . . . . . . . . . . . . . . . . . . . . . . . . . . . . . . . . . . . . . . . . . . . . 37
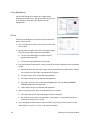
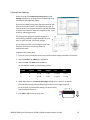
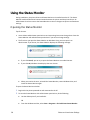
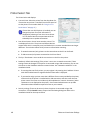
Using the Status Monitor. . . . . . . . . . . . . . . . . . . . . . . . . . . . . . . . . . . . . . . . . . . . . . . . . . . . . . . . 38
Opening the Status Monitor. . . . . . . . . . . . . . . . . . . . . . . . . . . . . . . . . . . . . . . . . . . . . . . . . . 38
Closing the Status Monitor . . . . . . . . . . . . . . . . . . . . . . . . . . . . . . . . . . . . . . . . . . . . . . . . . . .40
Printer Status Tab . . . . . . . . . . . . . . . . . . . . . . . . . . . . . . . . . . . . . . . . . . . . . . . . . . . . . . . . . . . 40
Printer Setting Tab . . . . . . . . . . . . . . . . . . . . . . . . . . . . . . . . . . . . . . . . . . . . . . . . . . . . . . . . . . 42
Retransfer Tab . . . . . . . . . . . . . . . . . . . . . . . . . . . . . . . . . . . . . . . . . . . . . . . . . . . . . . . . . . . . . 43
Bend Remedy Tab. . . . . . . . . . . . . . . . . . . . . . . . . . . . . . . . . . . . . . . . . . . . . . . . . . . . . . . . . . 44
Media Setting Tab . . . . . . . . . . . . . . . . . . . . . . . . . . . . . . . . . . . . . . . . . . . . . . . . . . . . . . . . . . 44
Property Tab. . . . . . . . . . . . . . . . . . . . . . . . . . . . . . . . . . . . . . . . . . . . . . . . . . . . . . . . . . . . . . . 46
Laminator Tab . . . . . . . . . . . . . . . . . . . . . . . . . . . . . . . . . . . . . . . . . . . . . . . . . . . . . . . . . . . . . 47
Printer Select Tab. . . . . . . . . . . . . . . . . . . . . . . . . . . . . . . . . . . . . . . . . . . . . . . . . . . . . . . . . . . 48
Security Lock Tab. . . . . . . . . . . . . . . . . . . . . . . . . . . . . . . . . . . . . . . . . . . . . . . . . . . . . . . . . . . 49
Setting up Security . . . . . . . . . . . . . . . . . . . . . . . . . . . . . . . . . . . . . . . . . . . . . . . . . . . . . . 49
Locking the Printer. . . . . . . . . . . . . . . . . . . . . . . . . . . . . . . . . . . . . . . . . . . . . . . . . . . . . . .49
Unlocking the Printer. . . . . . . . . . . . . . . . . . . . . . . . . . . . . . . . . . . . . . . . . . . . . . . . . . . . . 50
Deleting the Password . . . . . . . . . . . . . . . . . . . . . . . . . . . . . . . . . . . . . . . . . . . . . . . . . . . 50
Changing the Password. . . . . . . . . . . . . . . . . . . . . . . . . . . . . . . . . . . . . . . . . . . . . . . . . . 50
Others Tab . . . . . . . . . . . . . . . . . . . . . . . . . . . . . . . . . . . . . . . . . . . . . . . . . . . . . . . . . . . . . . . . 51
Status Monitor Messages . . . . . . . . . . . . . . . . . . . . . . . . . . . . . . . . . . . . . . . . . . . . . . . . . . . . 51
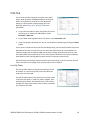
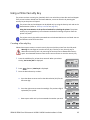
Using the LCD Panel Menus . . . . . . . . . . . . . . . . . . . . . . . . . . . . . . . . . . . . . . . . . . . . . . . . . . . . . 51
Connection and Lock Symbols . . . . . . . . . . . . . . . . . . . . . . . . . . . . . . . . . . . . . . . . . . . . . . . 52
Key Functions . . . . . . . . . . . . . . . . . . . . . . . . . . . . . . . . . . . . . . . . . . . . . . . . . . . . . . . . . . . . . . 52
Example: Using the Printer LCD Menus . . . . . . . . . . . . . . . . . . . . . . . . . . . . . . . . . . . . . . . . . 53
LCD Panel Menu Structure . . . . . . . . . . . . . . . . . . . . . . . . . . . . . . . . . . . . . . . . . . . . . . . . . . . 54
LCD Panel Menu Description . . . . . . . . . . . . . . . . . . . . . . . . . . . . . . . . . . . . . . . . . . . . . . . . . 55
Using a Printer Security Key. . . . . . . . . . . . . . . . . . . . . . . . . . . . . . . . . . . . . . . . . . . . . . . . . . .63
Creating a Security Key . . . . . . . . . . . . . . . . . . . . . . . . . . . . . . . . . . . . . . . . . . . . . . . . . . 63
Unlocking the Printer. . . . . . . . . . . . . . . . . . . . . . . . . . . . . . . . . . . . . . . . . . . . . . . . . . . . . 64
Deleting the Security Key. . . . . . . . . . . . . . . . . . . . . . . . . . . . . . . . . . . . . . . . . . . . . . . . . 65
Applying a Second Retransfer Layer. . . . . . . . . . . . . . . . . . . . . . . . . . . . . . . . . . . . . . . . . . . 66
Laminator Status and Settings . . . . . . . . . . . . . . . . . . . . . . . . . . . . . . . . . . . . . . . . . . . . . . . . . . . 68

ix
Displaying Laminator Status on the LCD Panel . . . . . . . . . . . . . . . . . . . . . . . . . . . . . . . . . . 68
Suggested Laminator Settings . . . . . . . . . . . . . . . . . . . . . . . . . . . . . . . . . . . . . . . . . . . . . . . . 69
Double-Sided Printing and Double-Sided Lamination . . . . . . . . . . . . . . . . . . . . . . . . . 70
Single-Sided Printing and Bottom-Side Lamination. . . . . . . . . . . . . . . . . . . . . . . . . . . . 70
Chapter 4: Maintaining Your Printer and Laminator. . . . . . . . . . . . . . . . . . . . . . . . . . . . . 71
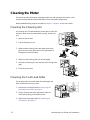
Cleaning the Printer . . . . . . . . . . . . . . . . . . . . . . . . . . . . . . . . . . . . . . . . . . . . . . . . . . . . . . . . . . . 72
Cleaning the Cleaning Unit . . . . . . . . . . . . . . . . . . . . . . . . . . . . . . . . . . . . . . . . . . . . . . . . . . 72
Cleaning the Card Load Roller . . . . . . . . . . . . . . . . . . . . . . . . . . . . . . . . . . . . . . . . . . . . . . . 72
Cleaning the Card Feed Rollers and Heat Roller. . . . . . . . . . . . . . . . . . . . . . . . . . . . . . . . . 73
Cleaning the Magnetic Head . . . . . . . . . . . . . . . . . . . . . . . . . . . . . . . . . . . . . . . . . . . . . . . . 74
Cleaning the Thermal Head. . . . . . . . . . . . . . . . . . . . . . . . . . . . . . . . . . . . . . . . . . . . . . . . . . 75
Cleaning the Printer Fan Filter . . . . . . . . . . . . . . . . . . . . . . . . . . . . . . . . . . . . . . . . . . . . . . . . 75
Cleaning the Laminator . . . . . . . . . . . . . . . . . . . . . . . . . . . . . . . . . . . . . . . . . . . . . . . . . . . . . . . . 76
Cleaning the Card Feed Rollers and Heat Roller. . . . . . . . . . . . . . . . . . . . . . . . . . . . . . . . . 76
Cleaning the Internal Components . . . . . . . . . . . . . . . . . . . . . . . . . . . . . . . . . . . . . . . . . . . 77
Cleaning the Laminator Cartridge . . . . . . . . . . . . . . . . . . . . . . . . . . . . . . . . . . . . . . . . . . . . 78
Cleaning the Fan Filter . . . . . . . . . . . . . . . . . . . . . . . . . . . . . . . . . . . . . . . . . . . . . . . . . . . . . . 78
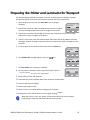
Preparing the Printer and Laminator for Transport. . . . . . . . . . . . . . . . . . . . . . . . . . . . . . . . . . . 79
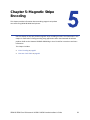
Chapter 5: Magnetic Stripe Encoding. . . . . . . . . . . . . . . . . . . . . . . . . . . . . . . . . . . . . . . . 81
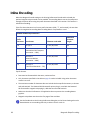
Inline Encoding . . . . . . . . . . . . . . . . . . . . . . . . . . . . . . . . . . . . . . . . . . . . . . . . . . . . . . . . . . . . . . . 82
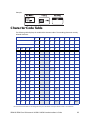
Character Code Table . . . . . . . . . . . . . . . . . . . . . . . . . . . . . . . . . . . . . . . . . . . . . . . . . . . . . . . . . 83
Start and End Sentinels. . . . . . . . . . . . . . . . . . . . . . . . . . . . . . . . . . . . . . . . . . . . . . . . . . . . . . . . . 84
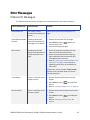
Chapter 6: Error Recovery and Messages. . . . . . . . . . . . . . . . . . . . . . . . . . . . . . . . . . . . . 85
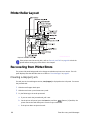
Printer Roller Layout . . . . . . . . . . . . . . . . . . . . . . . . . . . . . . . . . . . . . . . . . . . . . . . . . . . . . . . . . . . 86
Recovering from Printer Errors . . . . . . . . . . . . . . . . . . . . . . . . . . . . . . . . . . . . . . . . . . . . . . . . . . . 86
Clearing a Hopper Jam . . . . . . . . . . . . . . . . . . . . . . . . . . . . . . . . . . . . . . . . . . . . . . . . . . . . . 86
Clearing a Transfer Jam . . . . . . . . . . . . . . . . . . . . . . . . . . . . . . . . . . . . . . . . . . . . . . . . . . . . .87
Clearing a Turnover Jam . . . . . . . . . . . . . . . . . . . . . . . . . . . . . . . . . . . . . . . . . . . . . . . . . . . . 88
Clearing a Retransfer Section Jam . . . . . . . . . . . . . . . . . . . . . . . . . . . . . . . . . . . . . . . . . . . . 89
Mending a Broken Ink Ribbon or Retransfer Film . . . . . . . . . . . . . . . . . . . . . . . . . . . . . . . . . 90
Laminator Roller Layout . . . . . . . . . . . . . . . . . . . . . . . . . . . . . . . . . . . . . . . . . . . . . . . . . . . . . . . . 91
Recovering from Laminator Errors. . . . . . . . . . . . . . . . . . . . . . . . . . . . . . . . . . . . . . . . . . . . . . . . 91
Clearing a Card Jam . . . . . . . . . . . . . . . . . . . . . . . . . . . . . . . . . . . . . . . . . . . . . . . . . . . . . . .91
Adjusting the Patch Position. . . . . . . . . . . . . . . . . . . . . . . . . . . . . . . . . . . . . . . . . . . . . . . . . . 93
Changing the Front-to-Back Position . . . . . . . . . . . . . . . . . . . . . . . . . . . . . . . . . . . . . . . 93
Changing the Left-to-Right Position . . . . . . . . . . . . . . . . . . . . . . . . . . . . . . . . . . . . . . . . 94
Correcting Card Warping. . . . . . . . . . . . . . . . . . . . . . . . . . . . . . . . . . . . . . . . . . . . . . . . . . . . 94
Error Messages . . . . . . . . . . . . . . . . . . . . . . . . . . . . . . . . . . . . . . . . . . . . . . . . . . . . . . . . . . . . . . . 95
Printer LCD Messages . . . . . . . . . . . . . . . . . . . . . . . . . . . . . . . . . . . . . . . . . . . . . . . . . . . . . . . 95
Laminator LCD Messages. . . . . . . . . . . . . . . . . . . . . . . . . . . . . . . . . . . . . . . . . . . . . . . . . . . . 99
Chapter 7: Supplies . . . . . . . . . . . . . . . . . . . . . . . . . . . . . . . . . . . . . . . . . . . . . . . . . . . . . . 105

x
Ink Ribbon, Retransfer Film, and Laminator Material. . . . . . . . . . . . . . . . . . . . . . . . . . . . . 106
Cards. . . . . . . . . . . . . . . . . . . . . . . . . . . . . . . . . . . . . . . . . . . . . . . . . . . . . . . . . . . . . . . . . . . . 107
Cleaning Supplies . . . . . . . . . . . . . . . . . . . . . . . . . . . . . . . . . . . . . . . . . . . . . . . . . . . . . . . . . 109
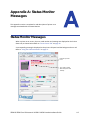
Appendix A: Status Monitor Messages . . . . . . . . . . . . . . . . . . . . . . . . . . . . . . . . . . . . . . . . . . . . . A-1
Status Monitor Messages . . . . . . . . . . . . . . . . . . . . . . . . . . . . . . . . . . . . . . . . . . . . . . . . . . . . . . A-1
Appendix B: Site Requirements and Specifications . . . . . . . . . . . . . . . . . . . . . . . . . . . . . . . . . . . B-1
Site and Usage Guidelines. . . . . . . . . . . . . . . . . . . . . . . . . . . . . . . . . . . . . . . . . . . . . . . . . . . . . B-2
Operating Environment . . . . . . . . . . . . . . . . . . . . . . . . . . . . . . . . . . . . . . . . . . . . . . . . . . . . B-2
Ventilation Clearance . . . . . . . . . . . . . . . . . . . . . . . . . . . . . . . . . . . . . . . . . . . . . . . . . . . . . B-3
Storage Environment for Supplies . . . . . . . . . . . . . . . . . . . . . . . . . . . . . . . . . . . . . . . . . . . . B-3
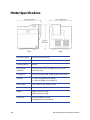
Printer Specifications . . . . . . . . . . . . . . . . . . . . . . . . . . . . . . . . . . . . . . . . . . . . . . . . . . . . . . . . . B-4
Operating Environment Conditions. . . . . . . . . . . . . . . . . . . . . . . . . . . . . . . . . . . . . . . . . . . B-5
Storage Environment Conditions. . . . . . . . . . . . . . . . . . . . . . . . . . . . . . . . . . . . . . . . . . . . . B-5
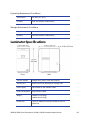
Laminator Specifications . . . . . . . . . . . . . . . . . . . . . . . . . . . . . . . . . . . . . . . . . . . . . . . . . . . . . . B-5
Operating Environment Conditions. . . . . . . . . . . . . . . . . . . . . . . . . . . . . . . . . . . . . . . . . . . B-6
Storage Environment Conditions. . . . . . . . . . . . . . . . . . . . . . . . . . . . . . . . . . . . . . . . . . . . . B-6

SR200 & SR300 Card Printers and LM200 & LM300 Laminators User’s Guide 1
Chapter 1: Introduction
ThischaptercontainsinformationaboutthisUser’ sGuide.Italso
providesanintroductiontotheSR200&SR300cardprintersand
optionalLM200&LM300laminators.
About This Manual
ThismanualprovidesdetailedinstructionsforoperatingtheSR200&SR300cardprintersandthe
optionalLM200&LM300cardlaminators.
Chapter 1:"Introduction”—Providesbasicinformationabouttheprinterandlaminator,
includingdrawingsandpartsidentification.
Chapter 2:"UsingthePrinterandLaminator”—Providesinstructionsforusingthecard
printerandlaminatortocreatecards.
Chapter 3:"PrinterandLaminatorSettings”—Providesinstructionsforviewingandchanging
printersettings,includingprintingpreferencesandprinterproperties,aswellaslaminator
settings.
Chapter 4:"MaintainingYourPrinterandLaminator”—Containsproceduresforcleaning,
maintaining,andtransportingthecardprinterandlaminator.
Chapter 5:"MagneticStripeEncoding”—Containsinformationaboutusingthecardprinterto
encodemagneticstripeinformationoncards.
Chapter 6:"ErrorRecoveryandMessages”—Containsproceduresforclearingcardjams,
mendingbrokenribbons,adjustinglaminatorpatchposition,andcorrectingcardwarping.
Chapter 7:"Supplies”—Specifiessuppliesneededforthecardprinterandlaminator.Ordering
information(includingpartnumbers,whereapplicable)isprovidedforinkri bbons,retransfer
film,laminatormaterial,cards,andcleaningsupplies.
Related Documentation
RefertotheDatacardSR200&SR300CardPrintersandLM200&LM300LaminatorsInstallation
Guideforinformationaboutinstallingandsettinguptheprinterandlaminator.
RefertotheDatacardSR200&SR300Plug‐inUser’sGuide forinformationaboutusingthecard
printerwithDatacardIDsoftwareapplications.The
manualincludesinstructionsforcreating
magneticstripeen codingconfigurations.

2 Introduction
Whom to Call for Assistance
Ifyouworkwith aDatacard‐authorizeddealer,distributor,orvalue‐addedreseller,contactthem
forassistance.Avalue‐addedresellerprovidestheSR200&SR300cardprintersandLM200&
LM300laminatorsaspartofanoverallsystem.
Ifanycontentsoftheboxaremissing,contactyourDatacard‐authorized
dealer,distributor,or
reseller.IfyoupurchasedyourprinterdirectlyfromDatacard,contacttheDatacardCustomer
CareCenterinyourregion:
Makesurethatyouhavetheprinterserialnumber,locatedonthebackoftheprinter,and
optionallaminatorserialnumber,whenyoucall.
About the Card Printers
TheSR200&SR300cardprintersuseretransferprintingtechnologytoproducehigh‐quality,
edge‐to‐edgeprintingonavarietyofPVCandnon‐PVCcardsurfaces,includingcontactand
contactlesssmartcards.
Theretransferprintingprocessusestworibbontypes—acolorinkribbonandaretransferfilm.
Theink
ribbonisavailableinYMCK(yellow,magenta,cyan,andblack)orYMCKKformat.First,the
printerusesthesecolorstoprintimagesontheretransferfilm.Thentheheatrollertransfersthe
resultingimageontoacard.
Aninkribbonwithapeel‐off(PO)panelisavailabletoremoveretransfer
materialfromareasof
thecardcontainingamagneticstripe,hologram,orsmartcardchip.Theprintercanalsousea
YMCKribbonwithaUVretransferpanel.
TheSR200printercanprintononesideofacardandtheSR300printercanprintononeorboth
sidesof
thecard.TheSR300printercanalsobeequippedwithoptionalmagneticstripeand
smartcardcapabilities.
TheSR300printerhastheabilitytoapplytwolayersofretransfermaterial(InTMfilm)oneither
sideoronbothsidesofacard,foraddeddurability.(Referto“ApplyingaSecondRetransfer
Layer”onpage 66.)
Americas +1800.328.3996or952.988.2316
Europe,Middle East,
andAfrica
+441489555627
AsiaPacific +85228210121

SR200 & SR300 Card Printers and LM200 & LM300 Laminators User’s Guide 3
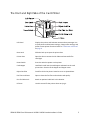
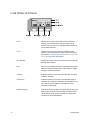
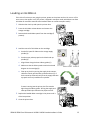
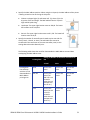
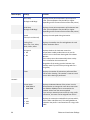
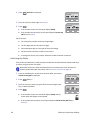
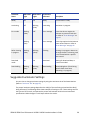
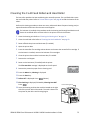
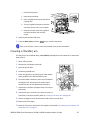
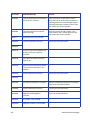
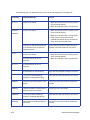
The Front and Right Side of the Card Printer
LCDPanel Displaystheprinterandlaminatorstatusandanymessages.Use
toviewprinterandlaminatorsettings,changesomesettings,and
performsomeprinterfunctions.Referto“CardPrinterLCDPanel”
onpage 6.
DoorLatch Slidethelatchuptoopentheprinterdoor.
PrinterDoor Openthedoortoaccesstheink
ribbonandretransferfilm
cartridges.
PowerSwitch Pre sstheswitchtopowerontheprinter.
CardHopper Loadblankcardsintothecardhopperandattachtothecard
printerhere.Consistsofthehopperandhoppercover.
RejectCardSlot Cardsforwhichtheprinterissuedanerrorareejectedhere.
FanFilterandCover Opentocleanthefanfilterandmaintaincardquality.
PortforCableLock Attachanoptionalcablelockinthislocation.
LiftArea Usethisareatolifttheprinterwhencarryingit.

4 Introduction
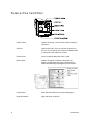
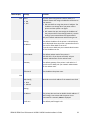
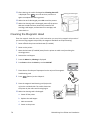
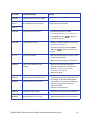
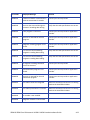
The Back of the Card Printer
ProductLabel Indicatestheprinter’sserialnumbermodelandagency
information.
USBPort USB2.0printerport.Useittoconnecttheprintertoa
PC,oruseitasanetworkhub.ConnectaUSBdatacable
oraUSBsmartcardcablehere,ifused.
EthernetPort Connectanetworkdatacablehere,
ifused.
OptionLabel Indicatestheoptionsinstalledintheprinter.For
example,thefollowinglabelisforaprinterthathas
Duplex,BendRemedy,andMagneticEncoderoptions:
CableGuides Securethedatacableheretopreventdamagingit.
PowerReceptacle Pluginthepowercordhere.

SR200 & SR300 Card Printers and LM200 & LM300 Laminators User’s Guide 5
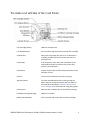
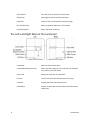
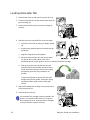
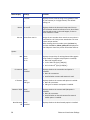
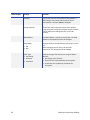
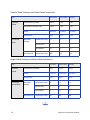
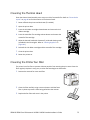
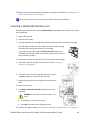
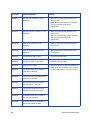
The Inside and Left Side of the Card Printer
FilmCartridge(Green) Holdstheretransferfilm.
FilmReleaseButton Presstoreleaseandremovetheretransferfilmcartridge.
CardOutSlot Aftercardsareprinted,theyexithere.Ifalaminatoris
installed,printedcardsexittheprinterandenterthe
laminatorhere.
CardStacker Ifnolaminatorisused,attachthecardstackerto
the
cardstack erbrackets.Ascardsexittheprinter,they
collectinthecardstacker.
InfraredPort Sendsorreceivesdataviainfraredcommunicationtothe
laminator,ifused.
LiftArea Usethisareatolifttheprinterwhencarryingit.
JogDials(Home) Usetheseremovabledialswhenclearingacardjam.
Return
themtothehomelocationsafteruse.Referto
theproceduresdescribedin“RecoveringfromPrinter
Errors”onpage 86forinstructionsonusingthejogdials.
CleaningUnit Removesdustordebrisfromthecardsbeforeprinting.
InkRibbonCartridge(Orange) Holdstheinkribbon.
RibbonReleaseButton Presstoreleaseandremovetheink
ribboncartridge.

6 Introduction
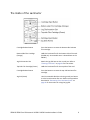
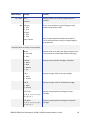
Card Printer LCD Panel
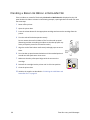
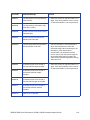
Line1 Displaysthecurrentprinterstatus,suchasReadyor
Printing.Italsoshowsthemenunamewhenusing
menus.Ifanerroroccurs,amessagedisplayshereand
ontheStatusMonitor.
Line2 Displayscardcountsorselectionsavailableforthe
menus.Itcanalsodisplaythestatusofthe
laminator,if
used.Referto“DisplayingLaminatorStatusontheLCD
Panel”onpage 68forinstructions.
KeyIndicator Displaysthecurrentnameorfunctionofthekeydirectly
beneaththeindicator.
Keys Presskeystonavigatethemenuanddisplayinformation
abouttheprinterandlaminator,andtovieworchange
settingsorperform
functions.
Locked? Indicateswhethertheprinter(andlaminator,ifused)is
lockedorunlocked.
Connection Indicateswhethertheprinterisconnectedthrougha
USBcableoranetworkconnection,andwhetherornot
theprinterhasanIPaddress.Alsoindicatesifthe
laminatorisconnected.
Speaker(buzzer) Providesanelectronicbeeptoindicatethat
anerrorhas
happenedortoconfirmthatsettingshavebeensaved.
Thebuzzerfunctioncanbeturnedonoroffusingthe
LCDpanelortheStatusMonitor.

SR200 & SR300 Card Printers and LM200 & LM300 Laminators User’s Guide 7
About the Laminators
TheLM200&LM300cardlaminatorsareoptionallaminatingmodulesthatworkwiththeSR200
&SR300printerstoaddtopcoatorpatchmaterialtoprintedcards.Holographiclaminating
materialisavailableforaddedsecurityandtamperresistance.Aprintedcardcanbelaminated
manuallybyinsertingitintothelaminator,
orautomaticallybytransferringthecarddirectlyfrom
theprintertothelaminator.
TheLM200laminatorcanlaminateononesideofacardandtheLM300laminatorcanlaminate
ononeorbothsidesofthecard.TheLM300selectstheside(s)ofthecardtobelaminatedbythe
presenceofoneorbothfilmcartridges:
Tolaminateonthetopsideofthecard,loadthetop‐sidecartridge.
Tolaminateonthebottomsideofthecard,loadthebottom‐sidecartridge.
Tolaminateonbothsidesofthecard,loadbothcartridges.
MessagesandotherinformationaboutthelaminatoraredisplayedontheprinterLCDpanel,and
onthePC(withtheStatusMonitor).
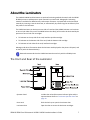
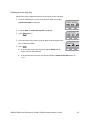
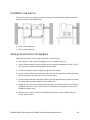
The Front and Rear of the Laminator
DatacardrecommendsthattheLM300laminatorbeusedonlywiththeSR300printer.
OperatorPanel Includestheredandbluestatusindicatorlightsandthe
operatorbutton.Referto“LaminatorOperatorPanel”on
page 10.
DoorLatch Slidethelatchuptoopenthelaminatordoor.
LaminatorDoor Openthedoortoaccessthelaminatorcartridges.
OPTION
INLET

8 Introduction
The Left and Right Sides of the Laminator
PowerSwitch Presstheswitchtopoweronthelaminator.
ExhaustFan Dischargesheatfrominsidethelaminator.
IntakeFan Drawsairintothelaminatorforinternalcooling.
PortforCableLock Attachanoptionalcablelockinthislocation.
PowerReceptacle Pluginthepowercordhere.
CardOutlet Cardsexitthelaminatorhere.
CardStackerAttachmentSlots Attachthe
cardstackerhere.Ascardsexitthelaminator,
theycollectinthecardstacker.
FilterCover Removetoaccesstheairintakefilter.
LiftArea Usethisareatoliftthelaminatorwhencarryingit.
CardInlet Printedcardsenterthelaminatorhere.
InfraredPort Sendsorreceivesdataviainfraredcommunicationtothe
cardprinter.

SR200 & SR300 Card Printers and LM200 & LM300 Laminators User’s Guide 9
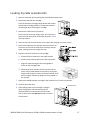
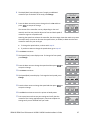
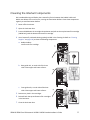
The Inside of the Laminator
CartridgeReleaseButton Pressthebuttontoremovethebottom‐sidelaminate
filmcartridge.
Bottom‐SideFilmCartridge
(Orange)
Holdsthelaminatefilmforthebottomsideofthecard.
(LM300only.Aremovablecoverislocatedhereonthe
LM200.)
JogDialInsertionSlot Attachthejogdialheretoclearacard
jam.Referto
“ClearingaCardJam”onpage 91forinstructions.
Top‐SideFilmCartridge(Green) Holdsthelaminatefilmforthetopsideofthecard.
CartridgeReleaseButton Pressthebuttontoremovethetop‐sidelaminatefilm
cartridge.
JogDial(Home) Usethisremovabledialwhenclearingacardjam.Return
it
tothehomelocationafteruse.Refertotheprocedure
describedin“RecoveringfromLaminatorErrors”on
page 91forinstructionsonusingthejogdial.

10 Introduction
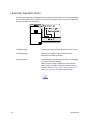
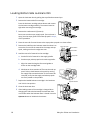
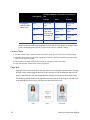
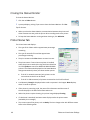
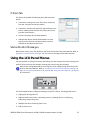
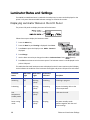
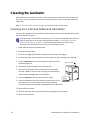
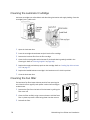
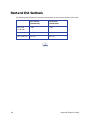
Laminator Operator Panel
Thestatusofthelaminatoris displayedonthecardprinter ’sLCDpanelandontheStatusMonitor
ofthePCconnectedtothecardprinter.Thelaminatoroperatorpanelhastwostatuslightsand
oneoperatorbutton,shownbelow:
RedStatusLight Ablinkingorsteadyredlightindicatesalaminatorerror.
BlueStatusLight Ablinkingorsteadybluelightindicatesthatthe
laminatorisfunctioningnormally.
OperatorButton Pressthisbuttonafterloadingalaminatorfilmcartridge,
toresetthelaminatorsettings.
Whennofilmcartridgeisloaded,presstheoperator
button
fortwosecondsorlongertostartthecleaning
operation.Referto“CleaningtheCardFeedRollersand
HeatRoller”onpage 76forcleaninginstructions.
Page is loading ...
Page is loading ...
Page is loading ...
Page is loading ...
Page is loading ...
Page is loading ...
Page is loading ...
Page is loading ...
Page is loading ...
Page is loading ...
Page is loading ...
Page is loading ...
Page is loading ...
Page is loading ...
Page is loading ...
Page is loading ...
Page is loading ...
Page is loading ...
Page is loading ...
Page is loading ...
Page is loading ...
Page is loading ...
Page is loading ...
Page is loading ...
Page is loading ...
Page is loading ...
Page is loading ...
Page is loading ...
Page is loading ...
Page is loading ...
Page is loading ...
Page is loading ...
Page is loading ...
Page is loading ...
Page is loading ...
Page is loading ...
Page is loading ...
Page is loading ...
Page is loading ...
Page is loading ...
Page is loading ...
Page is loading ...
Page is loading ...
Page is loading ...
Page is loading ...
Page is loading ...
Page is loading ...
Page is loading ...
Page is loading ...
Page is loading ...
Page is loading ...
Page is loading ...
Page is loading ...
Page is loading ...
Page is loading ...
Page is loading ...
Page is loading ...
Page is loading ...
Page is loading ...
Page is loading ...
Page is loading ...
Page is loading ...
Page is loading ...
Page is loading ...
Page is loading ...
Page is loading ...
Page is loading ...
Page is loading ...
Page is loading ...
Page is loading ...
Page is loading ...
Page is loading ...
Page is loading ...
Page is loading ...
Page is loading ...
Page is loading ...
Page is loading ...
Page is loading ...
Page is loading ...
Page is loading ...
Page is loading ...
Page is loading ...
Page is loading ...
Page is loading ...
Page is loading ...
Page is loading ...
Page is loading ...
Page is loading ...
Page is loading ...
Page is loading ...
Page is loading ...
Page is loading ...
Page is loading ...
Page is loading ...
Page is loading ...
Page is loading ...
Page is loading ...
Page is loading ...
Page is loading ...
Page is loading ...
Page is loading ...
Page is loading ...
Page is loading ...
Page is loading ...
Page is loading ...
Page is loading ...
Page is loading ...
Page is loading ...
Page is loading ...
Page is loading ...
Page is loading ...
Page is loading ...
Page is loading ...
Page is loading ...
Page is loading ...
Page is loading ...
Page is loading ...
Page is loading ...
-
 1
1
-
 2
2
-
 3
3
-
 4
4
-
 5
5
-
 6
6
-
 7
7
-
 8
8
-
 9
9
-
 10
10
-
 11
11
-
 12
12
-
 13
13
-
 14
14
-
 15
15
-
 16
16
-
 17
17
-
 18
18
-
 19
19
-
 20
20
-
 21
21
-
 22
22
-
 23
23
-
 24
24
-
 25
25
-
 26
26
-
 27
27
-
 28
28
-
 29
29
-
 30
30
-
 31
31
-
 32
32
-
 33
33
-
 34
34
-
 35
35
-
 36
36
-
 37
37
-
 38
38
-
 39
39
-
 40
40
-
 41
41
-
 42
42
-
 43
43
-
 44
44
-
 45
45
-
 46
46
-
 47
47
-
 48
48
-
 49
49
-
 50
50
-
 51
51
-
 52
52
-
 53
53
-
 54
54
-
 55
55
-
 56
56
-
 57
57
-
 58
58
-
 59
59
-
 60
60
-
 61
61
-
 62
62
-
 63
63
-
 64
64
-
 65
65
-
 66
66
-
 67
67
-
 68
68
-
 69
69
-
 70
70
-
 71
71
-
 72
72
-
 73
73
-
 74
74
-
 75
75
-
 76
76
-
 77
77
-
 78
78
-
 79
79
-
 80
80
-
 81
81
-
 82
82
-
 83
83
-
 84
84
-
 85
85
-
 86
86
-
 87
87
-
 88
88
-
 89
89
-
 90
90
-
 91
91
-
 92
92
-
 93
93
-
 94
94
-
 95
95
-
 96
96
-
 97
97
-
 98
98
-
 99
99
-
 100
100
-
 101
101
-
 102
102
-
 103
103
-
 104
104
-
 105
105
-
 106
106
-
 107
107
-
 108
108
-
 109
109
-
 110
110
-
 111
111
-
 112
112
-
 113
113
-
 114
114
-
 115
115
-
 116
116
-
 117
117
-
 118
118
-
 119
119
-
 120
120
-
 121
121
-
 122
122
-
 123
123
-
 124
124
-
 125
125
-
 126
126
-
 127
127
-
 128
128
-
 129
129
-
 130
130
-
 131
131
-
 132
132
-
 133
133
-
 134
134
-
 135
135
-
 136
136
-
 137
137
-
 138
138


DataCard LM200 User manual
- Category
- Laminators
- Type
- User manual
Ask a question and I''ll find the answer in the document
Finding information in a document is now easier with AI
Related papers
-
DataCard LM300 User manual
-
-
HP (Hewlett-Packard) Desktop Card Printers User manual
-
-
-
DataCard SD260 Installation and User Manual
-
-
-
 Datacard Group CP60 User manual
-

Other documents
-
 Magicard Prima 4 User manual
-
 Magicard Prima 8 User manual
-
JVC PRIMA401 User manual
-
 Magicard Prima 8 User guide
-
DNP CX-D80 User manual
-
 Digital Identification Solutions XID93xx Series User manual
-
 Digital Identification Solutions EDIsecure XID 8300 User manual
-
 Magicard Prima 8 User manual
-
-
Acroprint ESP180 Quick start guide


