Datacard
®
SR200 & SR300 Card Printers and
LM200 & LM300 Laminators
Installation Guide
March 2014
Part No. 527407-001, Rev. A

ii
Notice
Pleasedonotattempttooperateorrepairthisequipmentwithoutadequatetraining.
Anyuse,operationorrepairyouperformthatisnotinaccordancewiththeinformation
containedinthisdocumentationisatyourownrisk.
TheseproductsconformtoregulatoryrequirementsasspecifiedinNorthAmerica,
Europe,andAsia.
Referto “ComplianceStatements”onpageiiiformoreinformation.
Trademark Acknowledgments
DatacardisaregisteredtrademarkandservicemarkofDataCardCorporationinthe
UnitedStatesandothercountries.
MasterCardisaregisteredtrademarkofMasterCardInternationalIncorporated.
VisaisaregisteredtrademarkofVisaInternationalServiceAssociation.
AdobeandReaderareregisteredtrademarksofAdobeSystemsIncorporated.
Windowsisaregisteredtrademarkof
MicrosoftCorporation.
Allotherproductnamesarethepropertyoftheirrespectiveowners.
Proprietary Notice
ThedesignandinformationcontainedinthesematerialsareprotectedbyUSand
internationalcopyrightlaws.
AlldrawingsandinformationhereinarethepropertyofDataCardCorporation.All
unauthorizeduseandreproductionisprohibited.
DatacardGroup
11111BrenRoa dWest
Minnetonka,MN55343‐9015
Phone:952‐933‐1223
Fax:952‐933‐7971
www.datacard.com
©2014DataCardCorporation.Allrightsres e r ved .

iii
Compliance Statements
Liability Statement
TheWARNINGandCAUTIONlabelshavebeenplacedontheequipmentforyoursafety.Pleasedo
notattempttooperateorrepairthisequipmentwithoutadequatetraining.Anyuse,operationor
repairincontraventionofthisdocumentisatyourownrisk.
Safety
AllDatacard®productsarebuilttostrictsafetyspecificationsinaccordancewithCSA/UL60950‐1
requirementsandtheLowVo ltageDirective2006/95/EC.
Therefore,safetyissuespertainingtooperationandrepairofDatacard®equipmentareprimarily
environmentalandhumaninterface.
Thefollowingbasicsafetytipsaregiventoensuresafeinstallation,operationand
maintenanceof
Datacard®equipment.
• Connectequipmenttoagroundedpowersource.Donotdefeatorbypassthegroundlead.
• Placetheequipmentonastablesurface(table)andensurefloorsintheworkareaaredryand
non‐slip.
• Knowthelocationofequipmentbranchcircuitinterruptersorcircuitbreakersandhowtoturn
themonandoffincaseofemergency.
• Knowthelocationoffireextinguishersandhowtousethem.ABCtypeextinguishersmaybe
usedonelectricalfires.
• Knowlocalproceduresforfirstaidandemergencyassistanceatthecustomerfacility.
• Useadequatelightingattheequipmentlocation.
• Maintaintherecommendedtemperatureandhumidityrangeintheequipmentarea.

iv
Regulatory Compliance
Notice for USA (FCC notice)
ThisequipmenthasbeentestedandfoundtocomplywiththelimitsforClassAcomputing
devices,pursuanttoPart15ofFCCrules.Theselimitsaredesignedtoprovidereasonable
protectionagainstharmfulinterferencewhentheequipmentisoperatedinacommercial
environment.Thisequipmentgenerates,uses,andcanradiate
radiofrequencyenergy.Ifthis
equipmentisnotinstalledandusedinaccordancewiththisinstructionmanual,itmaycause
harmfulinterferencetoradiocommunications.Operationofthisequipmentinaresidentialarea
islikelytocauseharmfulinterferenceinwhichcasetheuserwillberequiredtocorrectthe
interferenceattheirownexpense.Changesormodificationsnotexpresslyapprovedbytheparty
responsibleforcompliancecouldvoidtheuser'sauthoritytooperatetheequipment.
Notice for Canada
ThisDevicecomplieswithIndustryCanadaLicense‐exemptRSSstandard(s).Operationissubject
tothefollowingtwoconditions:1)thisdevicemaynotcauseinterference,and2)thisdevice
mustacceptanyinterference,includinginterferencethatmaycauseundesiredoperationofthe
device.
CetappareilestconformeavecIndustrieCanadaRSS
standardexemptesdelicence(s).Son
fonctionnementestsoumisauxdeuxconditionssuivantes:1)cedispositifnepeutcauserdes
interférences,et2)cetappareildoitacceptertouteinterférence,ycomprislesinterférencesqui
peuventcauserunmauvaisfonctionnementdudispositif.
Notice for Europe
TheEUDeclarationofConformitycanbefoundonDatacard.com
WeherebycertifythatthisprintercomplieswithEMCDirective2004/108/EC,R&TTEDirective
1999/5/EC,andtheEURoHSDirectiveEUDirective2011/65/EC.ThisprinterconformstoClassAof
EN55022andtoEN301489‐5.Operationofthisequipment
inaresidentialenvironmentmay
possiblycauseinterference.Intheeventofinterference,theusers,attheir
ownexpense,willbe
requiredtotakewhatevermea sur esarenecessarytocorrecttheproblem.
Notice for China (Simplified Chinese)
警告
此为 A 级产品,在生活环境中,
该产品可能会造成无线电干扰。
在这种情况下,可能需要用户
对干扰采取切实可行的措施。

v
Notice for Taiwan (Traditional Chinese)
Notice for Japan
JapaneseVoluntaryControlCouncilforInterference(VCCI)classAstatement
Korea Communications Commission (KCC) statement
California Proposition 65 Compliance
WARNING: This product contains chemicals, including lead, known to the State of California to
cause cancer, and birth defects or other reproductive harm. Wash hands after handling.

vi
Revision Log
Datacard
®
SR200 & SR300 Card Printers and
LM200 & LM300 Laminators Installation Guide
Revision Date DescriptionofChanges
AMarch2014 Firstreleaseofthisdocument

vii
Table of Contents
Chapter 1: Planning the Installation. . . . . . . . . . . . . . . . . . . . . . . . . . . . . . . . . . . . . . . . . . . 1
About This Manual . . . . . . . . . . . . . . . . . . . . . . . . . . . . . . . . . . . . . . . . . . . . . . . . . . . . . . . . . . . . . 1
Related Documentation. . . . . . . . . . . . . . . . . . . . . . . . . . . . . . . . . . . . . . . . . . . . . . . . . . . . . . . . . 1
Whom to Call for Assistance . . . . . . . . . . . . . . . . . . . . . . . . . . . . . . . . . . . . . . . . . . . . . . . . . . . . . 2
Unpacking the Printer and Laminator. . . . . . . . . . . . . . . . . . . . . . . . . . . . . . . . . . . . . . . . . . . . . . 2
Packing Lists . . . . . . . . . . . . . . . . . . . . . . . . . . . . . . . . . . . . . . . . . . . . . . . . . . . . . . . . . . . . . . . . 2
Unpacking the Printer . . . . . . . . . . . . . . . . . . . . . . . . . . . . . . . . . . . . . . . . . . . . . . . . . . . . . . . . 3
Unpacking the Laminator. . . . . . . . . . . . . . . . . . . . . . . . . . . . . . . . . . . . . . . . . . . . . . . . . . . . .3
Choosing a Location . . . . . . . . . . . . . . . . . . . . . . . . . . . . . . . . . . . . . . . . . . . . . . . . . . . . . . . . . . . 4
Operating Environment . . . . . . . . . . . . . . . . . . . . . . . . . . . . . . . . . . . . . . . . . . . . . . . . . . . . . .4
Security . . . . . . . . . . . . . . . . . . . . . . . . . . . . . . . . . . . . . . . . . . . . . . . . . . . . . . . . . . . . . . . . . . . . 4
Ventilation Clearance . . . . . . . . . . . . . . . . . . . . . . . . . . . . . . . . . . . . . . . . . . . . . . . . . . . . . . . 5
Printer Options . . . . . . . . . . . . . . . . . . . . . . . . . . . . . . . . . . . . . . . . . . . . . . . . . . . . . . . . . . . . . . . . . 5
Supported Operating Systems. . . . . . . . . . . . . . . . . . . . . . . . . . . . . . . . . . . . . . . . . . . . . . . . . . . . 6
Installing More Than One Printer . . . . . . . . . . . . . . . . . . . . . . . . . . . . . . . . . . . . . . . . . . . . . . . . . . 6
Installation Requirements. . . . . . . . . . . . . . . . . . . . . . . . . . . . . . . . . . . . . . . . . . . . . . . . . . . . . . . . 6
Installation Overview . . . . . . . . . . . . . . . . . . . . . . . . . . . . . . . . . . . . . . . . . . . . . . . . . . . . . . . . . 7
USB Connection . . . . . . . . . . . . . . . . . . . . . . . . . . . . . . . . . . . . . . . . . . . . . . . . . . . . . . . . . . . . . 7
USB Installation Overview (no Smart Card) . . . . . . . . . . . . . . . . . . . . . . . . . . . . . . . . . . . 7
USB Installation Overview (with Smart Card) . . . . . . . . . . . . . . . . . . . . . . . . . . . . . . . . . . 8
Network Connection. . . . . . . . . . . . . . . . . . . . . . . . . . . . . . . . . . . . . . . . . . . . . . . . . . . . . . . . . 9
Network Installation Overview . . . . . . . . . . . . . . . . . . . . . . . . . . . . . . . . . . . . . . . . . . . . . . 9
Chapter 2: Installing the Hardware Components. . . . . . . . . . . . . . . . . . . . . . . . . . . . . . . 11
Installing the Components . . . . . . . . . . . . . . . . . . . . . . . . . . . . . . . . . . . . . . . . . . . . . . . . . . . . . . 11
Connecting the Laminator. . . . . . . . . . . . . . . . . . . . . . . . . . . . . . . . . . . . . . . . . . . . . . . . . . . 11
Installing the Card Hopper . . . . . . . . . . . . . . . . . . . . . . . . . . . . . . . . . . . . . . . . . . . . . . . . . . . 12
Installing the Card Stacker . . . . . . . . . . . . . . . . . . . . . . . . . . . . . . . . . . . . . . . . . . . . . . . . . . .12
Card Stacker on SR200 or SR300 Printer . . . . . . . . . . . . . . . . . . . . . . . . . . . . . . . . . . . . . 12
Card Stacker on Optional Laminator . . . . . . . . . . . . . . . . . . . . . . . . . . . . . . . . . . . . . . . 13
Plugging in the Power Cord(s) . . . . . . . . . . . . . . . . . . . . . . . . . . . . . . . . . . . . . . . . . . . . . . . . . . . 13
Connecting the Data Cable . . . . . . . . . . . . . . . . . . . . . . . . . . . . . . . . . . . . . . . . . . . . . . . . . . . .14
Connecting the USB Cable . . . . . . . . . . . . . . . . . . . . . . . . . . . . . . . . . . . . . . . . . . . . . . . . . . 15
Connecting the Network Cable . . . . . . . . . . . . . . . . . . . . . . . . . . . . . . . . . . . . . . . . . . . . . . 15
Chapter 3: Installing the Smart Card Driver. . . . . . . . . . . . . . . . . . . . . . . . . . . . . . . . . . . . 17
Downloading and Installing the Gemalto Contactless Driver . . . . . . . . . . . . . . . . . . . . . . . . . 17
Downloading and Installing the Duali Contactless or Duali Contact/Contactless Driver . . . 19
Installing the Identive Dual Contact/Contactless Driver. . . . . . . . . . . . . . . . . . . . . . . . . . . . . . 20
Installing the Identive Driver Automatically . . . . . . . . . . . . . . . . . . . . . . . . . . . . . . . . . . . . . 20
Downloading and Installing the Identive Driver Manually . . . . . . . . . . . . . . . . . . . . . . . . . 21
Installing the iCLASS/pcProx Driver and Support Files. . . . . . . . . . . . . . . . . . . . . . . . . . . . . . . . 24

viii
Installing the iCLASS Reader . . . . . . . . . . . . . . . . . . . . . . . . . . . . . . . . . . . . . . . . . . . . . . . . . . 24
Installing the pcProx Reader . . . . . . . . . . . . . . . . . . . . . . . . . . . . . . . . . . . . . . . . . . . . . . . . . 25
Chapter 4: Installing the USB Printer Driver . . . . . . . . . . . . . . . . . . . . . . . . . . . . . . . . . . . . 27
Installing with a USB Connection . . . . . . . . . . . . . . . . . . . . . . . . . . . . . . . . . . . . . . . . . . . . . . . . .27
Windows 7 Installation . . . . . . . . . . . . . . . . . . . . . . . . . . . . . . . . . . . . . . . . . . . . . . . . . . . . . . . 27
Windows XP Installation. . . . . . . . . . . . . . . . . . . . . . . . . . . . . . . . . . . . . . . . . . . . . . . . . . . . . . 35
Windows Vista or Windows 2000 Installation. . . . . . . . . . . . . . . . . . . . . . . . . . . . . . . . . . . . . 44
After Installing the USB Printer Driver . . . . . . . . . . . . . . . . . . . . . . . . . . . . . . . . . . . . . . . . . . . . . . 53
Chapter 5: Installing the Status Monitor. . . . . . . . . . . . . . . . . . . . . . . . . . . . . . . . . . . . . . . 55
Installing the Status Monitor . . . . . . . . . . . . . . . . . . . . . . . . . . . . . . . . . . . . . . . . . . . . . . . . . . . . . 55
Setting the Unit Number, Printer Name, and Connection . . . . . . . . . . . . . . . . . . . . . . . . . . . . . 59
Chapter 6: Network Installation . . . . . . . . . . . . . . . . . . . . . . . . . . . . . . . . . . . . . . . . . . . . . 63
About Network Installation. . . . . . . . . . . . . . . . . . . . . . . . . . . . . . . . . . . . . . . . . . . . . . . . . . . . . . 63
Choosing How to Assign the Network Address . . . . . . . . . . . . . . . . . . . . . . . . . . . . . . . . . . 64
IP Security Using a Printer Certificate (IPSec) . . . . . . . . . . . . . . . . . . . . . . . . . . . . . . . . . . . . 64
IP Security Using a Preshared Key . . . . . . . . . . . . . . . . . . . . . . . . . . . . . . . . . . . . . . . . . . . . . 66
Installing the Network Printer Driver . . . . . . . . . . . . . . . . . . . . . . . . . . . . . . . . . . . . . . . . . . . . . .68
Sharing a Printer on a Network Connection. . . . . . . . . . . . . . . . . . . . . . . . . . . . . . . . . . . . . . . . 76
Preparing to Share a Printer . . . . . . . . . . . . . . . . . . . . . . . . . . . . . . . . . . . . . . . . . . . . . . . . . . 76
Setting up Sharing . . . . . . . . . . . . . . . . . . . . . . . . . . . . . . . . . . . . . . . . . . . . . . . . . . . . . . . . . . 77
Chapter 7: Removing Printer Driver and Status Monitor. . . . . . . . . . . . . . . . . . . . . . . . . . 81
Removing the Printer Driver . . . . . . . . . . . . . . . . . . . . . . . . . . . . . . . . . . . . . . . . . . . . . . . . . . . . . 81
Removing the Status Monitor . . . . . . . . . . . . . . . . . . . . . . . . . . . . . . . . . . . . . . . . . . . . . . . . . . . . 84
Updating the Printer Driver . . . . . . . . . . . . . . . . . . . . . . . . . . . . . . . . . . . . . . . . . . . . . . . . . . . . . . 85

SR200 & SR300 Card Printers and LM200 & LM200 Laminators Installation Guide 1
Chapter 1: Planning the
Installation
Thischapterprovidesinfo rmationaboutthisUser’sGuide.Italso
containsinformationtohelpplantheinstallationofSR200&SR300card
printersandoptionalLM200&LM300laminators.
About This Manual
ThismanualprovidesdetailedinstructionsforinstallngtheSR200&SR300cardprintersandthe
optionalLM200&LM300cardlaminators.
Chapter 1:"PlanningtheInstallation”—Providesinformationaboutthismanual,aswellas
backgroundinformationneededtoplanforprinterandlaminatorinstallation.
Chapter 2:"InstallingtheHardwareComponents”—Providesinstructionsforunpackingand
installingthehardwarecomponents,cables,andpowercordsoftheprinterandlaminator.
Chapter 3:"InstallingtheSmartCardDriver”—Containsproceduresforinstallingthe
appropriatesmartcarddriver.Thisisnecessaryonlyifthecardprinterisequippedwithan
optionalsmartcardupgrade.
Chapter 4:"InstallingtheUSBPrinterDriver”—ProvidesinstructionsforinstallingtheUSB
printerdriverontothePC(s)usedtocre a teandprintcards.
Chapter 5:"InstallingtheStatusMonitor”—ProvidesinstructionsforinstallingtheStatus
MonitorontothePC(s)usedtocreateandprintcards.
Chapter 6:"NetworkInstallation”—Describeshowtoinstallthenetworkprinterdriver,how
toconfiguretheprinterforuseonalocalnetwork,andhowtoshareanetworkedprinter.
Chapter 7:"RemovingPrinterDriverandStatusMonitor”—Providesinstructionsfor
uninstallingtheprinterdriverorStatusMonitorfromthePC.Instructionsareincludedfor
updatingtheprinterdriverifanewversionisreleased.
Related Documentation
RefertotheDatacardSR200&SR300CardPrintersandLM200&LM300LaminatorsUser’sGuide
forinformationaboutusingtheprinterandlaminatortocreatecards.
RefertotheDatacardSR200&SR300Plug‐inUser’sGuide forinformationaboutusingthecard
printerwithDatacardIDsoftwareapplications.The
manualincludesinstructionsforcreating
magneticstripeen codingconfigurations.

2 Planning the Installation
Whom to Call for Assistance
Ifyouworkwith aDatacard‐authorizeddealer,distributor,orvalue‐addedreseller,contactthem
forassistance.Avalue‐addedresellerprovidestheSR200&SR300cardprintersandLM200&
LM300laminatorsaspartofanoverallsystem.
Ifanycontentsoftheboxaremissing,contactyourDatacard‐authorized
dealer,distributor,or
reseller.IfyoupurchasedyourprinterdirectlyfromDatacard,contacttheDatacardCustomer
CareCenterinyourregion:
Makesurethatyouhavetheprinterserialnumber,locatedonthebackoftheprinter,and
optionallaminatorserialnumber,whenyoucall.
Unpacking the Printer and Laminator
Unpackthecardprinterandthelaminator(ifpurchased)fromtheirshippingcartons.
Packing Lists
Theshippingcartonforthecardprintercontains:
SR200orSR300cardprinter
Powercord
Cleaningcard
Cardstack er
Whitegloves
Tweezers
SR200&SR300andLM200&LM300documentationshippingkit:
ReadMeFirstdocument
Owner’sLibraryCD‐ROM
SR200&SR300CardPrintersandLM200&LM300LaminatorsInstallationGuide
Warranty
SR200&SR300Support(Plug‐in)CD
Americas +1800.328.3996or952.988.2316
Europe,Middle East,andAfrica +441489555627
AsiaPacific +85228210121
ThismanualdescribestheSR200orSR300printerandtheLM200orLM300laminator.
Theinstructionsapplytobothprintersandbothlaminators,exceptwhenstated.

SR200 & SR300 Card Printers and LM200 & LM200 Laminators Installation Guide 3
Theshippingcartonforthelaminatorcontains:
LM200orLM300cardlaminator
Joiningplate
Cleaningcard
Powercord
Take‐upcore
Youmustprovidetheseitemsororderseparately:
USBcable
Networkcable(ifprinteristobeusedoveranetwork)
Inkribbon
Retransferfilm
Blankcards
Cleaningkit
Unpacking the Printer
RemovetheSR200orSR300cardprinterfromtheshippingcarton.Removeallpackingtapefrom
insideandaroundtheprinter.
Unpacking the Laminator
Removethelaminatorfromtheshippingcontainer.Makesuretoremoveallpackingtapeinside
andaroundthelaminator.Removetheprotectivecushionthatprotectsboththeheatedroller
andtheplatenroller.
RefertotheDatacardSR200&SR300CardPrintersandLM200&LM300LaminatorsUser’s
Guideforpartnumbersandorderinginformation.
Caution:Thecardprinterweighsapproximately27.6pounds(12.5kg)withoptions
installed.Usecarewhenremovingtheprinterfromtheshippingcontainer.
Save the shipping carton and packaging materials. They are required if you need to store,
move, or return the printer for service. Replacements are not available.
Caution:Thelaminatorweighsapproximately17pounds(8kg).Usecarewhenremoving
thelaminatorfromtheshippingcontainer.
Save the shipping carton and packaging materials. They are required if you need to store,
move, or return the laminator for service. Replacements are not available.

4 Planning the Installation
Choosing a Location
Theperformanceoftheprinterandoptionallaminatorisstronglyinfluencedbytheinstallation
location.Installtheunit(s)inalocationthatmeetsthefollowingcriteria:
Installtheprinterinalocationthatmeetsorex ceedsISO14611‐1Class8cleanliness
standards.Usingtheprinterindustylocationsmaycauseprintblurringandprinthead
malfunctions.
Powerofftheprinterwhenprintingisnotbeingperformed.Leavingpoweronforlong
periodswithoutprintingmayallowfinedusttocollectinsidetheprinter,causingprint
blurringandcausingdusttoadheretocards.
Avoidlocationssusceptibletostrongvibrationorshock.
Avoidlocationsexposedtodirectsunlight.
Avoidlocationswherethereisapossibilityofmetalobjectsorotherforeignmaterial
enteringtheprinter.
Avoidareasnearwallswithlittleventilation.Referto“VentilationClearance”onpage 5.
Avoidunstablelocationsandangledsurfaces.
Avoidlocationspronetostaticelectricity,suchasacarpetedroom.
Avoidareasnearairconditioners,humidifiers,orheatsourcesthatmaycausecondensation
withintheprinter.
Operating Environment
Installtheprinterinanenvironmentwiththefollowingrecommendedtemperatureandhumidity
range:
Temperature:59°–86°F(15°–30°C),or63°–83°F(17°–28°C)ifusingpeel‐off(PO)orUVink.
Humidity:35%–70%,non‐condensing,or35%–60%ifusingpeel‐offorUVink.
Security
BoththeSR200&SR300printersandtheLM200&LM300laminatorshaveslotsforcable‐type
securitylocks.Ifyouplantouseacablelock,selectalocationthatprovidesasecureplaceto
fastenthecables.
Caution:Usingtheprinterinanenvironmentwithtemperaturesthatarecoolerthan
therecommendedrangecancauseretransfererrors.Usingtheprinterinan
environmentwithtemperaturesthatarewarmerthantherecommendedrangecan
causeerrorssuchascardwarpingandwrinklingofthefilm.

SR200 & SR300 Card Printers and LM200 & LM200 Laminators Installation Guide 5
Ventilation Clearance
Ventilationholesareprovidedforthecoolingfansatthebottomandsidesoftheprinter,andat
thebackofthelaminator.Installtheprinterandlaminatorsothatthesidesareatleast8inches
(200mm)awayfromthesurroundingwall.Keepthebackoftheunitsat
least4inches(100mm)
awayfromawall.Donotplaceanyobjectsontopoftheprinterorlaminator.
Printer Options
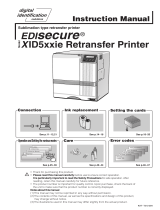
Printeroptionsinstalledinthefactoryaremarkedontheoptionslabelatthebackoftheprinter.
Eachoptioninstalledhasamarkedorfilledsquare.Forexample,thefollowingillustrationisfora
printerwithduplex(double‐sided),bendremedy,andmagneticencoderoptions.
Theprintercanhaveoneofthesefactory‐installedsmartcardreaderoptions:
ContactICEnc/R/W
DualiContactless
DualiContact/Contactless
Gemalto®Contactless
Indentive®DualContact/Contactless

6 Planning the Installation
ThesmartcardoptionissetupforusewithaUSBdatacableonly.Networkinstallationisnot
supportedforsmartcarduse.Ifsmartcardsaretobeencoded,downloadandinstallthesmart
carddriverbeforeconnectingtheprinterorinstallingtheprinterdriver.Referto“Installingthe
SmartCardDriver” onpage 17todownloadandinstallthesmartcarddriver.
Supported Operating Systems
Theprinterandprinterdrivercanbeinstalledonthefollowingoperatingsystems:
Windows7(testedwithServicePack1installed)
WindowsVista(testedwithServicePack2installed)
WindowsXP(testedwithServicePack3installed)
Windows2000(testedwithServicePack4installed)
Installing More Than One Printer
FollowtheseguidelinestoinstallmorethanoneprinteronaPC:
Youcaninstallupto10cardprintersononePC.
YoucaninstallbothSR200&SR300printersonthesamePC.
Ifyouwantbothanetwork‐connectedprinterandaUSB‐connectedprinterofthesametype
installedonthesamePC,installtheUSB‐connectedprinterfirstforbestresults.
IfyouplantoinstallmultipleprintersofthesametypeononeormorePCs,assigntheunit
numbersandprinternamesusingtheStatusMonitorandaUSBconnection.EachPCmust
usetheunitnumberandprinternameassignedtoeachprinter.
Installation Requirements
Beforeinstallingtheprinter,makesurethatyouunderstandandfollowtheseimportantpoints:
Iftheprinterhasasmartcardreaderinstalled,youmustinstallthesmartcarddriversfirst.
Referto“InstallingtheSmartCardDriver”onpage 17.
Knowtheunitnumberassignedtoeachprinterbeinginstalled.Referto“SettingtheUnit
Number,PrinterName,andConnection”onpage 59.
IfyouupgradetheoperatingsystemofyourPCtoWindowsVistaorWindows7,removeall
SR200orSR300printerdriversbeforeupgrading.Installtheprinter(s)againaftertheupgrade
iscompleted.
Contactyourserviceproviderforcurrentlysupportedoperatingsystems.
Caution:Duringinstallation,donotpowerontheprinteruntildirectedtodoso.

SR200 & SR300 Card Printers and LM200 & LM200 Laminators Installation Guide 7
Installation Overview
Thissectionprovidesanov erviewofthestepsyouwillfollowwheninstallingtheprinter.
USB Connection
ThesimplestandmostdirectmethodofconnectingthecardprintertoaPCiswithaUSBcable.
Withthismethod,thecardprinterisalocalprinterandonlytheconnectedPCcanuseittoprint
cards.
Notethattwoormorecardprinterscanbeconnecte dto
aPC,eachwithitsownUSBcable,as
shownbelow:
TheUSBinstallationprocedurevaries,dependingonwhethertheprinterincludesasmartcard
option.UseoneofthefollowingOverviewsectionstohelpyouplanthestepsneededtoinstall
yourprinter.
USB Installation Overview (no Smart Card)
PerformthesestepstoinstallyourcardprinterwithaUSBconnectionwhentheprinterdoesnot
containasmartcardoption.RefertoChapters2,4,and5ofthismanualfordetailedinstructions.
1. (Optional)InstallIDsoftware,suchasDatacard
®
IDWorks
®
identificationsoftware,ont othe
PCthatwillbeusedtodesignandprintcards.
2. Physicallyinstalltheprinterandoptionallaminator:
a. Connectthelaminator(ifused)totheprinter.
b. Installthecardhopper.
c. Installthecardstacker.
Ifyourprinterincludesasmartcardoption,itmustbeconnectedtothePCwithaUSB
cable.NetworkconnectionforsmartcarduseisnotsupportedbytheSR200&SR300
printers.

8 Planning the Installation
d. Connectthepowercordtotheprinterandtothelaminator(ifused).Poweronboth
devicesandthenpoweroffagain.
e. Installprintingandlaminatingsupplies(inkribbon,retransfermaterial,laminatorfilm
cartridges,andcards).
3. UsetheInstallationCDtoinstalltheSR‐CPprinterdriverontothePC.
(Youwillbeinstructed
toconnecttheUSBcableduringthisstep.)
4. UsetheInstallationCDtoinstalltheStatusMonitorontothePC.
5. PowerontheprinterandconfiguretheconnectionbetweenthePCandtheprinter.If
necessary,usethePCtoassigntheDatacardSR‐CRretransferprinter
plug‐intotheprinter.
USB Installation Overview (with Smart Card)
PerformthesestepstoinstallyourcardprinterwithaUSBconnectionwhentheprinterdoes
containasmartcardoption.RefertoChapters2–5ofthismanualfordetailedinstructions.
1. (Optional)InstallIDsoftware,suchasDatacard
®
IDWorks
®
identificationsoftware,ontothe
PCthatwillbeusedtodesignandprintcards.
2. InstalltheappropriatesmartcarddriverontothePC.
3. Physicallyinstalltheprinterandoptionallaminator:
a. Connectthelaminator(ifused)totheprinter.
b. Installthecardhopper.
c. Installthecardstacker.
d. Connectthepowercord
totheprinterandtothelaminator(ifused).Poweronboth
devicesandthenpoweroffagain.
e. Installprintingandlaminatingsupplies(inkribbon,retransfermaterial,laminatorfilm
cartridges,andcards).
4. UsetheInstallationCDtoinstalltheSR‐CPprinterdriverontothePC.(Youwillbeinstructed
to
connecttheUSBcableduringthisstep.)
5. UsetheInstallationCDtoinstalltheStatusMonitorontothePC.
6. PowerontheprinterandconfiguretheconnectionbetweenthePCandtheprinter.If
necessary,usethePCtoassigntheDatacardSR‐CRretransferprinterplug‐intothe
printer.
Caution:DonotconnecttheUSBcabletotheprinterandPCyet.Theprinter
drivermustbeinstalledfirsttoenablecommunicationbetweenthecomponents.
Caution:DonotconnecttheUSBcabletotheprinterandPCyet.Theprinter
drivermustbeinstalledfirsttoenablecommunicationbetweenthecomponents.

SR200 & SR300 Card Printers and LM200 & LM200 Laminators Installation Guide 9
Network Connection
Whenalocalnetworkisavailable,boththecardprinterandthePCcanbeconnectedtothe
network.Whenanetworkconnectionisused,youcanprintcardsfromanyPCconnectedtothat
network.
EachPCmusthavethedesignsoftwareusedtocreateandprintcards,musthave
theSR‐CP
printerdriverandStatusMonitorinstalled,andmustbeconnectedtothesamenetworkasthe
printer(s).
Network Installation Overview
Performthesestepstoinstallyourcardprintertoanetwork.RefertoChapters2,4,5,and6of
thismanualfordetailedinstructions.
1. (Optional)InstallIDsoftware,suchasDatacard
®
IDWorks
®
identificationsoftware,ont othe
PCthatwillbeusedtodesignandprintcards.
2. Physicallyinstalltheprinterandoptionallaminator:
a. Connectthelaminator(ifused)totheprinter.
b. Installthecardhopper.
Remember,useaUSBconnectionifyourcardprintercontainsanoptionalsmartcard
reader.NetworkconnectionforasmartcardisnotsupportedbytheSR200&SR300
printers.

10 Planning the Installation
c. Installthecardstacker.
d. Connectthepowercordtotheprinterandtothelaminator(ifused).Poweronboth
devicesandthenpoweroffagain.
e. Installprintingandlaminatingsupplies(inkribbon,retransfermaterial,laminatorfilm
cartridges,andcards).
3. UsetheInstallationCDtoinstalltheSR‐CPprinter
driverontothePC.(Boththenetworkand
USBcableswillbeconnectedduringthisstep.)
4. UsetheInstallationCDtoinstalltheStatusMonitorontothePC.
5. PowerontheprinterandconfiguretheconnectionbetweenthePCandtheprinter.
Ifnecessary,usethePCtoassigntheDatacard
SR‐CRretransferprinterplug‐intotheprinter,
andtosetuptheunitnumberandprintername.SetthedefaultinterfacevaluetoNetwork.
6. PowerofftheprinteranddisconnecttheUSBcable.Usethenetworkcabletoconnectthe
printertoyourlocalnetwork.
7. Reinstalltheprinter
driverusingthenetworkcable.
8. Assigntheprinter’sIPaddre ss,ifnecessary.
9. SetupIPsecurity,ifneeded,usingeitheraprintercertificateorapresharedkey .
10. Setupprintersharing,ifdesired.
Caution:DonotconnecttheUSBornetworkcabletotheprinterandPCyet.The
printerdrivermustbeinstalledfirsttoenablecommunicationbetweenthe
components.

SR200 & SR300 Card Printers and LM200 & LM200 Laminators Installation Guide 11
Chapter 2: Installing the
Hardware Components
Thischapterprovidesstep‐by‐stepinstructionsforinstallingphysical
components,powercords,andcablesoftheSR200&SR300cardprinters
andoptionalLM200&LM300laminators.
Installing the Components
Usethefollowingprocedurestoconnecttheoptionallaminatortothecardprinter,andtoinstall
thecardhopperandthecardstackertotheprinterorlaminator.
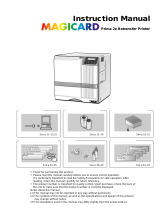
Connecting the Laminator
Usetheprovidedjoiningplatetoconnectthelaminator(ifused)tothecardprinter.
1. Placetheprinteronthework
surfacewiththejoiningplate
attached.
2. Mountthelaminatoroverthe
holesonthejoiningplate.
Theinfraredportsontheprinter
andlaminatormustbealignedfor
thelaminatortowork.
Make sure to install both units on a secure, level surface. Make sure the laminator and the
printer fit securely into the joining plate holes.
Caution:Makesurethatthepowerswitchisturnedoffandthepowercordisdetached
fromthereceptaclebeforeconnectingordisconnectingthelaminator.Otherwise,
electricshock,fire,ormalfunctionoftheproductmightoccur.
JoiningPlate

12 Installing the Hardware Components
Installing the Card Hopper
1. Ifpresent,removestyrofoampackingfoamfrominsidethecardhopper.
2. Insertthecardhopperhooksintothereceptacleslotsontheprinter.
3. Slidethecardhopperdownuntilitclicksintoplace.
Installing the Card Stacker
Ascompletedcardsexittheprinterorlaminator,theyarecollectedinthecardstacker.Installthe
cardstackerbelowthecardoutslotontheleftsideoftheprinterorthelaminator(ifused).
Card Stacker on SR200 or SR300 Printer
Whennolaminatorisused,placethestack ertabsintotheattachmentslotsonthesideofthe
printer.Besuretohangthecardstackerontheattachmentslots,notonthecardoutslot.
The card hopper can hold up to 100, 0.030 inch (0.75 mm) thick cards.
The card stacker can hold up to 100 0.030 inch (0.75mm) thick cards.
CardOutSlot
Page is loading ...
Page is loading ...
Page is loading ...
Page is loading ...
Page is loading ...
Page is loading ...
Page is loading ...
Page is loading ...
Page is loading ...
Page is loading ...
Page is loading ...
Page is loading ...
Page is loading ...
Page is loading ...
Page is loading ...
Page is loading ...
Page is loading ...
Page is loading ...
Page is loading ...
Page is loading ...
Page is loading ...
Page is loading ...
Page is loading ...
Page is loading ...
Page is loading ...
Page is loading ...
Page is loading ...
Page is loading ...
Page is loading ...
Page is loading ...
Page is loading ...
Page is loading ...
Page is loading ...
Page is loading ...
Page is loading ...
Page is loading ...
Page is loading ...
Page is loading ...
Page is loading ...
Page is loading ...
Page is loading ...
Page is loading ...
Page is loading ...
Page is loading ...
Page is loading ...
Page is loading ...
Page is loading ...
Page is loading ...
Page is loading ...
Page is loading ...
Page is loading ...
Page is loading ...
Page is loading ...
Page is loading ...
Page is loading ...
Page is loading ...
Page is loading ...
Page is loading ...
Page is loading ...
Page is loading ...
Page is loading ...
Page is loading ...
Page is loading ...
Page is loading ...
Page is loading ...
Page is loading ...
Page is loading ...
Page is loading ...
Page is loading ...
Page is loading ...
Page is loading ...
Page is loading ...
Page is loading ...
Page is loading ...
/