Page is loading ...

Datacard® CR500™ Instant Issuance System
User Reference Guide
July 2015
527495-001 Rev B

Datacard CR500 User Reference Guide The CR500 Instant Issuance System
3
2
Contents
The CR500 Instant Issuance System .......................................................... 3
View the Printer Touch Screen .................................................................. 4
User Buon and Light.......................................................................................... 4
Down Arrow, Up Arrow, and Enter Keys .............................................................. 5
Ribbon Light ........................................................................................................ 5
Card Light ............................................................................................................ 6
Supplies Status Light ........................................................................................... 6
View the Print Unit Front Panel ................................................................ 7
Load Supplies ........................................................................................... 8
Load the Ink Ribbon ............................................................................................ 8
Load the Retransfer Film ................................................................................... 11
Load Cards ......................................................................................................... 14
Remove Rejected Cards .......................................................................... 17
Clean the System .................................................................................... 18
Cleaning Kit ....................................................................................................... 18
Printer Cleaning Schedule ................................................................................. 19
Clean the Card Cleaning Rollers and Cleaning Unit ........................................... 20
Clean the Mul-Hopper .................................................................................... 24
Clean the Print Unit ........................................................................................... 26
Clean the Magnec Stripe Head ....................................................................... 30
Clean the Thermal Printhead ............................................................................ 32
Clean the Print Unit Fan Filter ........................................................................... 34
Prepare the Printer for Use ............................................................................... 34
Common Error Messages ........................................................................ 35
Printer Error Recovery ....................................................................................... 35
Message 103: Printer problem .......................................................................... 35
Message 158: Check print unit front panel ....................................................... 36
Message 159: Print unit card jam ...................................................................... 37
Clear Card Jams ...................................................................................... 39
Clear a Mul-Hopper Jam ................................................................................. 40
Clear a Print Unit Cleaning Roller or Turnover Jam ........................................... 42
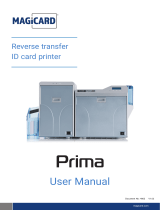
The CR500 Instant Issuance System
A - Card Cleaning Unit
B - Security Enclosure Door
C - Security Enclosure Lock
D - Card Weights (3)
E - Touch Screen
F - Excepon Card Slot
G - Security Enclosure
H - Power Switch
J - Ink Ribbon Cartridge and Release
Buon
K - Print Unit Door
M - Jog Dials (2)
N - Film Cartridge and Release Buon
P - Print Unit
Q - Turnover Unit
R - Print Unit Front Panel

Datacard CR500 User Reference Guide View the Printer Touch Screen
5
4
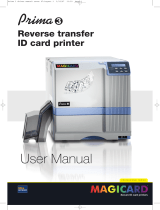
View the Printer Touch Screen
The printer touch screen, located on the security enclosure, operates when the
printer is powered on. It shows printer status, the printer’s menu system, and
printer messages or condions as they are issued.
Indicators include the following:
O (not visible) The printer is o.
Green The printer is ready.
Blinking green The printer is busy.
Amber The printer is not ready.
Blinking amber The printer has an error.
Down Arrow, Up Arrow, and Enter Keys
Use the arrow keys to move through the printer menu system. Press the Enter key
to make a selecon.
Ribbon Light
The ribbon light indicates the status of the ribbon in the printer. It glows green when
the print ribbon is low and glows amber when there is a problem with the ribbon,
such as a broken ribbon.
O Ribbon is okay.
Green
Ribbon is low—less than 10% remains. The percent
of ribbon remaining required for nocaon can be
changed using Printer Manager (refer to the printer’s
Installaon and Administrator’s Guide).
Amber Ribbon is out or broken.
Blinking
amber
The printer problem applies to the ribbon.
LCD Panel
Down Arrow Up Arrow Enter
Ribbon Light
Card Light
User Buon
Retransfer Film Status (Green)
Ink Ribbon Status (Orange)
The menu system contains several choices for viewing and changing printer sengs,
and performing simple maintenance tasks, including prinng a test card.
User Button and Light
The touch screen User buon displays with a border of light that indicates the
system status. Use the User buon to:
• Suspend the printer when it displays Ready.
• Clear a message.
• Clear all messages—press the User buon for at least 2 seconds.
• Cancel all cards currently prinng—press and hold the User buon
for several seconds. (Make sure that this acon is allowed by your
organizaon.)
• Determine whether the printer is ready, busy prinng, or not available.

Datacard CR500 User Reference Guide View the Print Unit Front Panel
7
6
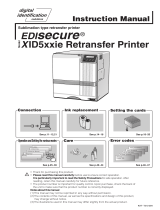
View the Print Unit Front Panel
The print unit front panel is available when the security enclosure door is open. It
has two lines of text, indicators for key funcons, and symbols for connecon type
and lock status. At mes, you must use the print unit front panel.
Card Light
The card light indicates the status of the cards in the printer. It blinks amber when
the printer has a card problem, such as when the printer is out of cards.
O Cards are okay.
Rapid blinking
green
Insert a card using the excepon card
slot.
Blinking amber The printer problem applies to cards.
Supplies Status Light
The touch screen status light shows the status of the retransfer lm and ink ribbon.
The green bar shows the amount of retransfer lm available: 100% available, 75%
available, 50% available, or 25% available.
The orange bar shows the amount of ink ribbon available: 100% available, 75%
available, 50% available, or 25% available.
• Line 1—Displays messages during error recovery and shows the menu
name when using the print unit menu system.
• Line 2—Shows card counts or selecons available if you are using menus.
• Line 3—Presents key indicators, the connecon symbol, and the current
lock state.
• The display background color changes according to the current state of the
print unit. The background is:
• Bright green during power on.
• Bright blue when the printer is operang normally, including when
inializing, preheang, and prinng cards.
• Medium blue when recovering from errors.
• Red on print unit error.
Speaker
Connecon Type
Lock Status
Key
Line 1
Line 2
Line 3

Datacard CR500 User Reference Guide Load Supplies
9
8
Load Supplies
The rst me you use the printer, it must be powered on and o once to cancel
Transport Mode and allow supplies to be loaded. Transport mode is used when
shipping or moving the printer.
Tips for Success
Follow these ps when handling the ink ribbon and retransfer lm:
• Do not touch the prinng surface of the ink ribbon or retransfer lm. Oils
on hands will reduce prinng quality.
• Place the cartridge on a smooth, level surface when loading or reloading.
• To prevent damage to the door, do not place the cartridge on the printer
door.
• Keep unused ink ribbon and retransfer lm in the original package unl
ready for use.
• Do not place ribbon or lm on a dusty or dirty surface; dirt can aect print
quality.
• Follow your organizaon’s guidelines for tracking the supplies used in the
printer.
Load the Ink Ribbon
When the ink ribbon runs out, “Ink Ribbon Out” displays on the print unit front
panel, and message 165, “Ink ribbon out,” displays on the touch screen. The right
column of the touch screen supplies gauge shows white, not orange.
Do the following to load the ink ribbon cartridge.
1. Unlock the printer and open the security enclosure.
2. On the print unit, slide the door latch up, and open the print unit door.
3. Press the ink ribbon cartridge eject buon, and remove the orange cartridge.
4. Remove both used ribbon spools from the cartridge (if present).
5. Load the new roll of ink ribbon on the cartridge:
a. Put the full spool of ribbon on the orange supply spindle.
b. Align the ribbon along the three ribbon guides, as shown on the
cartridge diagram.
c. Put the empty take-up spool on the black take-up spindle.
d. Turn the take-up knob on the underside of the cartridge to remove any
slack. Gently pull out the take-up knob so it turns smoothly.
If slack cannot be removed, check that the supply and take-up spools are
rmly seated on the spindles. To insert the cartridge into the printer, the
ribbon must be ght along the ribbon guides. Use the supply and take-up
knobs to maintain the proper tension.
1
2
3
5b
5c
5d
5a

Datacard CR500 User Reference Guide Load Supplies
11
10
Load the Retransfer Film
When the retransfer lm runs out, “Media Run Out” displays on the print unit front
panel, and message 162, “Retransfer lm out,” displays on the touch screen. The
le column of the touch screen supplies gauge shows white, not green.
Do the following to load the retransfer lm cartridge.
1. Unlock the printer and open the security enclosure.
2. On the print unit, slide the door latch up and open the print unit door.
3. Press the retransfer lm cartridge eject buon and remove the green
cartridge.
6. Insert the loaded ribbon cartridge in the printer unl it clicks into posion.
7. Close the print unit door.
8. On the print unit front panel, press Reset and then Return to inialize the ink
ribbon.
9. Close the security enclosure door to lock the printer.
1
2
3

Datacard CR500 User Reference Guide Load Supplies
13
12
5b
5c
5d
5a
4. Remove both used lm spools from the cartridge (if present).
5. Load the new roll of retransfer lm on the cartridge:
a. Put the full roll of lm on the green supply spindle.
b. Align the retransfer lm along the three lm guides, as shown on the
cartridge diagram.
c. Put the empty take-up spool on the black take-up spindle and wind two
frames of lm onto the take-up spool.
d. Turn the take-up knob on the underside of the cartridge to remove any
slack. Gently pull out the take-up knob so it turns smoothly.
If slack cannot be removed, check that the supply and take-up spools
are rmly seated on the spindles. To insert the cartridge into the printer,
the lm must be ght along the lm guides. Use the supply and take-up
knobs to maintain the proper tension.
6. Insert the loaded cartridge in the printer unl it clicks into posion.
7. Close the print unit door.
8. On the print unit front panel, press Reset and then Return to inialize the lm.
9. Close the security enclosure door to lock printer.

Datacard CR500 User Reference Guide Load Supplies
15
14
Load Cards
Track the cards removed from inventory and loaded in the printer
following your organizaon’s card tracking procedure.
Follow your organizaon’s guidelines to load the correct cards in
hopper 1, hopper 2, and hopper 3.
Tips for Success
Use the following card handling ps as you load cards into the hopper.
Cauon: Do not touch the surface of cards before prinng them.
(Oils on hands may result in reduced prinng quality over me.)
Handle cards by the edges, or wear the gloves provided with the
printer when handling cards.
• Cards can sck together. Slide or fan cards to separate the edges.
• Orient all cards the same way.
• Load only ID-1 cards of 0.030-inch (0.75 mm) thickness.
• Load up to 70 cards in hopper 1, 50 cards in hopper 2, and 50 cards in
hopper 3.
• If only one hopper is being used, load cards into hopper 3 for fastest
throughput.
• Do not use cards that are bent or otherwise damaged.
• The cards are held in posion with a card weight. Always use the card
weight to make sure that cards are picked and transported properly.
Load Cards in the Multi-Hopper
1. Unlock the printer and open the security enclosure door.
2. Remove the card weight from each hopper to be loaded.
3. Fan or separate cards before placing them in the hopper.
4. Place cards in the hopper.
1
2
3
4
6
5
50 card
max
50 card
max
70 card
max

Datacard CR500 User Reference Guide Remove Rejected Cards
17
16
Remove Rejected Cards
The printer stores rejected cards in the security enclosure. Follow your
organizaon’s procedures for when to remove rejected cards and how to
track them.
1. Unlock the printer and open the security enclosure door.
2. Remove rejected cards from the reject card tray.
3. Close the security enclosure door to lock the printer.
4. Follow your organizaon’s procedures to track the cards removed and to
dispose of them.
1
Orient the cards as follows:
• For cards with pre-printed images, load cards with the front of the
card down and the top of the image toward the print unit.
• For cards with a magnec stripe, load cards with the stripe up and
toward the print unit.
• For cards with a contact smart card chip, load cards with the chip
down and toward the back of the print unit.
5. Load cards in addional hoppers, as needed, following steps 2 through 4.
Place a card weight in all hoppers, even if a hopper contains no cards. Make
sure the notched end of the card weight faces the back of the printer.
6. Aer all supplies are loaded, close the security enclosure door to lock the
printer.
2

Datacard CR500 User Reference Guide Clean the System
19
18
Clean the System
Supplies required:
Supply Part Number
Cleaning Kit 509630-101
Dual-Sided Cleaning Cards–cleaning unit rollers only
(10 in pack)
508976-001
Single-Sided Cleaning Cards–print unit internal rollers
(10 in pack)
506277-001
Magnec Head Cleaning Cards (10 in pack) 564729-166
Cleaning Swabs (5 in pack) 507377-001
Isopropanol (90%) —
Lint-Free Cleaning Wipes —
Cleaning Kit
Each CR500 printer is shipped with a cleaning kit. The kit contains the supplies you
need to clean the printer. Order addional cleaning supplies as you need them.
Tips for Success
• To restore the print unit when it is in sleep mode, press the User buon on
the touch screen or send a card to print.
• Handle cards by the edges to preserve print quality. Do not touch the print
surface with your hands.
Printer Cleaning Schedule
Clean parts of the printer using the schedule in the following table.
When the printer is not in use, turn o the power, let the printer cool,
and cover the printer with the plasc shipping bag to keep dust and other
debris out of the printer.
Task Schedule Descripon
*Card Cleaning
Rollers/Cleaning Unit
Every 200 cards or
when you change the
ink ribbon
Wash the blue cleaning rollers
with water. Then clean using the
dual-sided cleaning card and
cleaning swab if debris remains
on the rollers. Refer to “Clean
the Card Cleaning Rollers and
Cleaning Unit” on page 20.
Yearly Replace the cleaning unit yearly,
or more oen if it is no longer
cleaning eecvely.
*Mul-hopper Every 200 cards Clean as described in “Clean the
Mul-Hopper” on page 24.
Print Unit:
• Card Load Roller
• Card Feed Roller
• Heated Roller
Every 200 cards or
when you change the
ink ribbon
Clean every me you change the
ink ribbon.
With heavy use, clean more
frequently. Refer to “Clean the
Print Unit” on page 26.
*Magnec Stripe
Head
Aer every 1000
encoded cards
Clean the magnec stripe head
as described in “Clean the
Magnec Stripe Head” on
page 30.
*Thermal Printhead Aer every 1000
printed cards
Clean as described in “Clean the
Thermal Printhead” on page 32.
*Printer Fan Filter Clean regularly; replace
yearly
Wash the lter as described in
“Clean the Print Unit Fan Filter”
on page 34. Replace the lter
every year, or whenever the
foam begins to deteriorate.
* May need to be cleaned more oen depending on the type of card stock used
and the environment.

Datacard CR500 User Reference Guide Clean the System
21
20
Clean the Card Cleaning Rollers and Cleaning Unit
The cleaning unit, located inside the printer door, removes lint and other debris
from the cards before prinng. Clean the card cleaning rollers aer every 200 cards
or when you change the ink ribbon.
Use the following procedure to clean the unit.
1. Unlock and open the security enclosure door.
2. Open the print unit door.
3. Pull out the green cleaning unit.
1
2
3

Datacard CR500 User Reference Guide Clean the System
23
22
4. Clean the rollers.
a. Rinse the blue cleaning rollers with cold water. Gently rub the rollers
under running water.
Cauon: Do not use soap or detergents, which can damage the rollers.
b. Allow the card cleaning rollers to dry thoroughly.
c. If debris remains on the rollers, use the dual-sided cleaning card.
i. Remove the protecve paper from both sides of the cleaning card
(part no. 508976-001).
ii. Insert the cleaning card into the rollers of the cleaning unit.
iii. Move the cleaning card back and forth through the rollers unl all
debris possible is removed.
If you have trouble moving the cleaning card through the rollers, remove a
jog dial from the printer and use it to turn the rollers with the card in place.
d. If any debris sll remains, use a cleaning swab to clean the rollers unl
no debris is visible.
i. When nished using the cleaning swab to clean the rollers, rinse
the rollers under running water again to remove any traces of
isopropanol le by the swab.
ii. Allow the rollers to dry completely before reinstalling the cleaning
unit.
5. Reinstall the cleaning unit with the blue rollers facing to the right.
6. Replace the jog dial if it was removed.
7. If cleaning is complete, close the print unit door and the security enclosure
door to lock the printer.
or
Connue with “Clean the Mul-Hopper.”
4a
4b
Jog Dial

Datacard CR500 User Reference Guide Clean the System
25
24
Clean the Multi-Hopper
The mul-hopper holds cards before they are printed. Clean the hoppers aer every
200 cards or when you noce debris on cards.
1. Unlock and open the security enclosure door.
2. Remove all cards from the mul-hopper. Track the hopper(s) in which cards
were placed so you can replace them aer cleaning.
3. Prepare a cleaning card by folding a magnec stripe cleaning card. Do not
apply any type of uid to the card.
4. Clean the tracks:
a. Insert the folded card into hopper 1 and push it all the way along the
back track, toward the print unit. Remove the card. Repeat for hoppers 2
and 3.
b. Use the clean end of the card to clean the front track following the
instrucons in step 4a.
5. Discard the used cleaning card.
6. If cleaning is complete, close the security enclosure door to lock the printer.
or
Connue with “Clean the Print Unit.”
1
2
3
4a
4b

Datacard CR500 User Reference Guide Clean the System
27
26
Clean the Print Unit
Use the single-sided, adhesive cleaning card (part no. 506277-001) to clean the card
load roller, the print unit card feed rollers, and the heated roller. The card load roller
moves cards into the print unit. The card feed rollers move the card through the
printer. The heated roller provides the heat that transfers the lm to the card. Clean
the print unit aer every 200 cards or when you change the ink ribbon.
Cauon: Use the single-sided cleaning card whose label reads “Printer
Only.” Inserng a dual-sided cleaning card into the printer will damage
the printer.
1. Before beginning this procedure, do the following:
a. Clean the cleaning unit as described in “Clean the Card Cleaning Rollers
and Cleaning Unit” on page 20.
b. Clean the mul-hopper as described in “Clean the Mul-Hopper” on
page 24.
c. If closed, unlock and open the security enclosure door and the print unit
door.
d. Power o the printer. Wait approximately 10 to 20 minutes for the
printer to cool down.
Cauon: Do not clean the heated roller while it is hot. Allow the printer
to cool, or perform cleaning before the heated roller reaches operang
temperature.
2. Remove the concealed output stacker.
3. Remove the retransfer lm cartridge
a. Press the retransfer lm cartridge eject buon and remove the retransfer
lm cartridge.
b. Close the print unit door.
4. Remove the cards from the mul-hopper. Keep the security enclosure cover
open.
5. Remove the protecve paper from the single-sided cleaning card.
Cauon: Make sure that you use the single-sided cleaning card with the
label “Printer Only” and part no. 506277-001. Inserng the incorrect
cleaning card into the printer will damage the printer.
6. Insert the cleaning card into the excepon card slide with the scky side facing
up.
2
3a
3b
4
5
6
506277-001

Datacard CR500 User Reference Guide Clean the System
29
28
7. Move the cleaning card through the printer.
a. Rotate the shule to the down posion.
b. Push the excepon card slide in, past the resistance unl it reaches the
stop posion.
c. Push the card to the print unit card feed roller.
d. Stop when the card is under the roller and engages the printer.
7a
7b
7c
7d
8
8. Power on the printer. The message “Film Search A1” displays on the print unit
front panel.
9. Use the print unit front panel to run the cleaning card.
a. Press Menu to display “Cleaning”.
b. Press Enter to display “Rollers OK?”.
c. Press Return to display “Film checking” followed by “Cleaning Start OK”.
d. Press Return.
The print unit pulls the cleaning card into the print unit and cleaning begins.
If the card is not pulled into the unit and no errors display, lightly push
the card unl the roller catches it and the card moves into the unit.
10. The cleaning card is discharged and “Cleaning Start OK?” displays again.
11. Turn the cleaning card over and place it in the excepon card slide with the
scky side facing down. Refer to step 7 to posion the card properly.
12. Press Return.
13. When the cleaning card is discharged, press Exit to end the cleaning process.
14. Discard the used cleaning card.
Cauon: Use a cleaning card one me only. Reusing a card can damage
the rollers.
15. When cleaning is complete:
a. Reinstall the retransfer lm cartridge.
b. Replace the concealed output stacker.
Refer to “Prepare the Printer for Use” on page 34.

Datacard CR500 User Reference Guide Clean the System
31
30
Clean the Magnetic Stripe Head
Clean the magnec stripe head aer every 1000 encoded cards. Use a magnec
stripe head cleaning card to perform the cleaning procedure. When the cleaning
card becomes dirty, replace it. Using a dirty one can damage the head.
1. Unlock and open the security enclosure door.
2. Remove any cards or card weights in the mul-hopper. Keep the security
enclosure cover open.
3. Place the magnec stripe head cleaning card in hopper 3.
4. Push the card to the print unit card feed roller. Stop when the card is under the
roller and engages the print unit.
1
2
3
4
5
5. At the print unit front panel.
a. Press Menu to display “Cleaning”.
b. Press Enter, then press Next to display the “MG” opon.
c. Press Return to start the cleaning process.
The print unit pulls the cleaning card into the print unit and cleaning begins.
If the card is not pulled into the unit and no errors display, lightly push
the card unl the roller catches it and the card moves into the unit.
d. Aer the print unit ejects the card into the reject tray, press Exit to end
the cleaning process.
6. Refer to “Prepare the Printer for Use” on page 34.

Datacard CR500 User Reference Guide Clean the System
33
32
Clean the Thermal Printhead
Clean the thermal printhead aer every 1000 printed cards.
Cauon: The thermal printhead can be damaged by an electrostac
charge. Discharge yourself by touching the print unit frame before
cleaning the printhead.
1. Prepare the printer.
a. Unlock the printer and open the security enclosure door.
b. Power o the printer.
c. Open the print unit door.
2. Press the ink ribbon cartridge eject buon and remove the ink ribbon
cartridge.
3. Press the retransfer lm cartridge eject buon and remove the retransfer lm
cartridge.
4. Locate the thermal printhead and rollers. The thermal printhead is located in
the area between the ink ribbon and retransfer lm cartridge slots.
a. Carefully insert the cleaning swab.
b. Gently wipe the thermal printhead.
c. Gently wipe the roller, just above the printhead.
5. Discard the swab aer you nish cleaning the printhead.
Cauon: Never use metal or abrasive materials to clean the thermal
printhead.
6. Reinstall the ink ribbon and retransfer lm cartridges.
7. Refer to “Prepare the Printer for Use” on page 34.
2
3
4a
4b
4c
1

Datacard CR500 User Reference Guide Common Error Messages
35
34
Clean the Print Unit Fan Filter
The print unit has a fan lter to prevent airborne parcles from entering the print
area. Clean the lter regularly and replace it yearly.
1. Press down on the latch to free the external fan cover.
2. Remove the external fan cover.
3. Rinse the lter under running water.
4. Allow the lter to dry thoroughly.
5. Replace the lter and cover.
1
2
3
Common Error Messages
Printer Error Recovery
The printer touch screen displays messages. The print unit front panel background
color changes to red when the print unit has an problem, and it displays text that
describes the problem.
Always record the type of card removed (from hopper 1, 2, 3 or the
excepon card slide), following your organizaon’s guidelines for tracking
cards and supplies.
Message 103: Printer problem
Message Source /
Text Possible Cause Soluon
Print Unit:
No Card D0
Print unit problem with
handling cards.
Power the printer o and then on.
If that does not solve the problem,
contact your service provider for
assistance.
Note: This is the default print unit
front panel message when the
security enclosure door is open.
Print Unit: Codes
A1, 20, 24, 26, 27,
FB,
The printer has a
control problem.
Power the printer o and then on.
If that does not solve the problem,
contact your service provider for
assistance.
Security Enclosure The printer has a
control problem.
Power the printer o and then on.
If that does not solve the problem,
contact your service provider for
assistance.
Security Enclosure The card did not reach
the print unit input
area.
Power the printer o and then on.
If that does not solve the problem,
contact your service provider for
assistance.
Security Enclosure The message needs to
be cleared from the
touch screen.
Press the User buon to display
Ready on the touch screen.
Prepare the Printer for Use
Aer cleaning is complete:
1. Close the print unit door, if it is open.
2. On the print unit front panel, press Exit to return to the top level of the menu
system. If an error displays on the front panel, press Reset and Return. The
printer inializes.
3. Replace the cards and card weights in the mul-hopper.
4. Close the security enclosure door to lock the printer.

Datacard CR500 User Reference Guide Common Error Messages
37
36
Message 158: Check print unit front panel
Message Source /
Text Possible Cause Soluon
Print Unit:
Please, Power O
The power must be
turned o to inialize
the printer.
Turn the power switch o and
then on again.
Print Unit:
Please Remove
Media Cassee
Cleaning cannot start
when the retransfer
lm cartridge is in the
printer.
Remove the retransfer lm
cartridge.
On the print unit front panel,
press Reset and then Return to
inialize the print unit.
Start the cleaning cycle again,
following the steps in “Clean the
Print Unit” on page 26.
Print Unit:
HR is too hot
Cleaning cannot
start because the
temperature of the heat
roller is too high.
Power o the printer and allow
the heat roller to cool for about 20
minutes.
Refer to “Clean the Print Unit” on
page 26 for instrucons on how to
run the cleaning card.
Contact your service provider if
“HR is too hot” displays on the
print unit front panel and you are
not cleaning the printer.
Print Unit:
Please Adjust Turn
Unit Pos!
The card turnover unit
is not in the correct
posion.
Turn the unit to the home posion
using a jog dial, as described in
“Clear a Print Unit Cleaning Roller
or Turnover Jam” on page 42.
Contact your service provider for
assistance if the problem persists.
Print Unit:
Tesng or Cleaning
DC
The print unit is
processing a cleaning
card or the front panel
menu is being used.
Wait unl the cleaning is
complete, or complete the menu
task.
On the print unit front panel,
press Reset and then Return to
inialize the print unit.
Print Unit:
On Seng or
Transport Mode
DD
The print unit front
panel is being used.
The print unit has been
set to Transport Mode.
Complete any work using the
front panel. Close the print unit
door and then close the security
enclosure door to lock the printer.
Power o the printer, wait 15
seconds, and power on to cancel
Transport Mode.
Print Unit The print unit is in
power saving mode.
Unlock and open the
security enclosure door.
On the print unit front panel,
press Reset and then Return to
inialize the print unit.
Close the doors to lock the printer.
Message 159: Print unit card jam
Message Source /
Text Possible Cause Soluon
Print Unit:
Jam (Hopper) 90
There is a card jam in
the hopper secon.
Remove the jammed card from
the card hopper. Refer to “Clear a
Mul-Hopper Jam” on page 40.
Print Unit:
Jam (Turnover) 91
There is a card jam in
the turnover secon.
Remove the jammed card from
the turnover secon. Refer to
“Clear a Print Unit Cleaning Roller
or Turnover Jam” on page 42.
Print Unit:
Jam (MG) 92
There is a card jam in
the magnec stripe
encode secon.
Remove the jammed card from
the turnover secon. Refer to
“Clear a Print Unit Cleaning Roller
or Turnover Jam” on page 42.
Print Unit:
Jam (Transfer) 93
There is a card jam in
the card feed rollers.
Refer to the CR500 User’s Guide
for detailed instrucons.
Print Unit:
Jam (Discharge)94
There is a card jam
in the card discharge
secon.
Print Unit:
Jam (Retransfer) 95
There is a card jam near
the retransfer rollers.

Datacard CR500 User Reference Guide Clear Card Jams
39
38
Clear Card Jams
When a card becomes jammed inside the printer, you must remove it before
connuing to print cards. The procedure you use depends on the locaon of the
card jam.
To resolve a card jam:
1. Read the message displayed on the touch screen
2. Unlock and open the security enclosure door and look at the print unit front
panel for more informaon about the card jam.
3. Look inside the security enclosure or print unit to locate the card.
4. Remove the card, if possible, using the instrucons in this secon.
Cauon: Some internal parts may be hot. Wear a glove when reaching
into the printer, or let it cool rst. Use the provided tweezers to remove
the card, if possible.
For detailed informaon about locang and removing a jammed card, refer to the
printer’s User’s Guide.
Notes
/