KVH Industries TracPhone V7-IP Installation guide

Type
Installation guide

This manual is also suitable for

KVH Industries TracPhone V7-IP is a high-performance maritime communications system that provides reliable voice, data, and internet connectivity at sea. With its advanced antenna technology, the TracPhone V7-IP offers superior signal acquisition and tracking, ensuring a stable connection even in challenging conditions. The system's intuitive user interface and built-in help menus make it easy to operate, allowing you to stay connected with family, friends, and colleagues while enjoying crystal-clear calls and fast internet access on your boat.

KVH Industries TracPhone V7-IP is a high-performance maritime communications system that provides reliable voice, data, and internet connectivity at sea. With its advanced antenna technology, the TracPhone V7-IP offers superior signal acquisition and tracking, ensuring a stable connection even in challenging conditions. The system's intuitive user interface and built-in help menus make it easy to operate, allowing you to stay connected with family, friends, and colleagues while enjoying crystal-clear calls and fast internet access on your boat.

KVH, TracPhone, and the unique light-colored dome with dark contrasting baseplate are registered trademarks of KVH Industries, Inc.
All other trademarks are property of their respective companies. The information in this document is subject to change without notice.
No company shall be liable for errors contained herein. © 2013-2017 KVH Industries, Inc., All rights reserved. 54-0882 Rev. C | 72-0572
1
Technical Support
If you need technical assistance, please contact KVH Technical Support:
Europe, Middle East, Africa, Asia-Pacific:
Phone: +45 45 160 180
North/South America, Australasia:
Phone: 1 866 701-7103 (U.S. only) or +1 401 851-3806
Email: mvbsu[email protected]
TracPhone V7HTS/V7IP Remote Service Module
Replacement Instructions
The following instructions explain how to replace
the remote service module (GPRS modem) in a
TracPhone
®
V7-HTS or V7-IP antenna.
NOTE: Your antenna might have parts that differ from
those pictured in this document. Such differences have no
bearing on the instructions unless noted otherwise.
Tools Required
This procedure requires the following tools:
#2 Phillips screwdriver
Flat-head jeweler’s screwdriver
Flat-head torque screwdriver set to 5 in.-lbs
•Flush cutters
•Adhesive remover
Figure 1: Remote Service Module
2
Step 1 - Remove the Radome
Follow the steps below to disconnect power and
remove the radome.
a. Power off and unplug the ICM or CommBox-
ACU and modem to disconnect power from the
antenna. Follow all shipboard lockout-tagout
procedures, where applicable.
b. Using a #2 Phillips screwdriver, remove and
discard the six #10-32 screws securing the
radome to the baseplate (see Figure 2).
c. Carefully lift the radome straight up until clear
of the antenna assembly and set it aside in a safe
place. Do not place the radome on a hot steel
deck – the heat may warp the radome.
NOTE: If you keep the radome topside, secure it with a
lanyard to prevent it from falling overboard.
WARNING
To prevent injury, disconnect power from the
system before proceeding and keep it
disconnected for the duration of this procedure.
Failure to disconnect power risks electric shock,
potentially resulting in DEATH.
Figure 2: Remove the Radome
#10-32 Screw (x6)
3
Step 2 - Replace the Remote Service
Module
Follow the steps below to replace the remote service
module.
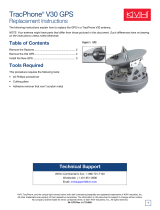
a. Disconnect the GPRS cable from the remote
service module (see Figure 3). To avoid
breaking the DB9 connector’s retaining screws,
loosen the retaining screws with a jeweler’s
screwdriver.
b. Using flush cutters, cut the two tie-wraps that
surround the remote service module in its
mounting bracket.
c. Grasp the remote service module and pull it free
from the mounting bracket, then remove any
remaining adhesive residue from the bracket.
d. Peel off the paper backing from the replacement
remote service module to expose the adhesive.
Then press the remote service module down
firmly onto the inside of the mounting bracket.
Apply pressure to make sure the adhesive
bonds to the bracket.
e. Using the two new tie-wraps supplied in the kit,
secure the remote service module to the
mounting bracket.
f. Reconnect the GPRS cable to the remote service
module and tighten the retaining screws to
approximately 5 in.-lbs of torque. Do not
overtighten – the screws break easily.
g. Inspect the inside of the antenna to make sure
you have not left any tools or debris inside.
h. Reinstall the radome onto the antenna securing
it with new #10-32 screws (supplied in the kit).
i. Reconnect power to the antenna.
Step 3 - Update the Software
Follow the instructions in the system’s Help menu
or User’s Guide to update the system software to
the latest version.
Then, if the location is within cellular range, call
KVH Technical Support and ask them to test the
remote service module’s GPRS cellular connection.
The replacement procedure is complete!
Figure 3: GPRS DB9 Connector, Cable, and Tie-Wraps
  • Page 1 1
  • Page 2 2
  • Page 3 3

KVH Industries TracPhone V7-IP Installation guide

Type
Installation guide
This manual is also suitable for

KVH Industries TracPhone V7-IP is a high-performance maritime communications system that provides reliable voice, data, and internet connectivity at sea. With its advanced antenna technology, the TracPhone V7-IP offers superior signal acquisition and tracking, ensuring a stable connection even in challenging conditions. The system's intuitive user interface and built-in help menus make it easy to operate, allowing you to stay connected with family, friends, and colleagues while enjoying crystal-clear calls and fast internet access on your boat.

Ask a question and I''ll find the answer in the document

Finding information in a document is now easier with AI