Page is loading ...

Part of Thermo Fisher Scientific
Polysonics SX30
Portable Doppler Flowmeter
User Guide
P/N 1-0563-007
Revision L


Polysonics SX30
Portable Doppler Flowmeter
User Guide
P/N 1-0563-007
Revision L


© 2019 ThermoFisher Scientific Inc. All rights reserved.
“Sil-Glyde” is a registered trademark of American Grease Stick Company.
All other trademarks are the property of ThermoFisher Scientific Inc. and its subsidiaries.
ThermoFisher Scientific (ThermoFisher) makes every effort to ensure the accuracy and completeness of this
manual. However, we cannot be responsible for errors, omissions, or any loss of data as the result of errors or
omissions. ThermoFisher reserves the right to make changes to the manual or improvements to the product at
any time without notice.
The material in this manual is proprietary and cannot be reproduced in any form without expressed written
consent from ThermoFisher.

This page intentionally left blank.

Contents
Chapter 1 Product Overview ............................................................................................. 1-1
Introduction........................................................................................ 1-1
Ordering Information ......................................................................... 1-1
Specifications ...................................................................................... 1-2
Performance..................................................................................... 1-2
Physical............................................................................................ 1-2
Functional........................................................................................ 1-3
Environmental ................................................................................. 1-4
Approvals ......................................................................................... 1-4
Chapter 2 Installation & Wiring........................................................................................ 2-1
Installing the Transducers ................................................................... 2-1
Wiring ................................................................................................ 2-4
DC Auxiliary Power......................................................................... 2-5
Transducers...................................................................................... 2-5
4–20 mA Current Loop ................................................................... 2-5
Chapter 3 Operation & Configuration .............................................................................. 3-1
The Interface....................................................................................... 3-1
Screen Contrast................................................................................ 3-1
Configuration ..................................................................................... 3-2
Auto Mode....................................................................................... 3-2
Manual Mode .................................................................................. 3-3
HydraScan .......................................................................................... 3-5
Flow Menu Items .............................................................................................. 4-1
Chapter 4
Setup................................................................................................... 4-1
Reset ................................................................................................ 4-1
Config.............................................................................................. 4-1
FFT..................................................................................................... 4-1
Logset ................................................................................................. 4-1
Accessing, Saving, & Loading Log Files............................................ 4-2
Trend.................................................................................................. 4-2
Rate.................................................................................................. 4-2
Max.................................................................................................. 4-2
Troubleshooting & Maintenance................................................................... 5-1
Chapter 5
General Troubleshooting .................................................................... 5-1
Thermo Fisher Scientific Polysonics SX30 User Guide v

Contents
vi Polysonics SX30 User Guide Thermo Fisher Scientific
Learn Mode Warnings ..................................................................... 5-2
Operating Mode Warnings .............................................................. 5-2
Checking the FFT............................................................................ 5-3
Signal Quality & Strength................................................................... 5-5
Maintenance ....................................................................................... 5-6
General ............................................................................................ 5-6
Upgrades............................................................................................. 5-6
Contact Information ........................................................................... 5-7
Warranty............................................................................................. 5-8
Obtaining Pipe ID .............................................................................................A-1
Appendix A
Appendix B Toxic & Hazardous Substances Tables*.....................................................B-1

Chapter 1
Product Overview
Introduction ThermoFisher’s Polysonics SX30 portable Doppler flowmeter generates
two independent ultrasonic signals at different frequencies. By correlating
these frequencies, the instrument automatically identifies and eliminates
noise errors from sources such as variable frequency drives.
In addition, operation of the instrument is enhanced by an Expert System
that allows the flowmeter to automatically “learn” the application
parameters. As a result, the flowmeter can be easily commissioned in a
fraction of the time required to configure competitive ultrasonic
flowmeters.
Ordering
Information
Refer to the following list of part numbers to order spare parts for your
instrument.
Table 1–1.
Part Number Description
22767-0001 Poly CD, specification sheet, meter installation video CD
1-0563-007 User guide
1-0561-005 HydraScan software manual
01008-0006 RS232 cable, standard serial, 6 ft., female to male, DB9
10228-0002 Power adapter, 90–264 Vac input, 15 Vdc output
10312-0001 Battery, 12 V, 7.0 A-hr, 24-hour continuous operation
10312-0002 Battery, 12 V, 7.0 A-hr, 12-hour continuous operation
10435-0007 Cable coupling, BNC (to extend 22688-0001, 2 required)
10520-0005 Thermo Fisher accessory bag with shoulder strap
10605-0001 Pipe strap, SS, 32-inch with 3/8 SS screw
10605-0003 Pipe strap, SS, 67-inch with 3/8 SS screw
10705-0003 Nut driver, 3/8-inch
10808-0002 Coupling compound, silicone RTV108, 2.8 oz.
10823-0005 Coupling compound, Sil-Glyde®, 4 oz.
20192-0001 SS tag
Thermo Fisher Scientific Polysonics SX30 User Guide 1-1

Product Overview
Specifications
Part Number Description
20336-0001 Quick mount clamp assembly (set of 2)
22366-0002 Cable adapter, dedicated transducer to portable meter
22490-0001 Cable adapter set, portable transducer to dedicated meter
22686-0002 PCB assembly, Doppler
22688-0002 Transducer cables (set), 16 ft. with BNC connectors
22689-0002 PCB assembly, motherboard
22702-0001 Front panel assembly, includes keypad and display
22703-0001 Transducer assembly (set of 2), 15 ft. cable length
22705-0002 PCB assembly, CPU
22262-0006 4–20 mA board
Specifications
Performance Velocity Range: 0.2–18 ft./sec. (0.06–5.5 m/sec.)
Accuracy: ±1% of velocity full scale
Fluids: Liquids containing particulate or entrained gas bubbles
Pipe Size: 0.5–200 in. (12–5000 mm)
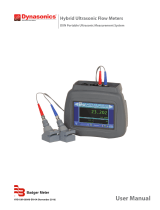
Physical Transmitter: NEMA 6 (IP67), environmentally sealed, waterproof against
accidental immersion, splash proof with lid open
Transducers
Two encapsulated dual frequency sensor heads
Encased in stainless steel shrouds, with stainless steel straps and quick
clamps
Cable length: 16 ft. (5 m)
Weight: 11 lb. (4.9 kg) with 12-hr. battery
Dimensions: Refer to Figure 1–1
1-2 Polysonics SX30 User Guide Thermo Fisher Scientific

Product Overview
Specifications
Figure 1–1.
Functional unctional Outputs: 4–20 mA (into 750 ohms), 12-bit, 5 kV opto-isolated; loop
powered
Power Supply: Built-in lead acid gel battery, 90–264 Vac, 50/60 Hz
Standard: 12 hours continuous operation
Optional: 24 hours continuous operation
Charger
15 V at 1 A typical input supply voltage
2 A maximum
Mains supply voltage fluctuations to charger not to exceed ±10% of
nominal supply voltage
Auxiliary Supply
12–15 Vdc auxiliary power port
15 V at 2 A typical supply voltage
Must be an SELV source: Auxiliary terminals are
supplied from the SELV source as per IEC1010-1
Annex H
Keypad: 21-key with tactile action
Display: Backlit, 240 x 60 dot, high resolution graphics display
Data Logger: 90000 points, programmable in intervals of 30 s, 1, 5, 15,
30, and 60 min.
Programming: Via HydraScan software or integral keypad
Thermo Fisher Scientific Polysonics SX30 User Guide 1-3

Product Overview
Specifications
1-4 Polysonics SX30 User Guide Thermo Fisher Scientific
Serial Interface: RS232 with DB9 connector
Temperature Range
Transducers: -40°F to 250°F (-40°C to 121°C)
Electronics
With CSA approval: 41°F to 104°F (5°C to 40°C)
Without CSA approval: -4°F to 140°F (-20°C to 60°C)
Environmental Pollution degree: 2
Installation category: I for meter; II for battery charger
Approvals
EMC Compliance IEC 61326-1: 2005

Chapter 2
Installation & Wiring
Installing the
Transducers
1. Select an installation site:
Keep the following questions in mind when choosing a proper
installation site:
● Is the chosen section of pipe always full of liquid?
● Are there at least 5 pipe diameters upstream and 3 pipe diameters
downstream from any directional changes, pipe joints, or
narrowing/widening of the pipe?
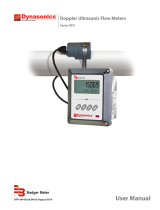
Figure 2–1.
Conditions at locations A, B, C, D, and E can interfere with the
transmission of the ultrasonic wave and yield inaccurate or unreliable
flow readings:
● A: Pipe may not be full
● B: Down flow
● C: Too close to elbow
● D: Air collects at the top of the horizontal pipe
● E: Sediment collects at the bottom of the horizontal pipe
Note Selecting the proper installation location is essential to flow
measurement reliability. Each application is unique and may require a
variation of installation locations. ▲
Thermo Fisher Scientific Polysonics SX30 User Guide 2-1

Installation & Wiring
Installing the Transducers
2. Select a transducer orientation:
Refer to Figure 2–2. If your application allows, install the transducers at
the 3 and 9 o’clock locations. Ensure the transducers are parallel to
each other along the pipe circumference.
Figure 2–2.
3. Attach the transducers to the pipe strap:
a. Use a screwdriver to loosen the mounting screw and slide the lock
back on each transducer.
Figure 2–3.
2-2 Polysonics SX30 User Guide Thermo Fisher Scientific

Installation & Wiring
Installing the Transducers
b. Place the pipe strap across the mounting, and slide the lock back
into place.
Figure 2–4.
c. Tighten the screws.
Figure 2–5.
4. Mount the transducers, ensuring the transducers face the same
direction (as shown in Figure 2–6):
a. Wrap the pipe strap around the pipe, and slide the end of the pipe
strap through the tension nut assembly.
b. Pull the strap tightly, and clamp the tension nut down to secure the
strap to the pipe.
c. Loosen the mounting screw of a transducer, and move the
transducer to the 3 o’clock position on the pipe. Tighten the
mounting screw to secure the transducer.
d. Loosen the mounting screw of the second transducer, and move the
transducer to the 9 o’clock position. Tighten the mounting screw
to secure the transducer.
e. Remove the strap from the pipe, and apply sonic coupling
compound to each transducer surface.
f. Reposition the strap on the pipe, placing the transducers in the
proper positions.
Thermo Fisher Scientific Polysonics SX30 User Guide 2-3

Installation & Wiring
Wiring
g. Tighten the tension nut assembly with a 3/8-inch hex nut driver to
secure the strap.
Note Increasing the pipe strap tension improves signal transmission. ▲
Figure 2–6.
W
iring Wiring is accomplished using the connections on the side of the instrument
enclosure. Refer to Figure 2–7 and the following sections.
Figure 2–7.
2-4 Polysonics SX30 User Guide Thermo Fisher Scientific

Installation & Wiring
Wiring
Thermo Fisher Scientific Polysonics SX30 User Guide 2-5
DC Auxiliary Power Locate the auxiliary power connector on the side of the instrument, and
connect a minimum 10.5-V power supply that supplies 0.25 A.
Note The battery will not charge while the unit is operating from the
auxiliary power source. ▲
Caution Avoid damaging the instrument: Do not use power supplies
greater than 18 V. ▲
Transducers Refer to Figure 2–7 to locate the transducer cable connections on the side
of the instrument.
4–20 mA Current
Loop
20 mA Current
Loop
Locate the red (in) and black (out) 4-20 mA connectors on the side of the
instrument. Connect as shown in Figure 2–8.
Figure 2–8.

This page intentionally left blank.

Chapter 3
Operation & Configuration
The Interface
Figure 3–1. Keypad features
Following is a description of the components called out in Figure 3–1.
● LCD: Displays menu items.
● Scroll: Press to scroll to the next parameter displayed on the LCD
● Enter: Press once you have made an entry.
● Backspace: Deletes the last value entered.
● Numeric keys: Use to enter values when configuring the meter
● Menu selection keys: Press to select the corresponding menu item
displayed on the LCD
Screen Contrast 1. Press the +/- key.
2. When the Adjust Contrast screen appears, press the +/- key again, and
the software scrolls through the levels of contrast. Press the +/- key to
stop the scrolling.
3. Use the scroll and backspace keys to make fine adjustments to the
contrast.
Thermo Fisher Scientific Polysonics SX30 User Guide 3-1

Operation & Configuration
Configuration
Configuration Note the following before configuring the meter:
● You must know the pipe internal diameter (ID) to ensure reliable flow
measurements. If you do not know the pipe ID, go to Appendix A.
● There must be flow in the pipe when you start the meter.
There are two modes of operation. Consider using auto mode if your
application is a constant process. The instrument default is the auto mode.
Apply power to the meter, and begin the configuration process by selecting
Auto or Manual operating mode. Once you have completed the
configuration process, you can access these screens from the Flow screen by
selecting Setup > Config.
Auto Mode 1. Pipe ID screen:
a. Enter the pipe ID, and press Enter.
b. Use the scroll key to select the measurement units (inches, mm).
Press Enter to select the unit.
c. Select Next to move to the next screen.
2. Flow Units screen:
a. Use the scroll key to select the flow units (US gallons, million
gallons, cubic meters, oil barrels, Imperial gallons, cubic feet, liters,
liquid barrels), and press Enter.
b. Use the scroll key to select the time base for flow measurement
(seconds, minutes, hours, days), and press Enter.
c. Select Next to enter learn mode.
3. The meter displays status of the learning process. Refer to “Learn Mode
Warnings” (Table 6–2 in Chapter 6) if you receive one of the following
messages:
● Invalid Signal, Can’t Learn
● No Flow, Can’t Learn
● Warning Low S Strength
● Warning Poor S Strength
3-2 Polysonics SX30 User Guide Thermo Fisher Scientific
/