Page is loading ...

Doppler Ultrasonic Flow Meters
Series DFX
DPP-UM-00256-EN-03 (August 2019)
User Manual

Doppler Ultrasonic Flow Meters, Series DFX
Page 2 August 2019DPP-UM-00256-EN-03

User Manual
Page 3 August 2019 DPP-UM-00256-EN-03
CONTENTS
Scope of This Manual . . . . . . . . . . . . . . . . . . . . . . . . . . . . . . . . . . . . . . . . . . . . . . . . . . . . . . . . . . . . . . . . . . . 5
Unpacking and Inspection . . . . . . . . . . . . . . . . . . . . . . . . . . . . . . . . . . . . . . . . . . . . . . . . . . . . . . . . . . . . . . . 5
Safety . . . . . . . . . . . . . . . . . . . . . . . . . . . . . . . . . . . . . . . . . . . . . . . . . . . . . . . . . . . . . . . . . . . . . . . . . . . . . 5
Terminology and Symbols . . . . . . . . . . . . . . . . . . . . . . . . . . . . . . . . . . . . . . . . . . . . . . . . . . . . . . . . . . . . . 5
Quick-Start Operating Overview . . . . . . . . . . . . . . . . . . . . . . . . . . . . . . . . . . . . . . . . . . . . . . . . . . . . . . . . . . . . 6
Transducer Location. . . . . . . . . . . . . . . . . . . . . . . . . . . . . . . . . . . . . . . . . . . . . . . . . . . . . . . . . . . . . . . . . 6
Pipe Preparation and Transducer Mounting . . . . . . . . . . . . . . . . . . . . . . . . . . . . . . . . . . . . . . . . . . . . . . . . . . 6
Transducer Connections . . . . . . . . . . . . . . . . . . . . . . . . . . . . . . . . . . . . . . . . . . . . . . . . . . . . . . . . . . . . . . 7
Startup . . . . . . . . . . . . . . . . . . . . . . . . . . . . . . . . . . . . . . . . . . . . . . . . . . . . . . . . . . . . . . . . . . . . . . . . . 7
Introduction. . . . . . . . . . . . . . . . . . . . . . . . . . . . . . . . . . . . . . . . . . . . . . . . . . . . . . . . . . . . . . . . . . . . . . . . . 8
General . . . . . . . . . . . . . . . . . . . . . . . . . . . . . . . . . . . . . . . . . . . . . . . . . . . . . . . . . . . . . . . . . . . . . . . . . 8
Application Versatility. . . . . . . . . . . . . . . . . . . . . . . . . . . . . . . . . . . . . . . . . . . . . . . . . . . . . . . . . . . . . . . . 8
User Safety. . . . . . . . . . . . . . . . . . . . . . . . . . . . . . . . . . . . . . . . . . . . . . . . . . . . . . . . . . . . . . . . . . . . . . . 9
Data Integrity . . . . . . . . . . . . . . . . . . . . . . . . . . . . . . . . . . . . . . . . . . . . . . . . . . . . . . . . . . . . . . . . . . . . . 9
Product Identication. . . . . . . . . . . . . . . . . . . . . . . . . . . . . . . . . . . . . . . . . . . . . . . . . . . . . . . . . . . . . . . . 9
Transducer Installation . . . . . . . . . . . . . . . . . . . . . . . . . . . . . . . . . . . . . . . . . . . . . . . . . . . . . . . . . . . . . . . . . 10
Unpacking and Inspection. . . . . . . . . . . . . . . . . . . . . . . . . . . . . . . . . . . . . . . . . . . . . . . . . . . . . . . . . . . . 10
Mounting Locations . . . . . . . . . . . . . . . . . . . . . . . . . . . . . . . . . . . . . . . . . . . . . . . . . . . . . . . . . . . . . . . . 10
Pipe Preparation . . . . . . . . . . . . . . . . . . . . . . . . . . . . . . . . . . . . . . . . . . . . . . . . . . . . . . . . . . . . . . . . . . 12
DT9 Clamp-On Transducer Mounting . . . . . . . . . . . . . . . . . . . . . . . . . . . . . . . . . . . . . . . . . . . . . . . . . . . . . 12
DP7 Probe Transducer Mounting. . . . . . . . . . . . . . . . . . . . . . . . . . . . . . . . . . . . . . . . . . . . . . . . . . . . . . . . 13
Transmitter Installation. . . . . . . . . . . . . . . . . . . . . . . . . . . . . . . . . . . . . . . . . . . . . . . . . . . . . . . . . . . . . . . . . 18
Unpacking and Inspection. . . . . . . . . . . . . . . . . . . . . . . . . . . . . . . . . . . . . . . . . . . . . . . . . . . . . . . . . . . . 18
Mounting Location . . . . . . . . . . . . . . . . . . . . . . . . . . . . . . . . . . . . . . . . . . . . . . . . . . . . . . . . . . . . . . . . 18
Dimensions . . . . . . . . . . . . . . . . . . . . . . . . . . . . . . . . . . . . . . . . . . . . . . . . . . . . . . . . . . . . . . . . . . . . . 19
Transducer Wiring Connections . . . . . . . . . . . . . . . . . . . . . . . . . . . . . . . . . . . . . . . . . . . . . . . . . . . . . . . . 20
Power Supply Wiring Connections. . . . . . . . . . . . . . . . . . . . . . . . . . . . . . . . . . . . . . . . . . . . . . . . . . . . . . . 21
AC Power Supply Connections . . . . . . . . . . . . . . . . . . . . . . . . . . . . . . . . . . . . . . . . . . . . . . . . . . . . . . . . . 22
DC Power Supply Connections . . . . . . . . . . . . . . . . . . . . . . . . . . . . . . . . . . . . . . . . . . . . . . . . . . . . . . . . . 22
Multiple Meter Installations . . . . . . . . . . . . . . . . . . . . . . . . . . . . . . . . . . . . . . . . . . . . . . . . . . . . . . . . . . . 23
ISO Modules. . . . . . . . . . . . . . . . . . . . . . . . . . . . . . . . . . . . . . . . . . . . . . . . . . . . . . . . . . . . . . . . . . . . . 24
4…20 mA Output Module . . . . . . . . . . . . . . . . . . . . . . . . . . . . . . . . . . . . . . . . . . . . . . . . . . . . . . . . . . . . 25
Internal Power Conguration . . . . . . . . . . . . . . . . . . . . . . . . . . . . . . . . . . . . . . . . . . . . . . . . . . . . . . . . . . 25
External Power Conguration. . . . . . . . . . . . . . . . . . . . . . . . . . . . . . . . . . . . . . . . . . . . . . . . . . . . . . . . . . 26

Doppler Ultrasonic Flow Meters, Series DFX
Page 4 August 2019DPP-UM-00256-EN-03
Control Relay Output Module. . . . . . . . . . . . . . . . . . . . . . . . . . . . . . . . . . . . . . . . . . . . . . . . . . . . . . . . . . 27
Rate Pulse Output Module. . . . . . . . . . . . . . . . . . . . . . . . . . . . . . . . . . . . . . . . . . . . . . . . . . . . . . . . . . . . 28
Instrument Programming . . . . . . . . . . . . . . . . . . . . . . . . . . . . . . . . . . . . . . . . . . . . . . . . . . . . . . . . . . . . . . . 29
General . . . . . . . . . . . . . . . . . . . . . . . . . . . . . . . . . . . . . . . . . . . . . . . . . . . . . . . . . . . . . . . . . . . . . . . . 29
Keypad Operation . . . . . . . . . . . . . . . . . . . . . . . . . . . . . . . . . . . . . . . . . . . . . . . . . . . . . . . . . . . . . . . . . 29
Totalizer Reset. . . . . . . . . . . . . . . . . . . . . . . . . . . . . . . . . . . . . . . . . . . . . . . . . . . . . . . . . . . . . . . . . . . . 29
Menu Structure. . . . . . . . . . . . . . . . . . . . . . . . . . . . . . . . . . . . . . . . . . . . . . . . . . . . . . . . . . . . . . . . . . . . . . 30
Hierarchy. . . . . . . . . . . . . . . . . . . . . . . . . . . . . . . . . . . . . . . . . . . . . . . . . . . . . . . . . . . . . . . . . . . . . . . 30
Menu Maps . . . . . . . . . . . . . . . . . . . . . . . . . . . . . . . . . . . . . . . . . . . . . . . . . . . . . . . . . . . . . . . . . . . . . 31
Parameters . . . . . . . . . . . . . . . . . . . . . . . . . . . . . . . . . . . . . . . . . . . . . . . . . . . . . . . . . . . . . . . . . . . . . . . . 33
Setup Parameters . . . . . . . . . . . . . . . . . . . . . . . . . . . . . . . . . . . . . . . . . . . . . . . . . . . . . . . . . . . . . . . . . 33
Module Conguration Parameters. . . . . . . . . . . . . . . . . . . . . . . . . . . . . . . . . . . . . . . . . . . . . . . . . . . . . . . 35
Advanced Conguration Parameters . . . . . . . . . . . . . . . . . . . . . . . . . . . . . . . . . . . . . . . . . . . . . . . . . . . . . 36
Startup and Troubleshooting . . . . . . . . . . . . . . . . . . . . . . . . . . . . . . . . . . . . . . . . . . . . . . . . . . . . . . . . . . . . . 38
Startup . . . . . . . . . . . . . . . . . . . . . . . . . . . . . . . . . . . . . . . . . . . . . . . . . . . . . . . . . . . . . . . . . . . . . . . . 38
Troubleshooting . . . . . . . . . . . . . . . . . . . . . . . . . . . . . . . . . . . . . . . . . . . . . . . . . . . . . . . . . . . . . . . . . . 39
Specications. . . . . . . . . . . . . . . . . . . . . . . . . . . . . . . . . . . . . . . . . . . . . . . . . . . . . . . . . . . . . . . . . . . . . . . 40
North American Pipe Schedules . . . . . . . . . . . . . . . . . . . . . . . . . . . . . . . . . . . . . . . . . . . . . . . . . . . . . . . . . . . 41
Part Number Construction. . . . . . . . . . . . . . . . . . . . . . . . . . . . . . . . . . . . . . . . . . . . . . . . . . . . . . . . . . . . . . . 46

Scope of This Manual
Page 5 August 2019 DPP-UM-00256-EN-03
SCOPE OF THIS MANUAL
This manual is divided into two main sections:
• “Quick-Start Operating Overview” on page6 is intended to help you get the DFX flow meter up and running quickly.
Refer to the detailed instructions if you require additional information.
• The remaining chapters provide a detailed description of all software settings and hardware installation guidance.
MPORTANTI
Read this manual carefully before attempting any installation or operation. Keep the manual accessible for future reference.
UNPACKING AND INSPECTION
Upon opening the shipping container, visually inspect the product and applicable accessories for any physical damage such
as scratches, loose or broken parts, or any other sign of damage that may have occurred during shipment.
OTE:N If damage is found, request an inspection by the carrier’s agent within 48 hours of delivery and file a claim with the
carrier. A claim for equipment damage in transit is the sole responsibility of the purchaser.
SAFETY
Terminology and Symbols
Indicates a hazardous situation, which, if not avoided, is estimated to be capable of causing death or serious
personal injury.
Indicates a hazardous situation, which, if not avoided, could result in severe personal injury or death.
Indicates a hazardous situation, which, if not avoided, is estimated to be capable of causing minor or moderate
personal injury or damage to property.

Quick-Start Operating Overview
Page 6 August 2019DPP-UM-00256-EN-03
QUICKSTART OPERATING OVERVIEW
This manual contains detailed operating instructions for all aspects of the DFX flow instrument. The following condensed
instructions are provided to help you get the instrument up and running as quickly as possible. This pertains to basic
operation of the clamp-on transducer only. If specific instrument features, a hazardous area installation or an alternate
transducer style are to be used—or if you are unfamiliar with this type of instrument—see the appropriate section in the
manual for complete details.
Transducer Location
Determine the appropriate mounting location for the transducers. (See Figure 1.) Pipe must be filled with liquid for
proper operation.
h
h
FLOW
Top View of Pipe
Figure 1: Transducer locations
45°
45°
YES
W and V Mount
Top of
Pipe
Figure 2: Transducer mounting configuration
Pipe Preparation and Transducer Mounting
1. The piping surface, where the transducers mount, needs to be clean and dry. Remove loose scale, rust and paint for
satisfactory acoustical bonds.
2. Connect the mounting straps around the pipe. Leave the strap loose enough to slip the transducers underneath.
3. Apply a liberal amount of couplant grease onto the transducer faces.
4. Place each transducer under the mounting strap, 180° apart on the pipe. Verify that the transducer cables are facing the
same direction on the downstream side of the ow. See Figure 3.
5. Route the transducer cable back to the monitor, avoiding conduits that contain high voltage AC supply wires.

Quick-Start Operating Overview
Page 7 August 2019 DPP-UM-00256-EN-03
FLOW
Top View
of Pipe
Figure 3: Transducer direction
Transducer Connections
1. Mount the monitor within the length of the transducer cables.
2. Route the transducer cables through the center conduit hole in the bottom of the enclosure and connect to terminal block
J4. The terminal blocks are a removable and can be disconnected to simplify wiring access. See the wiring diagram inside
the door for reference.
Startup
Initial Settings and Powerup
1. Verify that the power supply jumper settings are properly congured for the power supply. See “Power Supply Wiring
Connections” on page 21 or the wiring and jumper selection diagram is located inside the door.
OTE:N Power supply selection is specified during order placement and appropriate jumpers are placed at the factory.
If power is changed from AC to DC or vice versa, the fuse requirement changes. Fuse ratings are listed on the
transmitter’s door.
2. Route power connections through the conduit hole farthest to the left and in the enclosure. Then connect power to the J2
terminal block. See Figure 11 on page 17.
3. Apply power. On initial power-up, the DFX ow meter conducts a series of self-diagnostic tests and buering operations
that take approximately 30 seconds.
4. Enter pipe internal diameter (Pipe ID), measuring units and output conguration.

Introduction
Page 8 August 2019DPP-UM-00256-EN-03
INTRODUCTION
General
The DFX ultrasonic flow meter is designed to measure volumetric flow of solids-bearing or aerated liquid within a closed
conduit. Transducers are available as non-contacting (DT9) or insertion probe (DP7) types. DT9 non-contacting transducers
are strapped to the outside of a pipe and are suitable for most installations where the pipe material supports the transmission
of ultrasound. Some pipe materials, such as concrete pressure pipe and some plastic lined pipes do not allow ultrasound to
penetrate to the liquid inside. For these applications, use the DP7 insertion probe.
The flow meter operates by transmitting an ultrasonic sound from a transmitting transducer through the pipe wall or from
the probe tip into the moving liquid. The sound is reflected by sonic reflectors suspended in the liquid and recorded by the
receiving transducer. If the sonic reflectors are moving within the sound transmission path, sound waves are reflected at a
frequency shifted (Doppler frequency) from the transmitted frequency. The shift in frequency is directly related to the speed
of the moving particle or bubble. This shift in frequency is interpreted by the instrument and converted to various user
defined measuring units.
The criteria for a good Doppler reflector are:
• The scattering material must have a sonic impedance (sound speed difference) at least 10% different from the fluid.
• There must be some particles large enough to cause longitudinal reflection—particles larger than 35 micron.
• For a given pipe size, the longitudinal reflection must have sufficient energy to overcome the Rayleigh (energy wasting)
scattering caused by smaller particles.
• The reflecting material must travel at the same velocity as the fluid for good accuracy.
Application Versatility
The DFX flow meter can be successfully applied on a wide range of metering applications. The easy-to-program transmitter
allows the standard product to be used on pipe sizes ranging from 1…120 in. (25…3050 mm) pipe ID. With the small pipe
transducer option, the pipe size range is 0.25…1 in. (6…25 mm). A variety of liquid applications can be accommodated:
• Sewage
• River water
• Plant effluent
• Mining slurries
• Sludge
• Others
Because the transducers are non-contacting and have no moving parts, the flow meter is not affected by system pressure,
fouling or wear. Standard transducers are rated to a pipe surface temperature of 250° F (121° C).

Introduction
Page 9 August 2019 DPP-UM-00256-EN-03
User Safety
The DFX flow meter employs modular construction and provides electrical safety for the operator. The enclosure is
constructed from rugged polycarbonate plastic with UV inhibitors. The enclosure does not contain any conductive materials
that can become energized while the door is closed. The keypad is made of polycarbonate and is designed for outdoor use.
The AC power transformer provides 4000 Volts of isolation from the power supply mains. The display face contains voltages
no greater than 24V DC. Output modules are optically isolated from external power supplies and provide a great degree of
immunity to ground loops.
CAUTION
IF THE DFX FLOW METER IS USED IN A MANNER NOT SPECIFIED BY THE MANUFACTURER, THE PROTECTION PROVIDED
BY THE EQUIPMENT MAY BE IMPAIRED.
Data Integrity
The DFX flow meter retains all user configuration data and totalizer accumulations in non-volatile FLASH memory indefinitely.
Product Identication
The serial number and complete model number of the transmitter are on the side of the monitor enclosure.
Figure 4: Product labels

Transducer Installation
Page 10 August 2019DPP-UM-00256-EN-03
TRANSDUCER INSTALLATION
Unpacking and Inspection
Upon opening the shipping container, visually inspect the product and applicable accessories for any physical damage such
as scratches, loose or broken parts, or any other sign of damage that may have occurred during shipment.
OTE:N If damage is found, request an inspection by the carrier’s agent within 48 hours of delivery and file a claim with the
carrier. A claim for equipment damage in transit is the sole responsibility of the purchaser.
Mounting Locations
The transducers contain piezoelectric crystals for transmitting and receiving ultrasonic sound energy through the pipe wall
(DT9) and from the probe tip (DP7). Placement of the ultrasonic transducer is the most critical step in achieving an accurate
and reliable flow reading. All flow meters of this type rely on a full-pipe of fluid that is flowing symmetrically (evenly) in
the pipe. Flow in partially filled pipes and immediately downstream of elbows, valves and pumps is unstable and leads to
unstable readings and non-linearity.
The DFX flow meter has software algorithms that assume a full pipe of liquid. Install only in locations where the pipe is filled
at all times when flow measurements are required. Avoid partially filled pipes that can lead to very large flow measurement
errors. See Figure 5 for possible pipe configurations.
h
h
Figure 5: Pipe configurations and installation recommendations

Transducer Installation
Page 11 August 2019 DPP-UM-00256-EN-03
Select a transducer mounting location with adequate straight runs of pipe, both upstream and downstream, to achieve stable
readings
1
. See Figure 6 for examples of minimum upstream and downstream requirements.
*
**
Flow
*
**
Flow
*
**
Flow
*
**
Flow
Flow
*
**
Flow
*
**
24
24
14
10
10
10
5
5
5
5
5
5
* **
Upstream
Pipe
Diameters
Downstream
Pipe
Diameters
Piping Conguration
and Transducer Positioning
Figure 6: Upstream/Downstream Pipe Requirements
1
The DFX system provides repeatable measurements on piping systems that do not meet these requirements, but the
accuracy may be affected.

Transducer Installation
Page 12 August 2019DPP-UM-00256-EN-03
Pipe Preparation
Before the transducer heads are mounted to the pipe surface, an area slightly larger than the flat surface of the transducer
face must be prepared. If pipe insulation is present, it must be peeled back to expose the pipe surface. Use a wire brush to
remove loose paint, rust, scale or dirt. Paint, if bonded well to the pipe surface, does not need to be removed. Any bumps
present on ductile iron pipe do not need to be removed. Thoroughly dry the mounting surfaces so that the couplant grease
bonds to the surface.
OTE:N Small pits in the piping surface typically do not significantly impact ultrasonic transmission or signal reception.
Couplant
Use a coupling compound to create an acoustically conductive path between the transducer and the prepared pipe surface.
Clamp-on ultrasonic meters do not operate without coupling compound mounted between the pipe wall and the transducer
face. Enclosed with the DFX system is a tube of coupling compound that is adequate for general purpose applications. Use
a silicone-based valve grease or RTV (Room Temperature Vulcanizing) products or grease for Doppler installations as they
operate over a very wide temperature range. In some installations, such as automotive, silicone is not permitted. Alternate
petroleum-based products can be used, but verify that the grease is rated not to flow at the maximum surface temperature
anticipated on the pipe.
In general, use the following couplants with these transducers:
Transducer Couplant
DT90, DT91, DT94, DT95 Dow 732 or Dow 111 (or equivalent)
DT92, DT93, DT96, DT97 Krytox® LVP
DP7 Not applicable
Table 1: Transducer couplants
DT9 Clamp-On Transducer Mounting
Clamp-on transducers should be mounted on the pipe 180° apart and facing each other on the pipe, with the cables on the
downstream side of the transducers. If the pipe is horizontal, the preferred mounting orientation is 3 and 9 o’clock, with
12 o’clock being the top of the pipe. See Figure 7. Orientation on vertical pipes does not matter.
FLOW
Top View
of Pipe
Figure 7: Transducer Placement
Large pipe installations use stainless steel straps to secure the transducers to the outside of the pipe. The DFX system is
shipped with four 36 in. (900 mm) straps, which are suitable for pipes up to 39 in. (1000 mm) diameter.
1. Select the proper number of transducer straps to allow a complete strap to go around the circumference of the pipe. If a
pipe is larger than 39 in. (1000 mm), use a single strap/buckle arrangement to reduce the number of strap connections.
The straps can be connected together to make a continuous length. Small pipe installations use an integral clamping
mechanism built into the transducer.
Pipe Size Straps Required
1…9 in. (25…225 mm) 1
10…19 in. (250…480 mm) 2
20…29 in. (500…740 mm) 3
30…39 in. (760…1000 mm) 4
Table 2: Straps required vs. pipe size

Transducer Installation
Page 13 August 2019 DPP-UM-00256-EN-03
2. Wrap the strap around the pipe where the transducers mount. Leave the strap loose enough to allow the transducers to
be placed underneath. If multiple straps are being used, wrap electrical tape around all but one strap connection to secure
the strap worm screws in place.
3. Spread an even layer of coupling compound, approximately 1/8 in. (3 mm) thick, to the prepared transducer mounting
areas of the pipe.
4. Spread an even layer of coupling compound, approximately 1/8 in. (3 mm) thick, to the at face of the two transducers.
5. Place each transducer under the strap with the at face—amber plastic window—positioned towards the pipe. The notch
on the back of the transducer provides a mounting surface for the strap. The transducer cables must be facing in the same
direction and downstream of the transducers for proper operation.
OTE:N Large pipes may require two people for this procedure.
6. Tighten the strap enough to hold the transducers in place, but not so tight that all of the couplant squeezes out of the gap
between the transducer face and pipe. Make sure that the transducers are squarely aligned on the pipe and 180° apart. If
RTV is used, avoid moving the transducers during the curing time (typically 24 hours) as bubbles may form between the
transducer and pipe that can reduce ultrasonic signal transmission to unsatisfactory levels.
7. Route the transducer cables back to the area where the transmitter mounts, avoiding high voltage cable trays and
conduits. While transducer cable extension is not generally recommended, if additional transducer cable length is
required, use cable and connectors of the correct type and impedance. In many cases, especially if a splice my be exposed
to water or other liquids, it may be more eective to replace the entire cable. Transducers use RG59, 75 Ohm coaxial cable
or Twinax (Belden #9463) or (Belden # 9463DB) 78 Ohm two conductor cable.
8. If the transducers are permanently mounted using Dow 732, the RTV must be completely cured before proceeding to
Instrument Startup. Make sure that no relative motion between the transducer and pipe occurs during the 24 hour curing
process. If Dow 111 grease was used for temporary operation of the DFX system, proceed with the Startup procedures.
DP7 Probe Transducer Mounting
The DP7 insertion transducer that is used by the DFX flow meter contains piezoelectric crystals for transmitting and receiving
ultrasonic sound energy. The black Ultem® plastic tip of the DP7 transducer contains these crystals, which are designed to be
inserted just into the path of the flowing liquid.
Select a transducer mounting location that is completely filled with liquid when flow measurements are made (see
Figure 5) and with adequate straight runs (without disturbances) of pipe, both upstream and downstream, to achieve stable
and accurate readings. Examples of minimum upstream and downstream requirements are included in Figure 5 on page 10.
Figure 8: Installation locations
When installing the DP7 transducer in a horizontal pipe, the preferred orientation is at least 20 degrees from the top or
bottom of the pipe. Verify that the mounting location allows for adequate clearance to install and retract the probe fully from
the pipe.
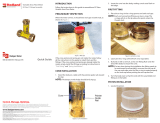
The following instructions cover hot tapping applications where the installation or removal of the transducer probe must
be done without shutting down the process pressure. If the product is being installed without an isolation valve, ignore
the steps that pertain to its installation. Figure 9 illustrates an exploded view of an isolation valve assembly and names the
various components.

Transducer Installation
Page 14 August 2019DPP-UM-00256-EN-03
Full Port
Ball Valve
Close
Nipple
Weld
Coupling
Seal
Fitting
Figure 9: Hot tap installation
The Bronze Hot Tap Kit (p.n. D030-1006-001) and the Stainless Steel Hot Tap Kit (p.n. D030-1006-002) include an isolation valve
assembly and are designed for installation in pipes under pressure, up to 700 psi (48 bar) at 70° F (21° C).
All items required for installation are provided with the kit, except for the 1-1/2 in. NPT weld coupling or service saddle and
the drilling and welding equipment. These instructions call for the use of a drilling machine designed for operations under
pressure (for example, Mueller Co., Water Products Division).
1. Verify that the pipe’s line pressure is within the rated limits of the pressure drilling machine being used.
2. Grind o paint or other coatings from the pipe in the DP7 probe mounting area.
3. Tack weld a 1-1/2 in. NPT weld coupling to the pipe or install a service saddle according to the supplier’s instructions. The
coupling or saddle must be aligned perpendicular to the pipe axis and square to its plane.
4. Complete welding. A water tight, 0.25 in. minimum weld bead is recommended.
5. Install the close nipple (supplied with assembly) into the weld coupling. Use appropriate pipe sealants.
6. Install the isolating ball valve on the close nipple. Verify that the valve is in the fully open position.
7. Install drill bit and adapter into the pressure drilling machine. Then attach the machine to the isolation valve.
8. Drill through the pipe wall in accordance with the instructions supplied with the drilling machine.
9. Withdraw the drill bit through the isolating valve.
10. Close the valve and remove the drilling machine.
11. Check for leakage at valve and connections.
12. Place pipe sealant on the 1-1/2 in. NPT threads of the insertion tting assembly.
13. Screw the assembly into the isolation valve and tighten with a 2-1/2 in. pump wrench.

Transducer Installation
Page 15 August 2019 DPP-UM-00256-EN-03
Probe Cables
Before inserting the probe into the pipe, the sensor cables should be routed to the transmitter location. Verify that the
supplied cable length is sufficient to meet the installation requirements. While transducer cable extension is not generally
recommended, if additional transducer cable length is required, use cable and connectors of the correct type and
impedance. In many cases, especially if a splice my be exposed to water or other liquids, it may be more effective to replace
the entire cable. Transducers use RG59, 75 Ohm coaxial cable, Twinax (Belden #9463) or (Belden # 9463DB) 78 Ohm
two-conductor cable.
CAUTION
THE PROBE CABLES ARE DESIGNED TO CARRY LOW LEVEL SIGNALS THAT ARE DEVELOPED BY THE SENSOR. CARE
SHOULD BE TAKEN IN ROUTING THE CABLES. AVOID RUNNING CABLES NEAR SOURCES OF HIGH VOLTAGE OR EMI/RFI.
ALSO AVOID ROUTING THE CABLES IN CABLE TRAY CONFIGURATIONS, UNLESS THE TRAYS ARE SPECIFICALLY USED
FOR OTHER LOW VOLTAGE, LOW LEVEL SIGNAL CABLES.
CAUTION
THE INTERNAL DP7 PROBE WIRING IS EPOXY ENCAPSULATED TO SEAL IT FROM MOISTURE. THE DP7 PROBE IS
PROVIDED WITH TWO COAXIAL CABLES TO SHIELD THE LOW LEVEL SIGNALS AND MUST BE CONTINUOUS TO THE DP7
PROBE TRANSMITTER. EXCESS WIRE MAY BE CUTOFF OR SIMPLY COILED NEAR THE DFX FLOW METER.
Probe Retraction Procedure
1. Retract the probe by loosening the upper jam nuts counterclockwise as viewed from the top of the probe using the proper
size wrench. If the pipe is under pressure, the nuts must be turned alternately about two turns at a time to prevent binding
as a result of non-equal seal loading. In many cases, the line pressure causes the probe to retract. Should the probe bind,
use the retraction nuts on the lower side of the probe ange to assist in the probe retraction. Continue this procedure until
the probe is fully retracted into the isolation valve.
CAUTION
DO NOT RUN THE DRIVE NUTS OFF THE RODS UNTIL THE ISOLATION VALVE IS FULLY CLOSED.
2. After the probe is retracted past the “ball” in the isolation valve, the isolation valve may be closed to isolate the probe from
the line so the probe can be removed entirely.
CAUTION
IF THE INSERTION PROBE IS NOT ABOVE THE “BALL” OF THE ISOLATION VALVE, THE VALVE CANNOT BE CLOSED. IF
THE VALVE WILL NOT CLOSE SMOOTHLY, THE BODY OR TIP OF THE PROBE IS MOST LIKELY NOT ABOVE THE “BALL”.
ATTEMPTING TO FORCE THE VALVE INTO THE CLOSED POSITION MAY RESULT IN DAMAGE TO THE PROBE.

Transducer Installation
Page 16 August 2019DPP-UM-00256-EN-03
Probe Insertion
Before inserting the DP7 probe into the piping system, calculate the probe insertion depth. Refer to the paragraphs that
follow and Figure 10 on page 17 for information regarding this process. The variables required are:
• The overall probe length
• Pipe internal diameter (ID)
• Pipe wall thickness
• The length of the valve stack
• Amount of straight pipe diameters in the system
To Calculate Insertion Depth
Using this information and referring to Figure 10, proper insertion depth can be determined.
• Measurement A — The typical depth that the DP7 probe tip is inserted into the piping system is 1/8 (12.5%) of the pipe
internal diameter.
• Measurement B — Pipe wall thickness. This information can be obtained from standard pipe wall charts (see
“Specifications” on page40) or ideally can be measured using an ultrasonic wall thickness gauge.
• Measurement C — Measure the distance that is going to be taken up by the pipe tap, nipple, full-flow ball valve and the
insertion fitting. DP7 probes use 1-1/2 in. NPT hardware and the insertion fitting is approximately 2-1/2 in. in height.
• Measurement D — The length of DP7 probe that protrudes from the insertion fitting after it is inserted to the proper
depth in the fluid stream.
• Measurement E — This is the overall length of the probe measured from the black measurement tip to the top flange on
the probe.
Measure and record the following linear dimensions.
A = 0.125 x Pipe OD =
B = Pipe Wall Thickness =
C = Seal Fitting to Pipe Wall =
D = E - C - B - A
D =
E = Probe Length =

Transducer Installation
Page 17 August 2019 DPP-UM-00256-EN-03
OTE:N For some low pressure/low temperature applications less than 30 psi (2.1 bar) and less than 100° F (38° C), the probe
may be pushed in by hand to decrease the insertion time.
Full Port
Ball Valve
Seal
Fitting
DP7 Probe
Pipe WallB
E
A
1/8 Pipe
Diameter
DP7
Length
Insertion
Measurement
D
Valve and
Seal Stack
C
Internal
Diameter
Figure 10: Installation measurements
Flow Direction
Arrow
Figure 11: Flow direction arrow
1. Lubricate the O-rings located within the DP7 probe seal tting so that the seals are not damaged during probe insertion.
2. Run the lower jam nuts down to a point that approximates the nal insertion position or at least far enough to allow
insertion into the insertion tting.
3. Using the threaded rods as a guide, position the probe in the insertion tting. Continue to insert the probe into the
isolation assembly until the probe tip comes in contact with the closed “ball” in the isolation valve.
CAUTION
DO NOT FORCE THE PROBE TIP AGAINST THE “BALL”, AS DAMAGE TO THE PROBE TIP MAY RESULT.
4. Replace the upper jam nuts (2 on each rod) and the cotter pins. The nuts should be run down to the top side of the
retaining collar and the cotter pins replaced.
5. Orient the probe in the direction of ow as indicated by the ow direction arrow located on the top of the probe ange.
6. Lock the probe in position with the enclosed Allen wrench.
CAUTION
THE NUTS ON BOTH ENDS OF THE RETAINING RODS MUST ALWAYS BE IN PLACE AS A SAFETY MEASURE TO PREVENT
POSSIBLE PROBE BLOW OUT. INSERTING COTTER PINS IS A FURTHER SAFETY MEASURE.
7. Slowly open the isolation valve. When the valve is fully open, use the proper size wrench on the insertion nuts, alternately
tightening each nut about two complete turns to avoid uneven seal loading.

Transmitter Installation
Page 18 August 2019DPP-UM-00256-EN-03
TRANSMITTER INSTALLATION
Unpacking and Inspection
Upon opening the shipping container, visually inspect the product and applicable accessories for any physical damage such
as scratches, loose or broken parts, or any other sign of damage that may have occurred during shipment.
OTE:N If damage is found, request an inspection by the carrier’s agent within 48 hours of delivery and file a claim with the
carrier. A claim for equipment damage in transit is the sole responsibility of the purchaser.
Mounting Location
The enclosure should be mounted in an area that is convenient for servicing, calibration and for observation of the
LCD readout.
1. Locate the transmitter within the length of transducer cable that was supplied with the DFX system. If this is not possible,
exchange the cable for one that is of proper length. While transducer cable extension is not generally recommended,
if additional transducer cable length is required, use cable and connectors of the correct type and impedance. In many
cases, especially if a splice my be exposed to water or other liquids, it may be more eective to replace the entire cable.
Transducers use RG59,75 Ohm coaxial cable or Twinax (Belden #9463) or
(Belden # 9463DB) 78 Ohm two-conductor cable.
2. Mount the DFX ow meter in a location that is:
• Free of vibration
• Protected from falling corrosive fluids
• Within ambient temperature limits – 40…185° F (– 40…85° C)
• Out of direct sunlight. Direct sunlight may increase transmitter temperature to above the maximum limit
3. See Figure 12 for enclosure and mounting dimension details. Make sure there is enough room for door swing, maintenance
and conduit entrances. Secure the enclosure to a at surface with four appropriate fasteners.
4. Use conduit hubs where cables enter the enclosure. Seal unused holes with plugs.
OTE:N Use NEMA 4 (IP-65) rated fittings/plugs to maintain the watertight integrity of the enclosure. Generally, the left
conduit hole (viewed from front) is used for line power, the center conduit hole for transducer connections and the
right hole is used for ISO-MOD I/O wiring.
5. If additional holes are required, drill the appropriate size hole in the enclosure’s bottom. Use extreme care not to run the
drill bit into the wiring or circuit cards.

Transmitter Installation
Page 19 August 2019 DPP-UM-00256-EN-03
Dimensions
5.75"
(146.1)
3.93"
(99.8)
4.25"
(108.0)
7.00"
(177.8)
Power
Connection
Transducer
Connection
Input/Output
Connection
(3) ½” (m20) Conduit
Holes
6.08"
(154.4)
5.19"
(131.8)
6.65"
(169.0)
3.31
(84.1)
1.70”
(43.2)
1.99”
(50.5)
6.25”
(158.8)
0.07”(1.8)
Maximum
Radius
PANEL CUT-OUT
Panel Thickness: 0.5” (12) Max
PANEL MOUNT (OPTION)
WALL MOUNT (OPTION)
RUN PROGRAM
RELAY 1 RELAY 2
Figure 12: DFX transmitter installation dimensions

Transmitter Installation
Page 20 August 2019DPP-UM-00256-EN-03
Transducer Wiring Connections
To access terminal strips for electronic connectors, loosen the two screws in the enclosure door and open the door.
1. Guide the transducer connectors through the middle conduit hole located of the transmitter enclosure. Secure the
transducer cable with the supplied conduit nut (See Figure 13).
+
C3
J3
J4
J2
JP1
Transducer
Connections
Figure 13: Transducer cable installation
The terminals within the DFX flow meter are removable. They can be unplugged, wired and then plugged back in.
2. Connect the wires to J4 at the corresponding screw terminals in the transmitter. See Figure 14 or the Wiring Diagram
located inside the door of the transmitter.
OTE:N The transducer cable carries low level, high frequency signals. While transducer cable extension is not generally
recommended, if additional transducer cable length is required, use cable and connectors of the correct type and
impedance. In many cases, especially if a splice my be exposed to water or other liquids, it may be more effective to
replace the entire cable. Transducers use RG59, 75 Ohm coaxial cable or Twinax (Belden #9463) or (Belden # 9463DB)
78 Ohm two conductor cable. Cable lengths up to 990 feet (300 meters) are available.
+
C3
JP2
J3
J4
J2
JP1
JP3
2
4
1
3
1
3
4
6
7
9
10
12
VPP12-800
CLASS B
R
®
VDE
Lock Nut
Grounding
Wire
Figure 14: Transducer connections
/