Page is loading ...

Technician’s
Handbook
This manual is updated as new information and models
are released. Visit our website for the latest manual.
www.manitowocfsg.com
America’s Quality Choice in Refrigeration
Flomatic
Beverage Valves
Part Number STH15 9/10


Safety Notices
As you work on Manitowoc equipment, be sure to pay
close attention to the safety notices in this handbook.
Disregarding the notices may lead to serious injury
and/or damage to the equipment.
Throughout this handbook, you will see the following
types of safety notices:
Procedural Notices
As you work on Manitowoc equipment, be sure to read
the procedural notices in this handbook. These notices
supply helpful information which may assist you as
you work.
Throughout this handbook, you will see the following
types of procedural notices:
NOTE: Text set off as a Note provides you with simple,
but useful, extra information about the procedure you
are performing.
!
Warning
Text in a Warning box alerts you to a potential
personal injury situation. Be sure to read the
Warning statement before proceeding, and work
carefully.
!
Caution
Text in a Caution box alerts you to a situation in
which you could damage the equipment. Be sure
to read the Caution statement before proceeding,
and work carefully.
Important
Text in an Important box provides you with
information that may help you perform a
procedure more efficiently. Disregarding this
information will not cause damage or injury, but it
may slow you down as you work.

Read These Before Proceeding:
!
Caution
Proper installation, care and maintenance are
essential for maximum performance and trouble-
free operation of your Manitowoc equipment. If
you encounter problems not covered by this
handbook, do not proceed, contact Manitowoc
Foodservice Group. We will be happy to provide
assistance.
Important
Routine adjustments and maintenance
procedures outlined in this handbook are not
covered by the warranty.
! Warning
PERSONAL INJURY POTENTIAL
Do not operate equipment that has been misused,
abused, neglected, damaged, or altered/modified
from that of original manufactured specifications.
We reserve the right to make product
improvements at any time. Specifications and
design are subject to change without notice.

Part Number STH15 9/10 5
Table of Contents
General Information
Model Numbers . . . . . . . . . . . . . . . . . . . . .7
How to Read a Model Number . . . . . . . . .8
Model/Serial Number Location . . . . . . . .8
Accessories . . . . . . . . . . . . . . . . . . . . . . .8
Special Applications . . . . . . . . . . . . . . . .12
Warranty Information . . . . . . . . . . . . . . . .12
Installation
Pre-installation Checklist . . . . . . . . . . . . .13
324, 424 & 464 Valves . . . . . . . . . . . . . . .13
Component Identification
Valve Types . . . . . . . . . . . . . . . . . . . . . . . .19
Levers . . . . . . . . . . . . . . . . . . . . . . . . . . . .21
Maintenance
Maintenance Schedule . . . . . . . . . . . . . . .23
Cleaning and Sanitizing the Dispensing
Valves and Product Lines . . . . . . . . . . . .25
Sanitizing . . . . . . . . . . . . . . . . . . . . . . . . .28
Setting the Brix . . . . . . . . . . . . . . . . . . . . .32
Operation
Flow Rate . . . . . . . . . . . . . . . . . . . . . . . . .33
Automatic Fill Valve . . . . . . . . . . . . . . . . .34
Troubleshooting
Checklist . . . . . . . . . . . . . . . . . . . . . . . . . .35
Carbonated Water System . . . . . . . . . . . .37
Circulating System . . . . . . . . . . . . . . . . . .44
Dispensing Valve . . . . . . . . . . . . . . . . . . .45
When the Brix is OFF . . . . . . . . . . . . . . . .50
Component Check Procedures
RATIO . . . . . . . . . . . . . . . . . . . . . . . . . . . .53
BUZZING . . . . . . . . . . . . . . . . . . . . . . . . . .53
LEAKS . . . . . . . . . . . . . . . . . . . . . . . . . . . .53
Every 6 months (2 times per year) . . . . .53


8 Part Number STH15 9/10
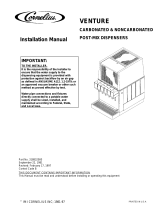
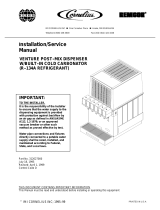
How to Read a Model Number
VALVE MODEL NUMBERS
With all models, mounting and ratio control are the same.
All Flomatic valves are identified by a Model Number,
Serial Number, a manufacture month and year on the
underside of the flow control base. These numbers are a
helpful reference before beginning any valve service.
Model/Serial Number Location
This number is required when requesting information
from your local distributor. All Flomatic valves are
identified by a Model Number, Serial Number, a
manufacture month and year on the underside of the flow
control base. These numbers are a helpful reference
before beginning any valve service
Accessories
Manitowoc Foodservice developed this manual as a
reference guide for the service agent and installer of
fountain equipment.
Fountain dispensing is the serving of a beverage (soft
drink, tea, or juice, etc.) from a dispenser that will chill
the product to an acceptable serving temperature for
the consumer.
The beverage, delivery system and dispenser can be
postmix or premix. The system may be an elaborate
system with most of the components in the back of the
store and the dispenser in the front. Fountain systems
could be a simple system with the complete system
under the counter where the dispenser is located.
Our goal is that this manual will remove some of the
confusion, and mystery of beverage dispensing
equipment while providing a general overview of
service to the equipment.
GP - Global Performance
HF - High Flow
464
454
424
324
202
Model Suffix
Model Base
464–GP

Part Number STH15 9/10 9
VALVES
Most Flomatic valves are available in sanitary push
lever, push button,automatic fill lever, and portion
control models.
Replacement
Flomatic created a kit (5007842) to replace both the 372-Q
or 380-Q Flomatic mounting blocks. All Flomatic mounting
blocks are identical in appearance, except for the part
numbers shown on the front recess of the block. The 380-
Q has inlet ports sized at 0.380 in. The 372-Q inlet ports
are sized at 0.372 in.
WHAT IS CARBONATION
Carbonation is the process of mixing carbon dioxide gas
into a liquid (water). The resulting liquid is called soda
water or carbonated water. The carbon dioxide gas is the
bubbles you see when a carbonated beverage (like soda)
is dispensed.
Most cola, lemon-lime products, etc. are carbonated.
Normally teas, juices, etc. are noncarbonated.
Some beverage technicians refer to noncarbonated water
as sweet water.
WATER CHARACTERISTICS
Water makes up over 80% of the typical finished
beverage. The quality of this primary ingredient is of
utmost importance. You should use regular cold tap water,
not water that has been through a water softener,
conditioner, etc. Any off taste or color should be treated by
proper water filtration.

10 Part Number STH15 9/10
WATER FILTERS
It is recommended that proper water filters treat the water
supply for the beverages. There are two basic filters
commonly in use.
1. Pre-filter, or sand filter. This filter removes any foreign
matter from the water down to 25 microns in size.
2. Carbon or activated charcoal filter is also used. This
filter will reduce chlorine and other chemicals, off-
taste and odor. Some of the higher quality filters may
reduce organic compounds (bacteria) in the water.
Do not use a filter containing any type of phosphate on the
beverage system. Phosphate as used for scale reduction
will cause the beverage to loose its carbonation and
become “flat” quickly.
WATER PRESSURES
Dynamic (flowing) water pressures to most
carbonators should be a minimum of 40 PSI. Water
pressure to dispensers for noncarbonated beverages
should be a minimum of 60 pounds. These pressures
are minimum operating pressures, not static pressure.
SYRUP BASICS
Your concentrated syrup containers should be stored
in a cool dry location that is easily accessible. Any
extremes in temperature can wreak havoc with the
quality of the product. For best results, the syrup
should be maintained in an environment between 40
and 90 degrees.
PREMIX
Premix fountain dispensing consists of a container
(figal) of beverage ready for dispensing, beverage
delivery system, carbon dioxide (CO
2) propellant,
beverage cooling system, and dispenser. We shall
discuss each component of this type of system within
the context of this manual.
The major advantage of a premix system over most
other types is its flexibility. This flexibility is the ability to
go anywhere. Many premix systems will operate
without electric power or separate water supply.

Part Number STH15 9/10 11
POSTMIX
Postmix fountain dispensing consists of either a tank
(called a Figal) or a box (called a Bag-in-Box) of
beverage syrup. The postmix system will also include
the carbonator, fresh water supply, carbon dioxide
(CO
2) supply, syrup delivery system, beverage cooling
system, and dispenser. We shall discuss each
component of this type of system within the context of
this manual.
The major advantage of the postmix system over most
other systems is the very low cost of delivering a high
quality, fresh beverage to the consumer utilizing less floor
and storage space for the quantity of beverages served.
PIPING
The fountain system is connected together by a series
of tubing or hoses. This tubing is called beverage tube
or hose and is commonly available in 1/4”, 3/8”, and 1/
2” inside diameters. Beverage hose is a flexible, high-
pressure hose. This hose is capable of withstanding
system pressures in excess of 100 PSI. The beverage
hose may be an individual line or assembled with
many lines of hose bundled together.
The beverage tubing or hose is attached to the various
components of the system with barbed stems, nuts,
tees, etc. The tubing is held onto the fittings with small
tube clamps called stepless (Oetiker®) clamps. When
attaching the tubing and fitting to a “flared” fitting, the
use of a flare washer is required.
Several different type of tubing are available for the
beverage industry. If there is any possibility of the
tubing laying in a damp environment, the use of non-
permeable tubing should be used. Tubing is also
available as a single tube or bundled together. Single
tube is available as non-permeable plastic or stainless
steel. Bundled tube is available as plastic only.

12 Part Number STH15 9/10
Special Applications
OUTDOOR APPLICATIONS
Flomatic Valves are approved and listed by
Underwriters Laboratories (UL). However they are not
UL approved for weather exposure applications.
These units must be installed in areas where adequate
protection from the elements is provided, all other
models are ETL listed.
Warranty Information
Consult your local distributor for terms and conditions
of your warranty. Your warranty specifically excludes
all beverage valve brixing, general adjustments,
cleaning, accessories and related servicing.
No equipment may be returned without a written
Return Materials Authorization (RMA). Equipment
returned without an RMA will be refused at the dock
and returned to the sender at the sender’s expense.
Please contact your local distributor for return
procedures.
!
Warning
Personal Injury Potential
Do not operate equipment that has been misused,
abused, neglected, damaged, or altered/modified
from that of original manufactured specifications.

Part Number STH15 9/10 13
Installation
Pre-installation Checklist
When installing any system, first make sure the
following has been done:
324, 424 & 464 Valves
These valves are available in manual, electric, portion
control and automatic fill models. All of these Flomatic
valves share the same mounting and flow control
characteristics. The 324 valves are also compatible
with the 300-Q mounting block.
Flomatic created a kit (5007842) to replace both the
372-Q or 380-Q Flomatic mounting blocks. All
Flomatic mounting blocks are identical in appearance,
except for the part numbers shown on the front recess
of the block. The 380-Q has inlet ports sized at 0.380
in. The 372-Q inlet ports are sized at 0.372 in. Select
the appropriate mounting option and install the
mounting block. Wet the inlet O-rings with water to
ease installation; do not use Vaseline®. Align the four
bolt holes and mount
.
Remove the valve cover and align the valve stems
with the mounting block. Independent positive
shut-offs and the locking system prevent removal
while the system is pressurized. The valve cannot be
removed unless the shut-off valves are closed (arrows
pointed across service line).
Relieve the system pressure before
removing or repairing the mounting block.
Determine which mounting block you need.
Important
Be sure to relieve the system pressure before
removing or repairing the mounting block.

14 Part Number STH15 9/10
The mounting hole pattern typically has key slots to
secure the product supply lines. If no key slots are
present, use the “S” clip option.
Engage the valve and depress the latch pin. Do not
force or you could bend the pin. If you have difficulty,
remount the valve and try again. Be sure the valve
base is completely seated against the block. Open the
shut-off valves by turning 1/4 turn (arrows pointed
toward service line) to engage system pressure.
INSTALL ADD-A-LEVER FOR “SODA ONLY”
The Flomatic Add-a-Lever is a two-piece assembly
which mounts on the pivot pin. Remove the cover,
partially withdraw the pivot pin to allow mounting,
reinsert the pin then replace the cover.
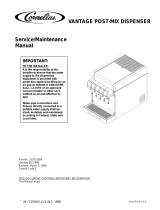
CONVERT TO PORTION CONTROL
Flomatic portion control electronics are contained in
the cover and can be factory or field installed. When
installing in the field, the 5031015 Conversion Kit for
the 464-GP makes it easy to add portion control.
The portion control module is designed to simplify
installation. The board can be programmed with the
first pour.
The “Stop/Fill” button serves as a top-off button and
cancels any of the timed portions if you need to abort
the pour.
Valve should seat securely
Shut-off closed

Part Number STH15 9/10 15
Each cup size must be programmed separately. Cup
sizes are preprogrammed at the factory:
1 second = small
2 second = medium
3 second = large
4 second = x-large.
Set the flow rate first, brix the valve, and then set the
cup sizes to match your desired flow rate. Once the
valve is brixed, replace the valve cover and set the
times (cup sizes) from the front switch pad.
The switch pad has a hidden “program” switch that
must be held down to keep the module in program
mode. Setting the times or programming is a
two-handed operation; push and hold the program
switch with one finger while dispensing the cup size
you wish to program with another. Once the drink is
full, simply release the cup size button to end the pour
cycle and then let go of the program switch. Repeat
the process for each cup size.
Hidden Program Switch
464 Portion Controls
STOP
FILL
Hidden Program
Switch
424 Portion Controls

16 Part Number STH15 9/10
The module will remember one top-off cycle
automatically if the foam height requires it to complete
the pour. To program a top-off cycle, begin
programming as described above. Once the foam
crests the top of the cup, PAUSE by removing your
finger from the cup size button. Do not release the
program button. Pause long enough for the foam to
settle, and then continue the pour with your finger on
the same cup size button until the cup is full. The
module will remember the sequence “pour - pause -
pour” as it was executed.
If you program the top-off feature, be sure to train the
operators so they do not pull a drink before the cycle is
complete. The portion control module will finish the
pour whether a cup is there or not.
TO CONVERT PUSH BUTTON TO SANITARY
LEVER OPERATION
Flomatic Valve With Pallet Actuators
1. Remove the valve cover from the valve.
2. Slide pivot pin far enough to one side to remove
the actuator spacer bushing from between the two
actuator assemblies.
Pivot Pin
Cover

Part Number STH15 9/10 17
3. Slide the pivot pin back into place. Make sure both
actuator assemblies are mounted correctly on the
pivot pin. The “fingers” of the solenoid armature must
be located on the back side of the actuators. When
the armature pulls into the solenoid, these “fingers”
will pull the actuators and open the pallets.
4. Slide sanitary lever from the bottom up into the
flow control base. The notch on the sanitary lever
will be on the top of the lever facing toward the
back of the valve. Hook the notch near the top of
the lever over the pivot pin.
5. Snap the electric retainer cap onto the sanitary
lever. Make sure it is tight. The retainer cap has a
top “arm” extension that is the back portion of the
retainer.
6. Remove the screw from the convertible switch
housing cover.
Actuator Spacer
Bushing
Actuator Assembly
Actuator Spacer
Bushing
Actuator Assembly
Sanitary Lever

18 Part Number STH15 9/10
7. The switch cover snaps together with a top and
bottom half. Unsnap the top cover. Downward
pressure on the bottom half of the assembly while
unsnapping the sides of the switch assembly
makes the job easier. If you accidentally pull the
entire switch assembly off the solenoid, you must
put it back one piece at a time. Gently lift the
micro switch from the two pins in the front of the
convertible switch housing base.
8. Being careful not to break any wires, flip the micro
switch on its back. Install the switch on the two
pins at the rear of the lower switch base. Make
sure the button on the switch lines up with the
retainer cap arm.
9. Snap the switch housing cover onto the base and
re-install the screw. Tighten the screw snug.
10. Install a push lever cover or place a flavor label
over the entire front of the valve cover.
Convertible
switch
housing
screw
Switch
Switch

Part Number STH15 9/10 19
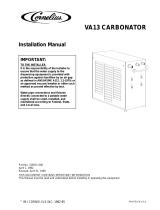
Component Identification
Valve Types
464-GP POST-MIX
Parts
Push Button
Portion Control
Automatic Fill
Sanitary Push Lever
Universal Electrical
Connection
Field
Conversion
Switch
Solenoid Plunger
Diffuser
Nozzle
Mounting Block Lever
Wire Keeper
Mounting Block
Ratio Control
Torsional Pallet
Spring
24-volt AC
Solenoid

/