Page is loading ...

Parts:
Quantity: 1
C: Desk Side
IMPORTANT NOTICE:
Place all wooden parts on a clean and smooth surface such as a rug or carpet to avoid scratching the parts.
Check to be sure that you have all parts and hardware.
Remove all wrapping materials, including staples & packing straps before you start to assemble.
Keep all hardware parts and packaging out of reach of children.
Any problems or questions call Regency Oce Furniture at 1-866-816-9822 or at [email protected]
B: Desk Front
Legacy Desk Shell • LDS4224, LDS6030, LDS6630, LDS7124, LDS7135, LDSBF7135 • INSTRUCTIONS
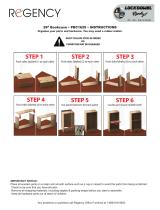
Organize your parts. You may need a rubber mallet.
Quantity: 1
Quantity: 2
A: Desk Top
A
B
C
C

STEP 1: Attach Desk Front (B) to one of the Desk Sides
(C) by lining up the Eclip with its corresponding holes,
and sliding into place
(see gure 1).
STEP 2: Attach the remaining Desk Side (C) to the Desk
Front (B) by lining up the Eclip with its corresponding
holes, and sliding into place
.
STEP 3A: Remove Thumb Screw from Desk Top (A) before assembly. Next, attach Desk Top (A) to the assembled base
by lining up the Eclip with its corresponding holes, and sliding into place
(see gure 2.)
Any problems or questions call Regency Oce Furniture at 1-866-816-9822 or at [email protected]
Figure 1
Figure 2
Figure 3
B
B
C
C
C
C B
A
A
STEP 3B: Finally, place Thumb Screw into the front angle bracket
connecting the Desk Top (A) to the Desk Front (B)
(see gure 3.)
Legacy Desk Shell • LDS4224, LDS6030, LDS6630, LDS7124, LDS7135, LDSBF7135 • INSTRUCTIONS
Organize your parts. You may need a rubber mallet.
/