Page is loading ...

IMPORTANT SAFEGUARDS
READ AND FOLLOW ALL SAFETY INSTRUCTIONS.
When using electrical equipment, basic safety precautions should always be followed including the following:
• DISCONNECT AC POWER SUPPLY BEFORE SERVICING.
• Installation and servicing of this equipment should be performed by qualified service personnel only.
• Ensure that the electrical wiring conforms to the National Electrical Code NEC® and local regulations,
if applicable.
• Do not mount near gas or electrical heaters.
• Equipment should be mounted in locations and at heights where it will not be readily subjected to tampering
by unauthorized personnel.
• The use of accessory equipment not recommended by the manufacturer may cause an unsafe condition.
• Any modification or use of non-original components will void the warranty and product liability.
• Do not use this equipment for other than intended use.
SAVE THESE INSTRUCTIONS!
Technical Support ■ (623) 580-8943 ■ [email protected]
NXFR Series
Installation Instructions
10070229 REV 1 - 11/20 800-533-3948 www.barronltg.com
1

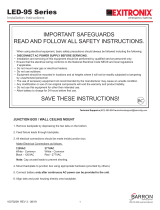
Wall Mount (Fig. 1)
1. Remove the lens by removing the (2) screw caps and loosening the (2) screws with O-rings, then set all aside.
2. Remove the inner enclosure and set aside.
3. Punch out any desired knockouts for mounting to the junction box located in the backplate.
4. Route wires out through the corresponding hole of the backplate and the center hole in the back gasket.
5. Make electrical connections with a 5-25VDC remote power supply. Yellow is positive (+) and blue is negative (-).
6. Secure the backplate to the J-box, ensuring that the gasket aligns properly with the backplate and makes a proper seal
with the backplate and the wall.
7. Replace the inner enclosure and adjust the lamp(s), as desired.
8. Replace the lens and secure using the (2) screws with O-rings from Step 1. Ensure the O-rings make a proper seal.
9. Cover the (2) screws with the (2) screw caps from Step 1.
Fig. 1 J-Box
Back Gasket
J-Box Mounting
Screw
Backplate
Knockouts
Screw Cap
Lens Lamp
Inner Enclosure
O-Ring
Stainless
Steel Screw
NXFR Series
Installation Instructions
10070229 REV 1 - 11/20 2
800-533-3948 www.barronltg.com

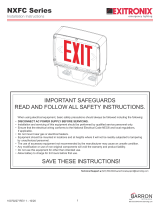
Fig. 2
Wall Mount Using Mounting Brackets (Fig. 2)
1. Secure the (2) mounting brackets to the back of the fixture using the (4) mounting bracket screws (provided).
2. Remove the (2) gasket pieces from the sides of the back gasket and discard. Attach the modified back gasket to the
back of the fixture.
3. Follow steps 1-2 in the Wall Mount section.
4. If desired, for a better seal, remove additional knockouts to allow for screws to secure the fixture to the J-box.
5. Using the brackets as a template, align the fixture to the mounting location and mark the drill locations on the wall.
6. Install wall anchors in the (4) marked locations.
7. Make electrical connections with a 5-25VDC remote power supply. Yellow is positive (+) and blue is negative (-).
8. Secure the fixture to the wall using (4) screws. If additional knockouts were removed in Step 4, secure the fixture to the
J-box at this time.
9. Follow steps 7-9 in the Wall Mount section.
Modified Back
Gasket
Mounting
Bracket
Screw
Wall
Anchor
Wall
Screw
Mounting
Bracket
Fixture
NXFR Series
Installation Instructions
10070229 REV 1 - 11/20 3 800-533-3948 www.barronltg.com
/