Page is loading ...

Installation Instructions
3.4167
1960-64 Chevrolet Impala
Convertible Body Mounts
It is recommended that if you are unfamiliar with this type of work that you refer to a
qualified service center specializing in this type of work. It is also recommended that if you
choose to do this work yourself that a factory service manual be obtained for the proper
procedures pertaining to removal, replacement and proper torque specifications for your
vehicle. This instruction set is intended as a guideline for the safe installation of Energy
Suspension’s polyurethane bushings, once you have removed the factory components from
your vehicle.
17540
4/NOV/10 BRH
1131 VIA CALLEJON, SAN CLEMENTE, CA 92673
R
Updated 8/JAN/03 BRH Updated 23/JAN/04 BRH
Updated 14/JAN/05 BRH Updated 10/JAN/06 BRH
Updated 2/JAN/07 BRH
2008 Energy Suspension. All rights reserved.2008 Energy Suspension. All rights reserved.
CC
May not be reproduced, in any form, or by any means,
without the written consent of Energy Suspension.
May not be reproduced, in any form, or by any means,
without the written consent of Energy Suspension.
1
2
3
4
5
6
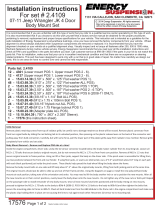
FRONT CLIP
DIAGRAM 1
3/8”-16x1”
BOLT
.812”x.406”x.1”
WASHER
WELDED PLATE
FRONT CLIP BRACKET
FRAME
2.50” x .437” x .125”
WASHER
4264
.750” x .500” x 1.50”
SLEEVE
4265
2.00” x .437” x .125”
WASHER
7/16 - 16 x 3.00”
BOLT
DIAGRAM 2
Removal and Installation
Loosen Positions 1, 5 and 6 on the driver and passenger sides but do
not completely remove the bolts.
Completely remove bolts for positions 2, 3, and 4 on the driver and
passenger sides. These inner positions, if not removed, could possibly
damage the body when lifting it from the frame.
Removal:
Remove bolts from positions 1, 5, 6 and the Front Clip on one side of the
vehicle. Use a jack and something to disperse the force of the jack on
the body, typically a block of wood, to raise the body off the frame just
enough to remove the old bushings and hardware. *Be cognizant of
brake lines, the fan shroud, and various hoses when lifting the body.
Also, note the location and position of any existing shims that may be
present, as you will need to return them to these positions when
reinstalling to ensure proper body alignment.
Installation:
With the old bushings and hardware removed, install the upper poly
bushings, washers and any pre-existing shims in positions 1, 2, 3, 4, 5,
and 6. *See diagram 2 below for assembly order. Lower the body until it
is barely making contact with the mounts. With the body in this
position, make sure the washers and poly bushings are properly
aligned, add the lower bushing and washer, and start the bolts for all
positions.
With the bolts started and the bushings and washers in place, set the
body back onto the frame. Now, remove the bolts from positions 2, 3
and 4, so you can safely lift the body when installing on the opposite
side. At the end of this step you should have poly bushings, washers
and bolts loosely assembled in positions 1, 5 and 6 and upper bushings
and washers aligned in positions 2, 3 and 4 on one side of the vehicle.
Follow the same steps for removal and installation on the opposite side.
Once positions 1, 5 and 6 on the passenger and driver sides have been
loosely assembled and the body is fully resting on the mounts, you can
install the bolts for positions 2, 3 and 4 on both sides. Torque all
positions to 40 - 50lbs.
After the body mounts in positions 1, 2, 3, 4, 5, and 6 on the driver and
passenger sides have been tightened to the proper torque
specifications, use the provided hardware and Diagram 1 to secure the
Front Clip positions.
Front Clip:
2 - 15.03.69.39 (.812”x.406”x.100”) Washer
2 - 15.05.36.39 (3/8-16x1.00”) Bolt
2 - 15.06.14.39 Welded Plate w/ Nut
Position 1-6:
12 - 4264 Upper
12 - 4265 Lower
12 - 15.03.07.39 (2.500”x.437”x.120”) Upper Washer
12 - 15.03.09.39 (2.0”x.437”x.120”) Lower Washer
12 - 15.05.08.39 (7/16”-16x3”) Bolt
12 - 15.10.321.39 (.750”x.500”x1.500”) Sleeve
BILL OF MATERIALS
Important Information
Always use some kind of material to disperse the weight when lifting the
body using a jack. Never place jack faces directly on body panels. If
possible, use multiple jacks to ensure even lifting of the body.
Always watch the fan shroud, brake lines, and various hoses when lifting
the body.
/