Page is loading ...

KJ04502 80-86 CJ-5, CJ-7 1” Body Lift Installation Instructions
Before beginning read all instructions and check Bill of Materials
*Location 6 may use 7/16-14x3.5” bolts. Check the stock body bolts
to determine which replacement bolts are to be used for your application.
www.DaystarWeb.com
Tech Support Contact Info
Phone: 623.907.0081
Fax: 623.907.0088
841 South 71st Avenue
Phoenix, AZ 85043
Bill Of Material
Part No. Description Qty
M02285 Bushing 1
M02287 Bushing 10
M02787 Bushing 10
M02905 Bushing 1
S10104 Washer 3/8 22
S10349 Bolt 3/8-16x3.5” Hex 10
S10350* Bolt 7/16-14 x 3.5” Hex 3
S10276 Steel Sleeve 10
S10012 Steel Sleeve 1
1. PLASTIC RADIATOR FAN SHROUD: Only raise body high enough to remove and replace body mounts. Always watch the fan shroud for
sufficient clearance when raising the body.
2. Loosen body mount bolts on one side of vehicle and remove bolts from opposite side for positions 1,5 and 6 (ref. Fig.1) and positions 2, 3 and
4. Use a long extension to remove mounts next to gas tank. Place 2x4 between jack and body to spread out load and jack up body on the side
you have removed the bolts from just far enough to remove mounts. The bolts on the opposite side will help ensure that the body does not
shift. CAUTION: Open Hood while jacking up the body to make sure that the fan doesn’t hit the shroud. Also, watch that hoses and wires are
not stretched. When lifting the side of the vehicle that the fuel filler is on keep a close eye not to stretch, tear or pull too far on the hose
connection.
3. Remove factory mounts one at a time and insert the corresponding steel sleeves into the new body mounts.
4. Jack up the body using a 2x4 under one side of the body for support just high enough to insert new body lift spacers. If the steel collar on new
mounts will not insert in frame holes, you may have to file out frame mount hole slightly to install spacer. Repeat on opposite side.
5. Now remove bolts from other side of vehicle and repeat instructions 2 through 4.
6. Once all new mounts are in place, you may re-torque all bolts to factory specs. Do not over tighten bolts.
7. Before starting engine, check fan for clearance of all lines and wires to make sure they are free and clear.
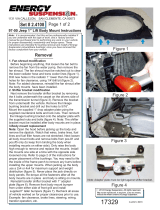
POSITION 1
POSITION 3,4,5, & 6
BODY
WASHER
M02787
STEEL SLEEVE
S10276
FRAME
M02287
WASHER
BOLT
POSITION 2
BODY
WASHER
M02787
STEEL SLEEVE
S10276
FRAME
M02287
WASHER
BOLT
BODY
M02905
STEEL SLEEVE
S10012
FRAME
M02285
WASHER
BOLT
WARNING
This vehicle has been modified to enhance its performance. The steering, braking and handling of this vehicle will differ from standard
passenger cars and trucks, This vehicle handles differently from an ordinary vehicle in driving conditions which may occur on streets, highways
and off road. Avoid unnecessary abrupt maneuvers, sudden stops, sharp turns and other driving conditions that could cause loss of control,
possibly leading to a roll over or other accident that could result in serious injury or death to driver and passengers. If larger tires are installed the
speedometer will read lower than the vehicles actual speed.
DRIVE WITH CARE, REDUCE SPEED AND WEAR SEAT BELTS AT ALL TIMES.
This kit should be installed by a professional mechanic.
Instruction Sheet P10422-11
© 2003 Daystar Products International Inc.
/