Page is loading ...

Rev:
Page:
E.C.O. No:
CUSTOMER SERVICE PHONE: 1-800-426-8562
1629-034 1 of 10 Part No:
Order of Assembly
Installation Instructions
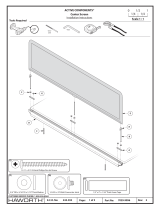
ECHO®
Scale 1 : 1
0 11/2
1/4 1/4
No Tools Required
#2
INSTALLATION OF GUARD RAIL WITH HORIZONTAL WIRE MANAGEMENT
INSTALLATION OF DESK SCREEN WITH HORIZONTAL WIRE MANAGEMENT
INSTALLATION OF GUARD RAIL, DESK SCREEN AND HORIZONTAL WIRE MANAGEMENT
6100-0252

Rev:
Page:
E.C.O. No:
CUSTOMER SERVICE PHONE: 1-800-426-8562
1629-034 2 of 10 Part No:
#10 x 1" Pan Head Screw
(S-1)
OR
INSTALLING HORIZONTAL WIRE MANAGEMENT WITH GUARD RAIL
NO SCREWS HERE
NO SCREWS HERE
NO SCREWS HERE
NO SCREWS HERE
1Refer to instruction (61000214) when
installing guard rail
NOTE: Do Not install
screws in these
locations.
NOTE: Do Not install
screws in these
locations.
6100-0252
OR
NO WIREWAY
WITH WIREWAY
OR
NO WIREWAY
WITH WIREWAY
RADIUS - CORNER DESK TOP
SQUARE - CORNER DESK TOP

Rev:
Page:
E.C.O. No:
CUSTOMER SERVICE PHONE: 1-800-426-8562
1629-034 3 of 10 Part No:
#10 x 1" Pan Head Screw
(S-1)
INSTALLING HORIZONTAL WIRE MANAGEMENT WITH GUARD RAIL
2Refer to instruction(s) (61000190 or 61000192) when installing
ECHO PET cable trays
NOTE: Screw through the
PET using the predrilled
holes securing both guard
rail and PET.
NOTE: Notch horizontal wire
manager (1” wide in screw location)
as shown to secure guard rail only, or
screw through horizontal wire
manager, securing both guard rial
and horizontal wire manager.
6100-0252
S-1
1”
F

INSTALLING DESK SCREEN WITH HORIZONTAL WIRE MANAGEMENT
Rev:
Page:
E.C.O. No:
CUSTOMER SERVICE PHONE: 1-800-426-8562
1629-034 4 of 10 Part No:
1Refer to instruction(s) (61000229) when installing ECHO desk screens
NOTE: If bracket location shown
in VIEW A. Follow instructions
(61000190 & 61000192) to install
horizontal wire manager.
NOTE: If bracket location
shown in VIEW B. horizontal
wire manager needs modied.
Follow next step.
VIEW A VIEW B
S-1
6100-0252
#10 x 1" Pan Head Screw
(S-1)
S-1
Q Q
P
Q
Q

INSTALLING DESK SCREEN WITH HORIZONTAL WIRE MANAGEMENT
Rev:
Page:
E.C.O. No: 1629-034 5 of 10 Part No:
NOTE: In some applications
the horizontal wire manager
must be modifed as shown.
Screen brackets take space
where horizontal wire
manager normally sits.
2Refer to instruction(s) (61000229) when installing ECHO desk screens
S-1
6100-0252
CUSTOMER SERVICE PHONE: 1-800-426-8562
#10 x 1" Pan Head Screw
(S-1)
1”
P
F

Rev:
Page:
E.C.O. No: 1629-034 6 of 10 6100-0252
Part No:
CUSTOMER SERVICE PHONE: 1-800-426-8562
#10 x 1" Pan Head Screw
(S-1)
OR
INSTALLING DESK SCREEN WITH GUARD RAIL
NO SCREWS HERE
NO SCREWS HERE
NO SCREWS HERE
NO SCREWS HERE
NO SCREWS HERE
NO SCREWS HERE
1Refer to instruction (61000214) when
installing guard rail
NOTE: Do Not install
screws in these
locations.
NOTE: Do Not install
screws in these
locations.
NO SCREWS HERE
NO SCREWS HERE
OR
NO WIREWAY
WITH WIREWAY
OR
NO WIREWAY
WITH WIREWAY
RADIUS - CORNER DESK TOP
SQUARE - CORNER DESK TOP

2Refer to instruction(s) (61000229) when installing ECHO desk screens
CORNER SCREEN
Rev:
Page:
E.C.O. No:
CUSTOMER SERVICE PHONE: 1-800-426-8562
1629-034 7 of 10 Part No:
INSTALLING DESK SCREEN WITH GUARD RAIL
6100-0252
NOTE: Install screws
for guard rail.
NOTE: Screw through the guard
rail securing screen and guard
rail to worksurface as shown.
NOTE: Install screen bracket
over guard rail pinching to
worksurface as shown.
#10 x 1" Pan Head Screw
(S-1)
P
S-1
S-1
Q
Q

#10 x 1" Pan Head Screw
(S-1)
NO SCREWS HERE
NO SCREWS HERE
NO SCREWS HERE
NO SCREWS HERE
NO SCREWS HERE
NOTE: Do Not install
screws in these
locations.
Rev:
Page:
E.C.O. No:
CUSTOMER SERVICE PHONE: 1-800-426-8562
1629-034 8 of 10 Part No:
OR
INSTALLING DESK SCREEN WITH GUARD RAIL
NO SCREWS HERE
NO SCREWS HERE
NO SCREWS HERE
1Refer to instruction (61000214) when
installing guard rail
NOTE: Do Not install
screws in these
locations.
6100-0252
OR
NO WIREWAY
WITH WIREWAY
OR
NO WIREWAY
WITH WIREWAY
RADIUS - CORNER DESK TOP
SQUARE - CORNER DESK TOP

Rev:
Page:
E.C.O. No: 1629-034 9 of 10 6100-0252
Part No:
CUSTOMER SERVICE PHONE: 1-800-426-8562
INSTALLING DESK SCREEN WITH GUARD RAIL
2Refer to instruction(s) (61000229) when installing ECHO desk screens
CORNER SCREEN
NOTE: Screw through the guard
rail securing screen and guard
rail to worksurface as shown.
NOTE: Install screen bracket
over guard rail pinching to
worksurface as shown.
#10 x 1" Pan Head Screw
(S-1)
NOTE: Remove these
screws when installing
horizontal wire manager.
P
S-1
S-1
Q
Q

INSTALLING DESK SCREEN WITH GUARD RAIL AND HORIZONTAL WIRE MANAGER
Rev:
Page:
E.C.O. No: 1629-034 10 of 10 6100-0252
Part No:
3Refer to instruction(s) (61000229) when installing ECHO desk screens
CUSTOMER SERVICE PHONE: 1-800-426-8562
CORNER SCREEN
#10 x 1" Pan Head Screw
(S-1)
NOTE: In some applications
the horizontal wire manager
must be modifed as shown.
Screen brackets take space
where horizontal wire
manager normally sits.
NOTE: Cut horizontal wire manager,
if needed when locating screw
holes for guard rial.
S-1
P
F
/


