OPT7 Aura Underglow Flexible Lighting Kit Installation guide

Category
Strip lights
Type
Installation guide

OPT7 Aura Underglow Flexible Lighting Kit: Illuminate your vehicle's undercarriage with vibrant, customizable LED lights. Choose from a spectrum of colors and dynamic patterns, easily controlled with the included handheld remote. The kit includes 36" and 48” flexible LED strips, ensuring a perfect fit for various vehicle sizes. Installation is a breeze with the provided mounting hardware, and the kit is powered by a 12V cigarette lighter adapter or hardwire harness for a seamless connection to your vehicle's electrical system.

OPT7 Aura Underglow Flexible Lighting Kit: Illuminate your vehicle's undercarriage with vibrant, customizable LED lights. Choose from a spectrum of colors and dynamic patterns, easily controlled with the included handheld remote. The kit includes 36" and 48” flexible LED strips, ensuring a perfect fit for various vehicle sizes. Installation is a breeze with the provided mounting hardware, and the kit is powered by a 12V cigarette lighter adapter or hardwire harness for a seamless connection to your vehicle's electrical system.

UNDERBODY
MAIN COMPONENTS
FLEXIBLE LED LIGHT STRIP 36" & 48”
AURA CONTROL BOX
HAND HELD REMOTE
MOUNTING KIT
- INCLUDES -
WIRE MOUNTS, SELF-TAPPING SCREWS,
BOOSTER, VELCRO, ZIP TIES
FUSE TAPS
INSTALLATION GUIDE
CIGARETTE
LIGHTER POWER ADAPTER
POWER HARNESS
ADHESIVE BOOSTER
STEP 1
INSTALLATION
AUXILIARY WIRE
POWER SOURCE HARDWIRE HARNESS FUSE TAP
FUSE
BOX
GROUND
CIGARETTE POWER ADAPTER12 VOLT CHARGING PORT
Once connected, plug the control box Cigarette Power Adapter into an
available 12 volt charging port.
As shown below, connect all light LED strips to the control box with the included
extension cables.
Decide where to locate the control box and
ensure wiring has enough length for light
strips to be installed in desired location.
IMPORTANT:
The control box must be installed inside the vehicle
as it is not waterproof. Avoid installation areas
of the engine bay + heated surfaces.
or connect the positive wire to the fuse tap and connector the open negative wire to
a ground (any metal surface). Then plug the fuse tap into the 10amp switched fuse.
IMPORTANT: Connecting to more then 10amp will override the kit and cause early failure,
ensure it is 10amps or less!
WARNING: Please ensure that the led strips/control box/wiring all are mounted
in areas where will not exceed 85C or 185F.
Heat Shrink Tube
1
2
INSTALLATION
STEP 2
Secure the light strips using the zip
ties to tie all the wiring away from
the moving components.
Secure Control box in desired
location with Velcro or zip ties.
* CONTROL BOX NOT WATERPROOF
Ensure the control box is safely and
securely hidden from exposing
elements of moisture.
STEP 4
STEP 3
Mount brackets to secure the
strip rst.
* IMPORTANT:
The LED connectors are not waterproof.
You will need to use HEAT SHRINK TUBE
(not included) or ELECTRICAL TAPE
around the LED connectors to ensure
the longevity of the lighting kit.
DISCLAIMER
NEED SUPPORT?
Scan for troubleshooting tips, and more.
OPT7 Lighting is not liable for damages or personal injuries while installing this product. The
Installation Guide is intended as assistance to reduce setup time. OPT7 Lighting assumes no
responsibility for improper installation.
If you are unfamiliar with your vehicle or inexperienced with aftermarket upgrades, please seek
professional assistance.
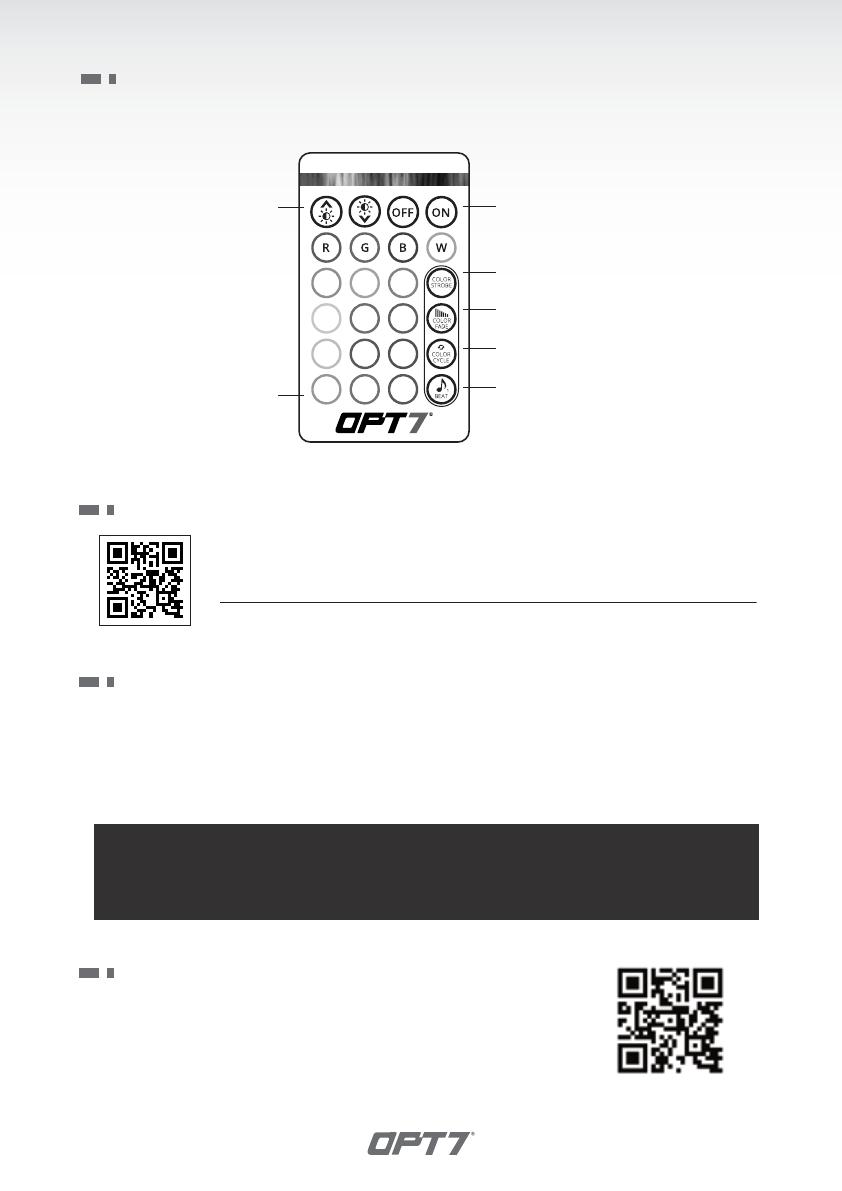
Using the included E-Z Remote, select your desired color or pattern.
DIMMER
COLOR SELECTION
MULTI-COLOR FADE
MULTI-COLOR CYCLE
SOUNDSYNC™
Press multiple times to change color
Adjust speed with "Dimmer" buttons
SINGLE-COLOR STROBE
ON / OFF
Press multiple times to change color
To adjust the sensitivity, please visit
www.OPT-7.com
STEP 5
AUX WIRING FOR A DOME / DOOR LIGHT
OPT7 recommends installation for safety and guidance.
Modied installations or installation recommendations not specied by OPT7 Lighting will
void product warranty.
Please scan to see a detail instruction on Door Assist Sync or go to
https://support.opt-7.com/549690-AURA-Door-Assist-Installation-Guide
  • Page 1 1
  • Page 2 2
  • Page 3 3
  • Page 4 4

OPT7 Aura Underglow Flexible Lighting Kit Installation guide

Category
Strip lights
Type
Installation guide

OPT7 Aura Underglow Flexible Lighting Kit: Illuminate your vehicle's undercarriage with vibrant, customizable LED lights. Choose from a spectrum of colors and dynamic patterns, easily controlled with the included handheld remote. The kit includes 36" and 48” flexible LED strips, ensuring a perfect fit for various vehicle sizes. Installation is a breeze with the provided mounting hardware, and the kit is powered by a 12V cigarette lighter adapter or hardwire harness for a seamless connection to your vehicle's electrical system.

Ask a question and I''ll find the answer in the document

Finding information in a document is now easier with AI