Page is loading ...

MSL-404600SC
www.maxximastyle.com
• To reduce the risk of death, personal injury or property damage from fire, electric shock, falling
parts, cuts/abrasions, and other hazards read all warnings and instructions included with and
on the fixture box and all fixture labels.
• Before installing, servicing, or performing routine maintenance upon this equipment, follow
these general precautions.
• DO NOT INSTALL DAMAGED PRODUCT!
CAUTION:
GENERAL SAFETY INFORMATION:
PIR LED Shop Light Instruction Sheet
NOTICE:
• This device complies with Part 15 of the FCC Rules. Operation is subject to the following two
conditions: (1) This device may not cause harmful interference, and (2) this device must accept
any interference received, including interference that may cause undesired operation.
• To install onto a plaster board surface, plaster board requires minimum 3/8” thick.
• Turn off the switch and circuit breaker before installing this LED lamp.
• Suitable for dry locations.
• Not for use with dimmers.
• Install directly beneath a ceiling-mounted receptacle.
• Use only insulated staples or plastic ties to secure the cord.
• Not intended for recessed installation or on ceiling.
• Do not install directly over a heat source (stove, etc.)
• Use safety precautions. Safety eye glasses and gloves are recommended.
• Installation should not be made on a radiant-heating ceiling.
• Injury to people and damage to the lamp and/or mounting surface may result if the lamp is
pulled from the surface. To reduce the likelihood of such injury or damage, mount only on a
mechanically sound surface.
• Do not alter the plug or power supply cord in any way or try to install this product in any other
method besides method shown on this sheet.
PARTS LIST:
PRODUCT SPECIFICATION:
Part Number: MSL-404600SC
Input Voltage: 120 VAC
Amp Draw: 0.35 A
Frequency:
60 Hz
Rated Power:
40W
Dwell Time: 10 Minutes
Suitable for: Dry Locations
Linkable: 4 Units Maximum
Installation Height: 2.8m
(9.2 ft) ~
3.5m (11.5 ft)
FIVE YEAR WARRANTY:
Maxxima extends a 5 year limited warranty to the original purchase that the products listed are
free from defects in material and/or workmanship only. Maxxima will replace any warrantied
product to the original consumer/purchaser if the product fails because of defects due to
workmanship and/or materials within the limited warranty period.
Limited warranty is not
transferable and applies to the original installation of the Maxxima product. This offer does
not constitute in any way a product guarantee and Maxxima does not hereby assume any
obligation whatsoever beyond sending a free replacement product.
MOTION DETECTION RANGE:
1
The recommended installation height (OC)
is 2.8m (9.2 ft)~3.5m (11.5ft)
Walking along the fixture (A-axis) will
trigger turn ON at approximately 10
feet (3m) from the center (point 0).
Walking towards the PIR sensor (towards point 0)
will trigger turn ON at approximately 3.3 feet (1m)
from the center (point 0).
PIR Sensor
PIR Sensor

PIR LED Shop Light Instruction Sheet
MSL-404600SC
www.maxximastyle.com
5. Install the LED lamp with chains, one end at a time on to each screw eye hook. Crimp
screw eye hook if needed.
6. Plug the power supply cord into the electrical outlet.
Crimp S-hooks
with pliers.
4
5
6
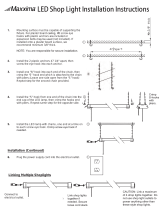
CHAIN INSTALLATION (RECOMMENDED):
1. Mounting surface must be capable of supporting the fixture. For plaster board ceiling, #8
screw eye hooks with plastic anchors are included or expansion bolts may be used (not
included). If installed onto a plaster board surface, we recommend minimum 3/8” thick.
NOTE: You are responsible for secure installation.
2. Install the 2 plastic anchors 47 1/4" apart, then screw the eye hook into each anchor.
3. Install one “S” hook into each end of the chain, then crimp the “S” hook end which is
attached to the chain with pliers.(Leave one side open from the “S” hook) Repeat step for
the second chain provided.
4. Install the “S” hook from one end of the chain into the end cap of the LED lamp, then
crimp the hooks end with pliers. Repeat same step for the opposite side.
3
4
3. Lift the fixture and line up the four mounting slots on the bottom to the screws. Slide it
towards the side with the power cord to secure it into place (In the case shown in Figure 3,
slide to the right since the power cord is on the right side).
NOTE: Secure the power cord firmly away from the fixture such that the fixture is securely
held in place and anchored to the screws. Please use discretion to properly place the
power cord away from traffic so that the fixture may not slide out of place and fall due to
accidental contact.
FLUSH MOUNT INSTALLATION:
1. Mounting surface must be capable of supporting the fixture. For plaster board ceiling,
#8 screws with plastic anchors are included. If installed onto a plaster board surface, we
recommend minimum 3/8” thick.
NOTE: You are responsible for secure installation.
2. Install the 4 plastic anchors 46.5" apart across the long side and 3.19" apart across the
short side as seen in the figures below. Insert the screw into each anchor and tighten it.
The space between the ceiling and the head of the screw should be at least 0.33".
4. Plug the power supply cord into the electrical outlet.
LINKING MULTIPLE SHOPLIGHTS:
Connect to
electrical outlet.
Link shop lights together
if needed. Secure loose
cord slack.
CAUTION: Link a maximum of 4
shop lights together. Do not use
shop light outlets to power anything
other than these style shop lights.
3
2
1
2
2
1
/