
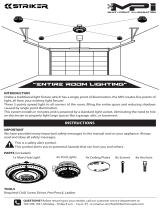
The Brighter Choice
MOTION SHOP LIGHT
Install Guide and Manual
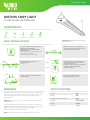
COMPONENTS
EASY INSTALLATION
WARNING SPECIFICATIONS
1.
2.
4.
7.
3.
5.
6.
8.
9.
Voltage
Wattage
Damp
Aluminium+PC
2.70lbs
7 years
120V
40W
Housing
Weight
Warranty
Suitable for Locations Ingress
All electrical connections must be in accordance with local and National Electric
Code (N.E.C.) standards. Consult a qualified electrician if you are unfamiliar with
proper electrical wiring connections. Please review instructions carefully
before proceeding.
WARNING: Risk of fire or electric shock. Do not alter, relocate or remove wiring
during installation.
This fixture complies with Part 15 of the FCC rules. Operation is subject to the
following two conditions: (1) this device may not cause harmful interference, and
(2) this device must accept any interference received, including
interference that may cause undesired operation.
NOTE: Not for use with dimmers. Do not install directly over a heat source.
Turn off circuit breaker that provides power to the
light switch for the recessed lights.
Mounting surface must be able to support the
weight of the fixture.
Depending on your lighting plan, space the
anchors accordingly.
•Link up to 4
Hang the lose end of the S hook chain on screw
eye hook in ceiling.
Attach two anchors to ceiling. Spacing between
hooks should be 47.25 inches apart, then screw in
the screw eye hooks into the anchors.
Install one S hook into each end of the chain, then
crimp the end attached to the chain with pliers.
Leaving the other side open.
Install the S hook from one end of the chain into the
end cap, then crimp the hook with pliers.
Repeat on the other side.
Plug in power cord to electrical outlet.
Turn on circuit breaker and test light.
Chain Link “S” Hook Screw Eye Hook Plastic Anchor Screw
Turn Power OFF
Turn Power ON
47.25” apart
Step 1
Step 2
Front
Side
Link up
8 shoplights
together
Connect to
additional
shoplight
Connect to
Power Outlet
Required Tools: Drill, Ladder, Hammer, Pliers,
Tape Measure, Pencil.
•Plaster board - #8 eye hook screw with plastic anchors,
or expansion bolts (not included);
•Plaster board thickness should be 3/8 inch.
X4X6X2X4X2

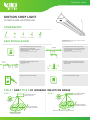
The Brighter Choice
Human infrared
sensor
Human infrared
sensor
STYLE 1 STYLE 2
The recomended installation
height is OC 2.8~3.5m
The recomended installation
height is OC 2.8~3.5m
Movement in this direction
sensing distance OB<5m
Movement in this direction
sensing distance OA/OB<2m
Movement in this direction
sensing distance OA/OB<2m
Movement in this direction sensing distance OB<5m
STYLE 1 AND STYLE 2 OF INFRARED INDUCTION RANGE
1.
2.
4.
6.
3.
5.
7.
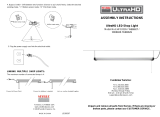
Turn off circuit breaker that provides power to the
light switch for the recessed lights.
Mounting surface must be able to support the
weight of the fixture.
•Plaster board thickness should be 3/8 inch.
Depending on your lighting plan, space the
anchors accordingly.
•Link up to 4
Plug in power cord to electrical outlet.
Install 4 plastic anchors 46.5 inches apart and
3.189 inches apart, screw in an eye hook into each
anchor. Gap between the ceiling and the cap nut
should be 0.75 inch.
•Recommended screw dimensions: ST4X30
Lift fixture up to screws and slide to one side to
secure into place. Fixture should be firmly fixed
against screws.
Turn on circuit breaker and test light.
Turn Power OFF
3.189”
0.33”
0.14”
46.5” apart
Link up
8 shoplights
together
Connect to
additional
shoplight
Connect to
Power Outlet
Turn Power ON
Required Tools: Drill, Ladder, Hammer, Pliers,
Tape Measure, Pencil.
MOTION SHOP LIGHT
Install Guide and Manual
COMPONENTS
EASY INSTALLATION
Chain Link “S” Hook Screw Eye Hook Plastic Anchor Screw
X4X6X2X4X2
-
 1
1
-
 2
2


Sunco Lighting 4 Pack LED Utility Shop Light, Motion Sensor,4 FT, Linkable Integrated Fixture, 40W=260W, 5000K Daylight, Clear Lens, Plug in, Suspension Mount, Garage– ETL, Energy Star Installation guide
- Type
- Installation guide
Ask a question and I''ll find the answer in the document
Finding information in a document is now easier with AI
Related papers
-
Sunco Lighting SHG-40W-2PK 4FT LED Grow Light for Indoor Plants 40W Installation guide
-
Sunco Lighting S076KIK1IA Installation guide
-
Sunco Lighting 6 Pack LED Ceiling Panel, 2x4 FT, Dimmable 0-10V, 5500 LM, 5000K Daylight,Flat Backlit Fixture, Direct Wire, Flush or Drop Ceiling Install, Dust Tight Commercial Grade - ETL, DLC User manual
Other documents
-
 Seville Classics WEB628 Assembly Instructions
-
 Maxxima MSL-404400F Installation guide
-
Honeywell SH450503Q211-2 User manual
-
Euri Lighting ESPL4-2050e Installation guide
-
 Commercial Electric SHOP2X4840MOTHD User manual
-
 Maxxima MSL-404600SC Installation guide
-
 Maxxima 4 ft. Utility LED Motion Sensor Shop Light Fixture, 40 Watt, Linkable, Clear Lens 5000K Daylight 4600 Lumens, Plug in, Hardware Included, LED Garage Light Energy Star Installation guide
-
 Commercial Electric SHOP/3X2/840/HD Installation guide
-
 STKR 00194 Installation guide
-
 Commercial Electric WS-LF1aA50DL1 Installation guide


