Page is loading ...

Rev: 16-01-12


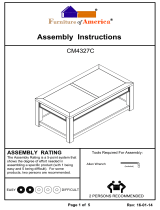
1. Insert the cam bolts (#A) into the
holes indicated, turn right to tighten.
2. Insert the cam locks (#B) into the holes
indicated. Make sure the cam lock
opening is aligned with the hole.
3. Insert cam bolts (#A) into the holes
and into the cam locks (#E). Secure
the cam locks using a screwdriver.
Insert wood dowels (#C) into the holes along the top panel (#1) and
shelf panels (#6), then place the article wine racks (#26) onto those
dowels (#C). Insert 4 screws (#H) into each and secure using a screwdriver.

4. Place adhesive
pads.
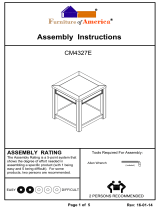
1. Insert the cam bolts (#V)
into the holes indicated,
turn right to tighten.
2. Insert the cam locks (#W) into
the holes indicated. Make
sure the cam lock opening
is aligned with the hole.
3. Insert cam bolts (#V) into the
holes and into the cam locks
(#W). Secure the cam locks
using a screwdriver.
1. Insert the wood dowels (#C)
into the holes indicated. Insert
the cam bolts (#A) the holes
indicated, turn right to tighten.
2. Insert the cam locks (#B) into
the holes indicated. Make
sure the cam lock opening
is aligned with the hole.
3. Insert the dowels (#C) and cam
bolts (#A) into the holes and into
the cam locks (#B). Secure the
cam locks using a screwdriver.

Align the down back panel (#13), then insert
the screws (#I). Secure using a screwdriver.
Insert the dowels (#C) into the inner holes,
then place the bottom panel (#12) onto those
dowels. Insert a bolt (#D) into each corner
and secure using the Allen wrench (#G).

2. Insert the cam locks (#B) into
the holes indicated. Make
sure the cam lock opening
is aligned with the hole.
1. Insert the wood dowels (#C)
into the holes indicated. Insert
the cam bolts (#A) the holes
indicated, turn right to tighten.
3. Insert the dowels (#C) and cam
bolts (#A) into the holes and into
the cam locks (#B). Secure the
cam locks using a screwdriver.
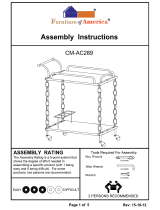
1. Prepare 8 bolt assemblies by first inserting a lock washer (#E) on
to the bolt (#D) then a flat washer (#F) onto that same bolt (#D).
2. Align the stretchers to
the holes, then insert a bolt (#U)
assembly into each end. Secure
using the Allen wrench.

Align the holes then prepare 8 bolt assemblies by first
inserting a lock washer (#E) onto the bolt (#D) then a flat
washer (#F) onto that same bolt (#D). Insert a bolt assembly
into each hole. Secure using the Allen wrench (#G).

Insert pins (#T) into desired shelf position.

1. Align the hinges (#J) to the
holes along the left and right
doors, insert screws (#K)
into each and secure.
3. Align the magnets (#M) to
the holes, then insert
2 screws (#I) into each.
Secure using a screwdriver.
2. Align the magnet
plates (#L) to the
top corner holes
along the doors.
Insert a screw (#N)
and secure using
a screwdriver.
Adjust according to ground level.
4. Insert a bolt (#Q) from
within each door, then
apply a gasket (#P) onto
the other end. Apply
the knob (#O) and secure
using a screwdriver.

1. Insert cam bolt (#V), turn right to tighten. Insert cam
lock (#W) into the drawer cross panel (#24). Then insert
(#24) onto the cam bolt, lock the cam lock using a screwdriver.
2. Align the drawer panels and
insert the screws (#H) into
each end. Make sure to place
the drawer bottom panel (#25)
into the ridges as you assemble.
3. Align the knobs (#R) and gaskets (#P) to the
front panel, then insert the bolts (#S) from
within. Secure using a screwdriver.

Insert drawer.

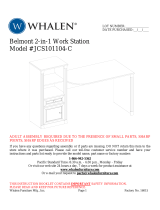
1. Drill a hole along the wall slightly smaller than the plug, then insert the plug until fully secured.
2. Align a bracket to the plug, then insert a long screw and secure. After that align the other bracket
to the back of the assembly and insert a small screw. Secure using a screwdriver.
3. Secure the strap accordingly.
/