Page is loading ...

Page |
1
PO#:
HZ030400TX
Starlynn Bar Cabinet
Assembly Instructions
For assistance with assembly, contact:
Southern Enterprises, Inc.
Customer Service: 1-800-633-5096
www.seifurniturestore
.com

Page |
2
1) Quantity
of 1
Top Panel
2) Quantity
of 1
Left Side Panel
3) Quantity
of 1
Right Side Panel
4) Quantity
of 1
Shelf Panel
5) Quantity
of 1
Upper Back Panel
6) Quantity
of 1
Middle Top Panel
7) Quantity
of 4
Leg
8) Quantity
of 6
Middle Panel
9) Quantity
of 1
Lower Back Panel
10) Quantity
of 2
Door Panel
11) Quantity
of 1
Left Side Panel of left door
frame
12) Quantity
of 1
Right Side Panel of right door
frame
Starlynn Bar Cabinet
Parts List
Please check packaging for all parts and hardware before discarding. Unpack and lay parts on clean, padded
surface like carpet or a blanket. Check that you have all parts indicated. Call customer service if any hardware is
missing. Before beginning assembly, carefully study the diagrams below and sort your hardware according to the
pictures. Using the incorrect hardware will cause damage.

Page |
3
13) Quantity
of 1
Right Side Panel of left door
frame
14) Quantity
of 1
Left Side Panel of right door
frame
15) Quantity
of 2
Shelf Panel
16) Quantity
of 2
Check Rails
17) Quantity
of 2
Bottom Panel of Door Frame
18) Quantity
of 1
Left Door Top Panel
19) Quantity
of 1
Right Door Top Panel
20) Quantity
of 1
Bottom Panel
21) Quantity
of 1
Glass Panel
22) Quantity
of 2
Iron Fence
A) Quantity
of 70
Cam Bolts
B) Quantity
of 70
Cam Locks
C) Quantity
of 22
Wood Dowels
Dia. 5/16"x1-1/4"
D) Quantity
o
f 8
Bolt Dia. 1/4x5/8” L
E) Quantity
o
f 16
Spring Washer Dia.1/4”
F) Quantity
o
f 16
Flat washer Dia.1/4” x3/4”
G) Quantity
of 1
Allen Wrench
H
)
Quantity
of 12
Screw Dia. 1/8” x 1/2”L
I
)
Quantity
of 4
Shelf Pin

Page |
4
J) Quantity
of 2
Knob
K) Quantity
of 2
Gasket
L) Quantity
of 2
Bolts
Dia. 5/32”x 5/8”L
M) Quantity
o
f 8
Bolt Dia. 1/4x1-3/4” L
N) Quantity
o
f 4
Bracket
O) Quantity
of 14
Screws Dia. 1/8”x5/8”L
P) Quantity
of 2
Plastic Strap
Q) Quantity
of 4
Bracket
R) Quantity
of 2
Screws Dia. 1/8”x1-1/2”L
S) Quantity
of 2
Screws Dia. 1/8”x5/8”L
T) Quantity
of 2
Anchor
U) Quantity
of 28
Adhesive Pad
Care and Cleaning Instructions:
Before using, wipe with a clean, dry cloth.
Avoid rubbing or scratching the surface with
rough or abrasive objects.
For replacement parts or questions, please call
SEI Customer Service at 1-800-633-5096.
Assembly Tool Required:
No.2 Phillips Screwdriver, Hammer
(Not Included)

Page |
5
Please do not overtighten cam locks. Stop when they
feel secure.
Figure 1
Align Cam Bolts (A) by hand.
Insert Cam Locks (B) into corresponding
holes on Upper Back Panel (5).
Screw Cam Bolts (A) into threaded holes
on Shelf Panel (4).
Attach Shelf Panel (4) to Upper Back
Panel (5) by inserting Cam Bolts (A) into
corresponding holes until all panels meet.
Tighten Cam Bolts (A) by rotating Cam
Locks (B) clockwise using Phillips
screwdriver (not included).
Figure 2
Align Cam Bolts (A) by hand.
Insert Cam Locks (B) into corresponding
holes on Upper Back Panel (5) & Shelf
Panel (4).
Screw Cam Bolts (A) into threaded holes
on Side Panels (2/3).
Attach Side Panels (2/3) to Upper Back
Panel (5) & Shelf Panel (4) by inserting
Cam Bolts (A) and Wood Dowels (C) into
corresponding holes until all panels meet.
Tighten Cam Bolts (A) by rotating Cam
Locks (B) clockwise using Phillips
screwdriver (not included).
Starlynn Bar Cabinet
Assembly Instructions
5
2
3

Page |
6
Figure 3
Align Cam Bolts (A) by hand.
Insert Cam Locks (B) into corresponding
holes on pre-assembled unit from figure 2.
Screw Cam Bolts (A) into threaded holes
on Top Panel (1).
Attach Top Panel (1) to pre-assembled
unit from figure 2 by inserting Cam Bolts
(A) and Wood Dowels (C) into
corresponding holes until all panels meet.
Tighten Cam Bolts (A) by rotating Cam
Locks (B) clockwise using Phillips
screwdriver (not included).
Cover Cam Locks (B) with Adhesive Pads
(U).
Figure 4
Align Cam Bolts (A) by hand.
Insert Cam Locks (B) into corresponding
holes on pre-assembled unit from figure 3.
Screw Cam Bolts (A) into threaded holes
on Middle Top Panel (6).
Attach Middle Top Panel (6) to
pre-assembled unit from figure 3 by
inserting Cam Bolts (A) and Wood Dowels
(C) into corresponding holes until all
panels meet.
Tighten Cam Bolts (A) by rotating Cam
Locks (B) clockwise using Phillips
screwdriver (not included).
Cover Cam Locks (B) with Adhesive Pads
(U).
1
B
U
6
U

Page |
7
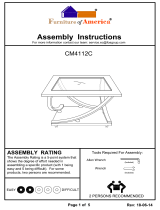
Figure 5
Attach 3 Legs (7) to the Middle Top Panel
(6) with Bolts (M), Spring Washers (E),
and Flat Washers (F).
Tighten bolts with Allen Wrench (G).
Figure 6
Attach Bottom Panel (20) to the
pre-assembled unit from Figure 5 with
Bolts (D), Brackets (N), Spring Washers
(E), and Flat Washers (F).
Tighten bolts with Allen Wrench (G).
G
M
E
F
7
7
7
6
2 0

Page |
8
Figure 7
Attach the fourth Leg (7) to pre-assembled
unit from Figure 6 with Bolts (D), Brackets
(N), Spring Washers (E), and Flat
Washers (F).
Tighten bolts with Allen Wrench (G).
Figure 8
Attach the Middle Panel (8) to
pre-assembled unit from Figure 7.
8
8
8
8
7
2 0
G
M
E
F

Page |
9
Figure 9
Attach Back Panels (9) to back of the unit
with Screws (H).
Tighten Screws (H) with Phillips
screwdriver (not included)
.
Figure 10
Align Cam Bolts (A).
Insert Cam Locks (B) into corresponding
holes on Check Rail (16).
Screw Cam Bolts (A) into threaded holes
on Shelf Panel (15).
Attach Shelf Panel (15) to Check Rail (16)
by inserting Cam Bolts (A) into
corresponding holes until all panels meet.
Tighten Cam Bolts (A) by rotating Cam
Locks (B) clockwise using Phillips
screwdriver (not included).
Attach Iron
F
ence (22) to Bottom Panel
(17).
Repeat step.
H
9
15
16
17
22

Page |
10
Figure 11
Align Cam Bolts (A) by hand.
Insert Cam Locks (B) into corresponding
holes on 1 pre-assembled unit from Figure
10.
Screw Cam Bolts (A) into threaded holes
on Side Panel of Door Frame (11/13).
Attach Side Panel of Door Frame (11/13)
to pre-assembled unit from Figure 10 by
inserting Cam Bolts (A) and Wood Dowels
(C) into corresponding holes until all
panels meet.
Tighten Cam Bolts (A) by rotating Cam
Locks (B) clockwise using Phillips
screwdriver (not included).
Figure 12
Align Cam Bolts (A) by hand.
Insert Cam Locks (B) into corresponding
holes on pre-assembled unit from Figure
11.
Screw Cam Bolts (A) into threaded holes
on Left Door Top Panel (18).
Attach Left Door Top Panel (18) to
pre-assembled unit from figure 11 by
inserting Cam Bolts (A) and into
corresponding holes until all panels meet.
Tighten Cam Bolts (A) by rotating Cam
Locks (B) clockwise using Phillips
screwdriver (not included).
Cover Cam Locks (B) with Adhesive Pads
(U).
11
13
B
A
U

Page |
11
Figure 13
Align Cam Bolts (A) by hand.
Insert Cam Locks (B) into corresponding
holes on pre-assembled unit from figure
12.
Screw Cam Bolts (A) into threaded holes
on Left Door Panel (10).
Attach Left Door Panel (10) to
pre-assembled unit from figure 12 by
inserting Cam Bolts (A) and Wood Dowel
(C) into corresponding holes until all
panels meet.
Tighten Cam Bolts (A) by rotating Cam
Locks (B) clockwise using Phillips
screwdriver (not included).
Cover Cam Locks (B) with Adhesive Pads
(U).
Figure 14
Align Cam Bolts (A) by hand.
Insert Cam Locks (B) into corresponding
holes on 2
nd
pre-assembled unit from
Figure 10.
Screw Cam Bolts (A) into threaded holes
on Side Panel Of Door Frame (12/14).
Attach Side Panel Of Door Frame (12/14)
to pre-assembled unit from Figure 10 by
inserting Cam Bolts (A) and Wood Dowels
(C) into corresponding holes until all
panels meet.
Tighten Cam Bolts (A) by rotating Cam
Locks (B) clockwise using Phillips
screwdriver (not included).
14
C
B
10

Page |
12
Figure 15
Align Cam Bolts (A) by hand.
Insert Cam Locks (B) into corresponding
holes on pre-assembled unit from Figure
14.
Screw Cam Bolts (A) into threaded holes
on Right Door Top Panel (19).
Attach Right Door Top Panel (19) to
pre-assembled unit from Figure 14 by
inserting Cam Bolts (A) and Wood Dowels
(C) into corresponding holes until all
panels meet.
Tighten Cam Bolts (A) by rotating Cam
Locks (B) clockwise using Phillips
screwdriver (not included).
Cover Cam Locks (B) with Adhesive Pads
(U).
Figure 16
Align Cam Bolts (A) by hand.
Insert Cam Locks (B) into corresponding
holes on pre-assembled unit from Figure
15.
Screw Cam Bolts (A) into threaded holes
on Door Panel (10).
Attach Door Panel (10) to pre-assembled
unit from Figure 15 by inserting Cam Bolts
(A) and Wood Dowels (C) into
corresponding holes until all panels meet.
Tighten Cam Bolts (A) by rotating Cam
Locks (B) clockwise using Phillips
screwdriver (not included).
Cover Cam Locks (B) with Adhesive Pads
(U).
19
10

Page |
13
Figure 17
Align Screws (O) by hand.
Attach the assembled doors from Figures
13 & 16 to pre-assembled unit from Figure
9 with Screws (O).
Tighten Screws (O) with Phillips
screwdriver (not included).
Attach the Knobs (J) & Gaskets (K) to the
doors with Bolts (L).
Tighten Bolts (L) with Phillips screwdriver
(not included).
Insert Shelf Pins (I) into holes on side
panels. Insert Glass Panel (21).
Make sure the Shelf Pins (I) hold the Glass
Panel (21) in stable position.
If the unit isn’t level, adjust the levels on
the legs.
Figure 18
Attach Brackets (Q) to Back Panel using
Short Screw (S). Tighten screws (S) using
a Philips screwdriver (not included).
Mark two desired locations on wall.
Drill two 3/16" holes on wall.
Insert plastic anchors (T) into the 2 holes
on wall, tap with hammer (not included) as
needed.
Attach the Brackets (Q) to wall using long
screws (R).
Tighten Screws (R) using a Philips screw
driver (not included).
21

Page |
14
Figure 19
Move the unit close to the fastened wall
bracket (Q) and tie in both brackets with
plastic straps (P).
Warning: Anti-tipping hardware must be
used for this product to avoid tipping and
injury.
Figure 20
Now your Starlynn Bar Cabinet is ready to
use.

Page |
15
Customer Information
Name
Address
City/State/Zip Code
Phone Number
Please indicate where you purchased this item: Store/Website/Catalog
Please indicate color/size/style number:
Style No Parts Letter Parts Description Quantity Needed
Please immediately examine this product carefully. Any request for missing parts or damage replacement must be
received within 90 days of your receipt of the product. Replacement, if available, will be honored within this time
frame. Parts will not be available for items arriving fully assembled. We do not recommend modifying product(s)
and we are not responsible for any damages due to product modification(s). If damages or missing parts are not
reported within 90 days of your receipt, we are under no obligation to provide parts or replacement merchandise.
For product issues, please contact Southern Enterprises at 800-633-5096 (toll-free) / 972-869-0111 (Dallas),
Mon-Fri 9am – 4pm CST, or email us at ser[email protected]. Please ask for customer service representative for
issues involving damages or replacement parts. Please ask for technical assistance representative for any issues
with product and assembly/construction.
Please contact the retailer that you purchased from for returns.
Parts Replacement Form
Customer Service: 1-800-633-5096
Southern Enterprises, Inc.
600 Freeport Parkway, Suite 200
Coppell, Texas 75019
/