Page is loading ...

Instructions
This publication will guide you through installation (or replacement)
of the 1336 PLUS Language Module.
1. Check the version of firmware presently installed in the drive.
If the current version is 1.04 or greater, proceed to step 2.
If you have version 1.03, parameters 111-127 and 180 must be
checked. The value of each parameter
must be greater than zero
and less than 212. If any value is outside of this range, reprogram
using the Program mode before proceeding to step 2.
Important:
Ifparameters127and/or180aresetto“0”(zero),these
must be reprogrammed to “1.”
If the above is not performed, an "EE Init Read" fault (F53) will
be issued when the drive is powered up with the new Language
Module.
2. Remove and lock-out all incoming power to the drive. Remove
the drive cover.
!
ATTENTION: This drive contains ESD (Electrostatic
Discharge) sensitive parts and assemblies. Static control
precautions arerequired when installing, testing, servicing
or repairing this assembly. Component damage may result
if ESD control procedures are not followed. If you are not
familiar with static control procedures, reference A-B
publication 8000-4.5.2, “Guarding Against Electrostatic
Damage” or any other applicable ESD protection
handbook.
!
ATTENTION: To avoid a shock hazard, assure that all
powertothedrivehasbeenremovedbeforeproceedingwith
thefollowing procedure. Inaddition,verifythattheDCbus
hasdischargedbymeasuringacrossthe“+DC”and“–DC”
terminals of TB1 with a voltmeter. The voltage should be
0.0V DC.
1336 PLUS Language Module
Installation/Replacement

2 1336 PLUS Language Module Installation/Replacement
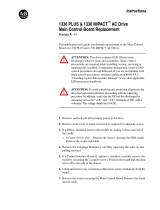
3. Using the figure above, locate the Language
Module for your drive and note orientation.
On 0.37-3.7 kW (0.5 - 5 HP) drives, the HIM
and cradle must be removed before
proceeding.
A. To remove the HIM, slide it down and
out of its cradle.
B. Remove the cradle by taking the 4 corner
screws out. Position the cradle and
attached cable out of the way.
0.37-3.7 kW (0.5-5 HP) Only
0.37-3.7 kW (0.5-5 HP) Only
LANGUAGE MODULE
ALLEN-BRADLEY
LANGUAGE MODULE
ALLEN-BRADLEY
Frames A1 - A4 Frames B - G
JOG
ESC
SEL
JOG
ESC
SEL
JOG
ESC
SEL
LANGUAGE MODULE
ALLEN-BRADLEY

1336 PLUS Language Module Installation/Replacement 3
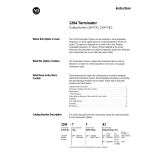
4. Remove the module by squeezing the sides-
in, and pulling outward. Discard module.
5. Position the new Language Module on the
Main Control Board, using the silk screen
outline on the board as a guide.
6. Carefully align the module connector with
the Main Control Board connector. Firmly
press the module onto the Main Control
Board until fully seated. The module will
“snap” (lock) in place.
7. Replace HIM and cradle (if removed).
Replace drive cover and restore power to the
drive. An
F53, F54
or
F66
fault will occur.
Reset parameters to the factory default values
– then, clear the fault by pressing the Stop
key or cycling power. The drive may now be
programmed as required.
Important:
Each module contains English
and an alternate language. The
factory default setting for the
[Language] parameter is
“English.” To program and
operate the drive in the alternate
language, the [Language]
parameter must be programmed
to the alternate language.
LANGUAGE MODULE
ALLEN-BRADLEY
LANGUAGE MODULE
ALLEN-BRADLEY
LANGUAGE MODULE
ALLEN-BRADLEY
JOG
ESC
SEL

Publication 1336 PLUS-5.5 – May, 1996 P/N74001-007-01(C)
Supersedes June, 1994 Copyright 1996 Rockwell International Corporation. All rights reserved. Printed in USA.
/