Perle UltraPort Serial Card User guide
- Category
- Interface cards/adapters
- Type
- User guide

Introduction
This Quick Start Guide covers the key points of the
installation of the device driver software and host card for
your
UltraPort product. To obtain the latest driver software,
please refer to the download section of the Perle web site.
Installing UltraPort cards
1. Turn off the power to your system and disconnect the
mains supply.
2. Remove the system cover to expose the inside of the
connector panel for host cards.
3. Insert the UltraPort card you want to install into a vacant
host card slot and secure in place.
4. Repeat steps 1. to 3. until you have installed all the
UltraPort cards you want.
5. Replace and secure the system cover.
6. Plug in the mains and turn on the power.
Accessing the CDROM
Windows
The CDROM will be automatically mounted a short time after
placing it in the CDROM drive. View with Windows Explorer.
Solaris
The CDROM will be automatically mounted a short time after
placing it in the CDROM drive.
SCO OpenServer
1. Login to your system as super user, then load the CDROM
into your system CD drive.
2. At the command prompt, type
mkdir /cdrom.
3. At the command prompt, type:
mount -f ISO9660 -r/dev/cd0 /cdrom
You can now browse the CDROM content using the File
Manager tool in the SCO OpenServer desktop.
SCO UnixWare
1. Login to your system as super user, then load the CDROM
into your system CD drive.
2. At the command prompt, type
mkdir /cdrom.
3. At the command prompt, type:
mount -r -F cdfs -o nmconv=c /dev/cdrom/c1b0t0l0 /cdrom
You can now browse the CDROM content using the File
Manager tool in the SCO UnixWare desktop.
Linux
1. Login to your system as super user then load the CDROM
into your system CD drive.
2. At the command prompt, type
mount /mnt/cdrom.
You can now browse the CDROM content using any one of
the file browsers available for Linux.
Installing driver software
Windows 95/98
To install under one of these Windows operating systems
proceed as follows;
1. Install the UltraPort cards you require and allow the
operating system to boot.
A new hardware pop-up message is now displayed
prompting you for a destination directory.
2. Load the CDROM.
3. In the popup window, select the
\drivers\ultraport\win9x\x.y.z directory on the CDROM
and click OK.
Windows NT 4
A device driver is installed with the PortDirector software,
supplied on the CDROM. To install PortDirector:
1. Load the CDROM.
2. Access the \drivers\ultraport\winnt\portdirector\x.y.z
directory in Windows Explorer and double-click on
Setup.exe.
3. Follow the instructions on screen to install PortDirector.
Windows 2000/XP/Server 2003/Vista/
Server 2008
To install under one of these Windows operating systems,
proceed as follows:
1. Install the UltraPort cards you require and allow the
operating system to boot.
2. The Found New Hardward wizard opens, prompting you
for a destination directory. Click Cancel.
3. Load the CDROM.
4. Access the \drivers\ultraport\w2k\x.y.z directory on the
CDROM and double-click the pserial-<arch>.exe file,
where <arch> is the architecture of your Windows
machine. The UltraPort drivers will now be installed on
your system.
Solaris (Intel)
To install under Solaris (Intel) proceed as follows;
1. Install any UltraPort PCI host cards into your system.
2. Login to your system as root, then load the CDROM into
your system CD drive.
3. At the command prompt, type pkgadd -d
/cdrom/drivers/ultraport/solaris/x.y.z/fast-sol-x.y.z.pkg
comf and press Enter. The UltraPort drivers will now be
installed on your system.
SCO OpenServer
To install under SCO OpenServer proceed as follows:
1. Install any UltraPort PCI host cards into your system.
2. Login to your system as super user, then load the CDROM
into your system CD drive.
3. Mount the CDROM using the instructions for SCO
OpenServer in Solaris.
4. In the SCO OpenServer desktop, double click on the
System Administration folder.
5. In the System Administration window, double click on the
software manager icon.
6. In the Software Manager menu, click
Software > Install
New
.
7. In the Begin Installation window, click on the
From
localhostname
button and then click on Continue.
8. In the Select Media window, select the
Media Images
option then click on Continue.
9. In the Enter Image Directory window, type;
/cdrom/drivers/ultraport/openserver/x.y.z and then click on
OK
10.In the Install Selection window, click on the Install button.
11. If you are installing other drivers, turn off the
Re-link Kernel option to prevent an unwanted kernel link.
SCO UnixWare
To install the UltraPort device drivers and utilities for the SCO
UnixWare operating system proceed as follows;
1. Install any UltraPort PCI host cards into your system.
2. Login to your system as super user, then load the CDROM
into your system CD drive.
3. Mount the CDROM.
4. At the command prompt, enter the following;
pkgadd -d
/cdrom/drivers/ultraport/unixware/x.y.z/spd-ose5-x.y.z.pkg
spd
Linux
To install the device drivers for Linux using the source RPM
package proceed as follows:
1. Log in to the LINUX system as root user.
2. At the LINUX prompt, copy the supplied
perle-serial-<version>-<release>.src.rpm file onto your
system in the /tmp directory.
3. Install the source rpm by typing the following command:
rpm –ivh perle-serial-<version>-<release>.src.rpm
4. Build the binary RPM package for your system by entering
the following commands:
cd /usr/src/<packages directory>/SPECS
<rpm build command> -bb perle-serial-<version>.spec
5. Install the binary RPM which was just created. Enter the
following commands:
cd /usr/src/<packages directory>/RPMS/<arch>
rpm –ivh perle-serial-<version>-<release>.<arch>.rpm
The <arch> value is the architecture of your LINUX machine
such as “i386” or “alpha”.
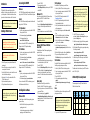
UltraPort4 RJ45 socket pinouts
The connector pinout for each RJ45 socket fitted to the
UltraPort4 cards is as follows;
Note
For more detailed information, see the user documentation on
the CDROM supplied with this product.
Warning
Dangerous voltages exist inside computer systems.
Before installing host cards in your system, turn off the
power supply and disconnect the mains lead.
Caution
Full anti-static precautions should be taken when
handling host cards.
Note
Do not turn on the power to your system until you have
connected the distribution cable or box you are using
with this host card.
Note
Any installed UltraPort cards will be automatically detected
and assigned from PortDirector.
Note
Patch files previous to Version 2.0 must be uninstalled before
installing the latest version. See UltraPort Serial Adaptors User
Guide for detailed instructions for installing using a
compressed TAR file or source RPM.
Note
The <packages directory> path name in the following
instructions will be different depending on the LINUX
distribution you have installed. ( i.e. Redhat will have a
“redhat” directory; Suse will have a “packages”
directory)
The <rpm build command> will change depending on the
version of the RPM utilites installed. For newer versions
(i.e. 4.2) , the <rpm build command> is “rpmbuild”. For
older versions use “rpm”.
RJ45
10-pin
RJ45
8-pin
Signal Direction Description
1 N/A RI In Ring
Indicator
2 1 DCD In Data Carrier
Detect
3 2 RTS Out Request To
Send

UltraPort8i RJ12 socket pinouts
The connector pinout for each RJ12 socket fitted to the
UltraPort8i cards is as follows;
Configuring the ports
Windows 95/98
Use the Device Manager to change the default settings that are
applied by the operating system.
Windows NT
PortDirector will automatically recognise the installed card
and its ports. The ports will have the default settings, although
this can be changed using PortDirector.
Windows 2000/XP/Server 2003/Vista/
Server 2008
Use the Device Manager to change the default settings that are
applied by the operating system.
Solaris (Intel)
The admin tool within the Solaris operating system allows you
to configure the extra serial ports you have added to your
system.
1. At the command pormpt, type admintool and the
Admintoll utility window will be displayed.
2. In the Admintool window, click on Browse->Serial Ports
and seletec the port you want to configure by clicking Edit
>Modify.The Modify Serial Port window will be
dispalyed
3. In the Modify Serial Port window, set the parameters that
you require and click OK to accept the changes.
4. Repeat the above step for each serial port you wish to
configure.
5. In the Serial Manager menu click on Host>Quit to quit
Serial Manager and close window.
SCO OpenServer
The Port Configuration utility allows you to configure the
UltraPort serial ports you have added to your system. To do
this proceed as follows;
1. In the SCO OpenServer desktop, double click on the
System Administration Folder.
2. In the System Administration window now displayed,
double click on the Speed folder, then in the Speed
window now displayed, double click the Port
Configuration icon.
3. In the Port Configuration window now displayed, select
the ports you want you want to configure and select the
getty definition and terminal type you want.
4. If required, click on the
ixon button to enable flow control
for Transparent printing (to enable sending of data on
receipt of the next character, click on the
ixany button).
5. Click on either the
Enable or Disable buttons as required to
enable or disable login sessions on the selected ports.
6. In the Port Configuration menu, click
Ports > Save & Exit.
SCO UnixWare
The UltraPort utilities for the SCO UnixWare operating
system includes a utility called
Serial Manager which allows
you to configure the extra UltraPort serial ports you have
added to your system. To invoke
Serial Manager;
1. At the command prompt, type
scoadmin to display the
System Administration window.
2. In the System Administration tool window, click on the
Hardware folder and then select Serial Manager.
Linux
After the Ultraport cards and the new driver have been
installed, terminal devices will need to be created for the
added ports. This can be done be using the ps_addports
utility.
To use the ps_addports script, enter the following command:
ps_addports m n
where:
m is the first port device (starting at 0)
n is the last port device to add.
The port devices will be created in the /dev directory and will
have the following format:
/dev/ttyPSnn
where nn is the 2 digit port number.
Once the port devices have been created, they may be used as
standard LINUX serial TTYs.
UltraPort
Multiport Serial Cards
Quick Start Guide
• Universal 3.3V/5V bus support
• Ease of installation and configuration
• 1, 2, 4, 8 or 16 ports
• Bi-directional speeds up to 921Kbps
4 3 DSR In Data Set
Ready
5 4 TXD Out Transmit
Data
6 5 RXD In Receive Data
7 6 S-GND Signal
Ground
8 7 CTS In Clear to Send
9 8 DTR Out Data
Terminal
Ready
10 N/C Not
Connected
Shell Shell C-GND Chassis
Ground
RJ12
6-pin
Signal Direction Description
1 DCD In Data Carrier Detect
2 RXD In Receive Data
3 DTR or
RTS
Out Data Terminal Ready/
Request To Send
4 S-GND Signal Ground
5 TXD Out Transmit Data
6 CTS In Clear to Send
10 Not Connected
Shell C-GND Chassis Ground
RJ45
10-pin
RJ45
8-pin
Signal Direction Description
Contacting Perle Technical Support
Perle offers free technical support to Perle Authorised
Distributors and Registered Perle Resellers.
To access technical support please visit the Perle
website at www.perle.com/support.
Here you will find:
• latest drivers and firmware updates for download
• technical tips
• frequently asked questions
• documentation
• configuration support
• cabling information
• maintenance contract information
• and much more...
If you are unable to find the information you require,
please feel free to contact our technical support teams
by email at:
USA
Email: [email protected]
Europe
Email: [email protected]
Asia
Email: [email protected]
Internet
www.perle.com/support_services/index.shtml
UltraPort Quick Start Guide
Part No: 5500151-16
Copyright © Perle Systems Limited, 2008
-
 1
1
-
 2
2


Perle UltraPort Serial Card User guide
- Category
- Interface cards/adapters
- Type
- User guide
Ask a question and I''ll find the answer in the document
Finding information in a document is now easier with AI
Related papers
-
Perle UltraPort Serial Card User guide
-
-
Perle SX Serial Card User guide
-
-
-
-
-
Perle Console Server User guide
-
Perle Systems 04003310 User manual
-
Other documents
-
 Perle Systems Adaptors User manual
-
 Perle Systems Network Card 5500152-23 User manual
-
 Perle Systems 5500174-11 User manual
-
 Perle Systems RIO 5500036-17 User manual
-
LSI Fibre Channel Host Adapter User guide
-
Digi AccelePort 8p Installation guide
-
Lenovo 2652 - ThinkPad A31 - Pentium 4-M 1.9 GHz Hardware Maintenance Manual
-
 Eicon Networks 800-241 User manual
-
IBM MT 2631 User manual
-


