Introduction
This Quick Start Guide covers the key points of the
installation of the SX device driver software and hardware. It
is intended for systems administrators familiar with Windows
NT, Windows 2000, SCO OpenServer 5, SCO UnixWare and
Linux operating systems. To obtain the latest driver software
please refer to the driver matrix page under technical support
in Perle web site.
Accessing the CDROM
Solaris
1. Login to your system as super user then load the CDROM
into your system CD drive.
Solaris will automatically mount the CDROM when inserted,
and start the file manager application.
You can now browse the CDROM content using the File
Management tools within Solaris.
SCO OpenServer
1. Login to your system as super user then load the CDROM
into your system CD drive.
2. Mount the CDROM using the
mount -fISO9660 -r /dev/cd0 /cdrom command.
You can now browse the CDROM content using the File
Manager tool in the SCO OpenServer desktop.
SCO UnixWare
1. Login to your system as super user then load the CDROM
into your system CD drive.
2. Mount the CDROM using the
mount -r -Fcdfs -o nmconv=c /dev/cdrom/cdrom1 /mnt
command.
You can now browse the CDROM content using the File
Manager tool in the SCO UnixWare desktop.
Windows NT
The CDROM will be automatically mounted a short time after
placing it in the CDROM drive. View with Windows Explorer.
Windows 2000
The CDROM will be automatically mounted a short time after
placing it in the CDROM drive. View with Windows Explorer.
Linux
1. Login to your system as super user then load the CDROM
into your system CD drive.
2. At the command prompt, type mount /mnt/cdrom.
You can now browse the CDROM content using any one of
the file browsers available for Linux.
Installing driver software
Solaris
To install under Solaris proceed as follows;
1. Install any SX PCI host cards into your system.
2. Login to your system as super user, begin a terminal
session then load the HandyWEB CDROM into your
system CD drive.
3. At the command prompt, type:
pkgadd -d/cdrom/handywebx/drivers/sxplus/solaris/
sx-sol-<ver>.pkg and press the Enter key (where ver is
version number).
4. At the resulting question prompt, select Y and press Enter.
SCO OpenServer
To install under SCO OpenServer proceed as follows;
1. Install any SX PCI host cards into your system.
2. Login to your system as super user.
3. Load the HandyWEB CDROM into your system CD drive.
4. Mount the CDROM using the
mount -fISO9660 -r /dev/cd0 /cdrom command.
5. In the SCO OpenServer desktop, double click on the
System Administration folder.
6. In the System Administration window, double click on the
Software Manager icon.
7. In the Software Manager menu, click on
Software > Install New.
8. In the Begin Installation window, click on the From
localhostname button and then click on Continue.
9. In the Select Media window, select the Media Images
option then click on Continue.
10. In the Enter Image Directory window, type;
/cdrom/drivers/sx/openserver and then click on OK
11. In the Install Selection window, click on the Install button.
12. If you are installing other drivers, turn off the
Re-link Kernel option to prevent an unwanted kernel link.
13. In the Specialix SX Configuration window now displayed,
click on the Cards > Exit menu option to close the
window.
14. In the pop-up window that now appears (for successful
installation) click on OK to close the window.
The software manager window is now updated to include the
SX driver in the list of installed software.You can now install
any ISA host cards and Device concentrators you require.
SCO UnixWare
To install the SX device drivers and utilities for the SCO
UnixWare operating system proceed as follows;
1. Install any SX PCI host cards into your system.
2. Login to your system as super user then load the
HandyWEB CDROM into your system CD drive.
3. Mount the CDROM using the
mount -r -Fcdfs -o nmconv=c /dev/cdrom/cdrom1 /mnt
command.
4. At the command prompt, type pkgadd -d
/mnt/drivers/sx/unixware/sx.pkg slxos and press Enter.
5. At the command prompt that now appears, type
shutdown -y -i6 and press Enter to shutdown and re-boot
the system.
Upon completion of the system re-boot the SX drivers you
have installed are ready to use.You can now install any ISA
host cards and Device concentrators you require.
Linux
To install the SX device drivers and utilities for the Linux
operating system proceed as follows;
1. Install any ISA or PCI host card(s) and device
concentrator(s) onto your system.
2. Mount the cdrom using the mount /mnt/cdrom command.
3. Apply the kernel driver patch to kernel sources in
/usr/src/linux: patch -p1
</mnt/cdrom/drivers/sx/linux/sx.patch-1.30-2.2.14
4. Set the Kernel Configuration->Character
Devices->Specialix SX (and SI) card support flag to m.
5. Use either the make config or make xconfig commands to
apply this setting. Now rebuild and install the new kernel
and modules then reboot using the new kernel.
6. Install utilities RPM: rpm -i
/mnt/cdrom/drivers/sx/linux/specialix_sxtools-4-1.i386.
rpm.
7. Load the SX driver: sxboot then load the host card
firmware: sxmkdev -f.
Your system is now ready to use the attached SX serial ports.
Windows NT
A device driver is installed with the PortDirector software,
supplied on the CDROM. To install PortDirector:
1. Load the CDROM then access the \drivers\portdirector
directory, in Windows Explorer and double-click on
Setup.exe.
2. Follow the instructions on screen to install PortDirector
You can now install any ISA host cards and Device
concentrators you require.
Windows 2000
To install under Windows 2000 proceed as follows;
1. Install the SX cards you require and allow the operating
system to boot.
2. Load the CDROM then in the popup window now
displayed, select the \drivers\sx\w2k directory and click on
OK.
You can now install PortDirector if required for management
of your serial ports. Alternatively, use the Windows 2000
Device Manager.
The device drivers and software are now installed
automatically into the selected destination.
You can now install any Device concentrators you require.
Device concentrator pinouts
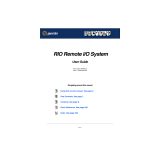
MX type device concentrators
All MX type SX device concentrators are fitted with DB25
male connectors as shown in the next table.
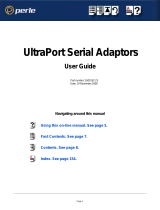
DX type device concentrators
All DX type SX device concentrators are fitted with DB25
female connectors as shown in the next table.
Note
Any installed SX cards will be automatically detected and
assigned from PortDirector.
Pin Signal Direction
1 Chassis
2 TXD Out
3 RXD In
4 RTS Out
5 CTS In
6 DSR In
7 GND
8 DCD In
20 DTR Out
22 RI In
Pin Signal Direction
1 Chassis
2 RXD In
3 TXD Out
4 RTS In
5 CTS Out
6 DSR Out
7 GND
8 DCD In
20 DTR In
22 RI In
Pin 1
Looking
into
connector
Pin 1
Looking
into
connector