Page is loading ...

SmartLife
IOT
For Home
Smart Home Kit QIG

Setup the IoT Package
Start to use IoT Gateway
Start to use IoT Device
Start to use AirLive SmartLife Plus
1
8
13
Appendix
Exclude Devices
Include Sensors and Smart Plug (Option)
Include SmartCube 300W (Option)
16
19
24
Page 00

Setup the IoT Package
Start to use IoT Gateway
Download the AirLive Smart
Life Plus APP
Please visit App Store or Google Play
to download AirLive SmartLife Plus
APP. You can use QR code scanner
software directly or simply search
the “AirLive SmartLife Plus”.
01
Page 01
SmartLife
IOT
For Home
Start to use IoT Gateway
AirLive SmartLife Plus
AirLive SmartLife Plus
AirLive SmartLife Plus
App Store Google Play
IOT
For Home

Connect the gateway to the Router
by Ethernet cable
Note: When the internet connection is
built, a white LED light will turn
ON.
Click the “AirLive
SmartLife Plus”
icon on your smart
phone
Page 02
Setup the IoT Package
Start to use IoT Gateway
Install the Gateway
02
Execute the APP
03
5V DC Power Ethernet
IOT
For Home
e

Page 03
Please select "QR Code" to add
gateway.
Remove the back holder of the
Gateway by sliding it down and
then, Please scan the QR code to
add the gateway.
Setup the IoT Package
Start to use IoT Gateway
Select QR code to Add
Gateway
04
Scan the QR code
05
Back of the gateway

Or click "LAN search" to add the
gateway if QR code not work.
Note: Make sure your phone and
gateway are on the same
network segment
Note: You can input your desired name
into Name field.
Key in gateway ID and password to
field. The default ID is "admin" and
the password is "airlive". Press the
Eye to see your password
Page 04
Setup the IoT Package
Start to use IoT Gateway
Select LAN Search to Add
Gateway
06
Key in the password
07

Note: If the sensors are not listed or you
want to add new sensors, please
go to “Include sensor” chapter.
After Login into the Gateway, the
APP will display the Scenes page by
default to see your devices. Click
"Devices" tab, all included sensors
should be shown on screen.
Page 05
Setup the IoT Package
Start to use IoT Device
Devices Screen
08
When the Siren is not displayed in
the Devices tab, then go to "Setting"
>> "Options" and check mark "Show
Gateway Siren" The siren will now
be shown in the Device tab.
Siren
09
1
2

1. Click the Icon to see the Device
information.
2. Click the Text to Activate the
Actuator (Sensor cannot be
Activated.
By default the Wifi in the Gateway is
turned on. The default SSID is
Airlive-XXXXX were XXXX is the
wireless MAC address of your
Gateway. The default WIFI password
is 12345678 It is highly recommend
that you change the WIFI settings to
your own after setting up the
Gateway. For example turn the WIFI
Off or change the SSID and
Password.
Page 06
Setup the IoT Package
Start to use IoT Gateway
Control Info
10
Wifi Notice-1
11
1
2

To change the Wifi settings Go to
"Setting" and "Gateway
Information" Click on the Wireless
icon to change the settings
Page 07
Setup the IoT Package
Start to use IoT Device
Wifi Notice-2
12
In the Wifi menu you can select OFF
to turn the Wifi of the Gateway Off.
Or for AP Mode/ STA mode. AP mode
is the default mode select this mode
to change the SSID and Wifi
Password. Select STA mode when
you like to connect the Gateway as
client to a Wifi network.
Wifi Notice-3
13
1
3
2

SmartLife
IOT
For Home
Start to use IoT Device
You can click "Question mark" to
download the user's guide for APP
operation.
Page 08
Setup the IoT Package
Start to use IoT Gateway / Start to use IoT Device
Download APP User's Guide
14

Setup the IoT Package
Start to use IoT Device
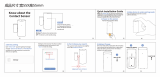
Note: The sensor should be aligned
with the center line when
pasting (gap up and down within
1cm / width 2cm)
Use the double-sided adhesive
attached to back of the device, and
paste the device on the door or
window.
Install the 3 in 1 sensor
02
Remove the black mylar, the red
light will flash about 10 seconds. And
then you can paste the device on the
door or window.
Start to use 3 in 1 sensor
01
Page 09

Turn the cover counter-clockwise
and open it. Remove the black
mylar, the red light will flash 3 times.
And then you can fix the bracket on
the wall.
Note: Enclosure lock is marked with a
dot.
Start to use Motion(PIR) Sensor
03
Setup the IoT Package
Start to use IoT Device
Install the Motion sensor
04
Fix the bracket on the wall. There's a
magnet on the backside of this
device. it will stick to the bracket.
Page 10

Plug the device into the outlet. And
then you can plug the appliance's
power into the plug.
Start to use Smart Plug (Option)
05
Setup the IoT Package
Start to use IoT Device
Plug the appliance's power into the
plug.
Ex: table lamp, electric fan
Install the Plug
06
Page 11

We recommend to connect the
camera via LAN cable, it is more
stable. But if your camera is not
installed near your router, please
connect the camera via WiFi. The
easiest way is to use the WPS push
button. Now, please click on the WPS
button on your router first
Install the SC300W by WIFI 1
07
Setup the IoT Package
Start to use IoT Device
Then immediately, please click on the
Reset/WPS button on the camera.
The green LED will be on for 2
minutes. When SmartCube-300W
connects to the router successfully,
the LED will be flashing.
Install the SC300W by WIFI 2
08
Ant.Reset/WPSLAN4 LAN3 LAN2 LAN1
12V DC
WAN
Broadband
PS
/WPS
et/W
Page 12

If you have connected the camera
through WiFi, please skip this step.
Do not connect by WiFi and Ethernet
cable at the same time. If your
camera is near your router, please
consider choose connecting by
Ethernet which is more stable.
Connect the Ethernet cable from
camera to the router directly. When
successful, the green LED will be
flashing.
Install the SC300W by
Ethernet
DC Power Ethernet
09
Setup the IoT Package
Start to use IoT Device / Start to use AirLive SmartLife Plus
SmartLife
IOT
For Home
Start to use
AirLive SmartLife Plus APP
IOT
For Home
Page 13

Start to use AirLive SmartLife Plus
Click the “AirLive SmartLife Plus”
icon on your smart phone, For more
information about the use of the APP
please see the APP guide by pressing
the "?".
Execute the SmartLife Plus
APP
01
IOT
For Home
AirLive SmartLife Plus APP features “Smart
Rules” which allows you to group sensors
from different rooms, as well as to cary out
Scenes and Macros Management settings.
Device: Turn on/off individual devices
Room: Create different settings for rooms
around the house
Scene: Make multiple actions such as
turning on multiple lightings at the
same time.
Macro: Set “IF->Then” conditions. For
example, if the interior illumination
is below certain level, the light will
turn on."OR" lets you add more
Sensors.
Settings: APP & Gateway advance settings.
Smart Rule
02
Setup the IoT Package
Page 14

Page 15
Start to use AirLive SmartLife Plus
After login the gateway to click
"Macros" tab
Quickly Launch Intruder
Alarm
03
Click the padlock to close/open, then
security will be in armed/disarmed
mode.
Note: If door/window or PIR is
triggered, user will receive a
notification and Siren will sound.
Click "Home Security Alarm" on
screen
Setting Intruder Alarm
04
Trigger: Set the duration for
triggering the alarm in armed mode
Siren Tone: To decide which tune of
siren to be used. (There are 6 tones)
Duration: Set the Duration of the
alarm.
Setup the IoT Package

Appendix
Exclude Devices
SmartLife
IOT
For Home
Exclude Devices
When using the Airlive Kit
the Devices have already
been included to the
gateway by default, but if
you want to include a
device again you must
exclude the device first.
Go to setting page and select Other
settings.
Press Include/Exclude icon and press
Exclusion.
Exclude Device -1
01
Page 16

Appendix
Exclude Devices
Page 17
APP will show "Exclude device",
and start count down.
Exclude Device -2
02
Exclude 3 in 1 sensor -3
03
Press tamper key on the back of
sensor 3 times in rapid succession
then the red light LED will flash.
Note: when device excluded, it will
automatically be in the inclusion
mode, red light slowly flashing
for 30 seconds.

Appendix
Exclude Devices
Page 18
Note: when device excluded, it will
automatically be in the inclusion
mode, red light slowly flashing
for 30 seconds.
Press tamper key on the back of
sensor 3 times in rapid succession
then the red light LED will flash.
Exclude Motion sensor -4
04
Exclude Smart Plug -5
05
Press LED key on the plug 3
times in rapid succesion then
the red light LED will flash.
Note: when device excluded, it will
automatically be in the inclusion
mode, red light slowly flashing
for 30 seconds.
/