
Industrial Secure Router User’s Manual
Edition 4.0, April 2018
www.moxa.com/product
© 2018 Moxa Inc. All rights reserved.

Industrial Secure Router User’s Manual
The software described in this manual is furnished under a license agreement and may be used only in accordance
with the terms of that agreement.
Copyright Notice
© 2018 Moxa Inc. All rights reserved.
Trademarks
The MOXA logo is a registered trademark of Moxa Inc.
All other trademarks or registered marks in this manual belong to their respective manufacturers.
Disclaimer
Information in this document is subject to change without notice and does not represent a commitment on the part of
Moxa.
Moxa provides this document as is, without warranty of any kind, either expressed or implied, including, but not
limited to, its particular purpose. Moxa reserves the right to make improvements and/or changes to this manual, or to
the products and/or the programs described in this manual, at any time.
Information provided in this manual is intended to be accurate and reliable. However, Moxa assumes no responsibility
for its use, or for any infringements on the rights of third parties that may result from its use.
This product might include unintentional technical or typographical errors. Changes are periodically made to the
information herein to correct such errors, and these changes are incorporated into new editions of the publication.
Technical Support Contact Information
www.moxa.com/support
Moxa Americas
Toll
-free: 1-888-669-2872
Tel:
+1-714-528-6777
Fa
x: +1-714-528-6778
Moxa China (Shanghai office)
Toll
-free: 800-820-5036
Tel:
+86-21-5258-9955
Fax:
+86-21-5258-5505
Moxa Europe
Tel:
+49-89-3 70 03 99-0
Fax: +49-89-3 70 03 99-99
Moxa Asia
-Pacific
Tel:
+886-2-8919-1230
Fax: +886-2-8919-1231
Moxa India
Tel:
+91-80-4172-9088
Fax:
+91-80-4132-1045

Table of Contents
1. Introduction ...................................................................................................................................... 1-1
Overview ........................................................................................................................................... 1-2
Package Checklist ............................................................................................................................... 1-2
Features ............................................................................................................................................ 1-2
Industrial Networking Capability .................................................................................................... 1-2
Designed for Industrial Applications ............................................................................................... 1-2
Useful Utility and Remote Configuration ......................................................................................... 1-2
2. Getting Started.................................................................................................................................. 2-1
RS-232 Console Configuration (115200, None, 8, 1, VT100) .................................................................... 2-2
Using Telnet to Access the Industrial Secure Router’s Console .................................................................. 2-3
Using a Web Browser to Configure the Industrial Secure Router ............................................................... 2-4
3. EDR-810 Series Features and Functions ............................................................................................ 3-1
Quick Setting Profile ............................................................................................................................ 3-3
WAN Routing Quick Setting .......................................................................................................... 3-3
Bridge Routing Quick Setting ........................................................................................................ 3-6
System .............................................................................................................................................. 3-9
Fast Bootup Setting ..................................................................................................................... 3-9
System Information ................................................................................................................... 3-10
User Account ............................................................................................................................ 3-11
Password and Login Policy .......................................................................................................... 3-13
Date and Time .......................................................................................................................... 3-14
Warning Notification .................................................................................................................. 3-15
SettingCheck ............................................................................................................................ 3-20
System File Update—by Remote TFTP .......................................................................................... 3-21
System File Update—by Local Import/Export ................................................................................ 3-22
System File Update –Import/Export the configurations stored on the ABC-02-USB ............................ 3-23
Restart ..................................................................................................................................... 3-25
Reset to Factory Default ............................................................................................................. 3-25
Port ................................................................................................................................................ 3-25
Port Settings ............................................................................................................................. 3-25
Port Status ............................................................................................................................... 3-26
Link Aggregation ....................................................................................................................... 3-27
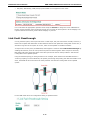
The Port Trunking Concept ......................................................................................................... 3-27
Port Mirror ................................................................................................................................ 3-28
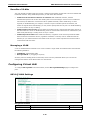
Using Virtual LAN .............................................................................................................................. 3-29
The VLAN Concept ..................................................................................................................... 3-29
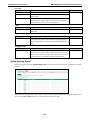
Configuring Virtual LAN .............................................................................................................. 3-30
Multicast .......................................................................................................................................... 3-32
The Concept of Multicast Filtering ................................................................................................ 3-32
IGMP Snooping ......................................................................................................................... 3-34
IGMP Snooping Settings ............................................................................................................. 3-34
IGMP Table ............................................................................................................................... 3-35
Stream Table ............................................................................................................................ 3-36
Static Multicast MAC .................................................................................................................. 3-36
QoS and Rate Control ........................................................................................................................ 3-37
QoS Classification ...................................................................................................................... 3-37
CoS Mapping ............................................................................................................................ 3-38
ToS/DSCP Mapping .................................................................................................................... 3-39
Rate Limiting ............................................................................................................................ 3-39
MAC Address Table ........................................................................................................................... 3-40
Interface ......................................................................................................................................... 3-41
WAN ........................................................................................................................................ 3-41
LAN ......................................................................................................................................... 3-44
Bridge Group Interface ............................................................................................................... 3-44
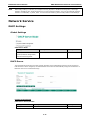
Network Service ............................................................................................................................... 3-47
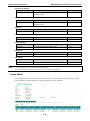
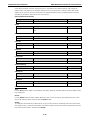
DHCP Settings .......................................................................................................................... 3-47
SNMP Settings .......................................................................................................................... 3-51
SNMP Trap Setting .................................................................................................................... 3-53
Dynamic DNS ........................................................................................................................... 3-53
Security ........................................................................................................................................... 3-54
User Interface Management ........................................................................................................ 3-54
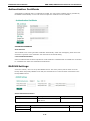
Authentication Certificate ........................................................................................................... 3-55
Trusted Access .......................................................................................................................... 3-56
RADIUS Server Settings ............................................................................................................. 3-57
Security Notification Setting ....................................................................................................... 3-58
Diagnosis ................................................................................................................................. 3-58
Event Log ................................................................................................................................. 3-59
Connection Status ..................................................................................................................... 3-59

4. EDR-G902/G903 Series Features and Functions................................................................................ 4-1
Overview ........................................................................................................................................... 4-3
Configuring Basic Settings ................................................................................................................... 4-4
System Identification ................................................................................................................... 4-4
Hardware Acceleration ................................................................................................................. 4-5
Accessible IP ............................................................................................................................... 4-6
Password.................................................................................................................................... 4-7
Time .......................................................................................................................................... 4-8
SettingCheck ............................................................................................................................ 4-10
Relay Event Setup ..................................................................................................................... 4-11
Warning .......................................................................................................................................... 4-12
System Event Setting ................................................................................................................ 4-12
System File Update—by Remote TFTP .......................................................................................... 4-13
System File Update—by Local Import/Export ................................................................................ 4-14
Backup Media ........................................................................................................................... 4-14
Restart ..................................................................................................................................... 4-15
Reset to Factory Default ............................................................................................................. 4-16
Network Settings .............................................................................................................................. 4-16
Mode Configuration ................................................................................................................... 4-16
Link Fault Passthrough ............................................................................................................... 4-17
MTU Configuration (for EDR-810/G902/G903) ............................................................................... 4-18
Speed Configuration .................................................................................................................. 4-20
WAN1 Configuration .................................................................................................................. 4-20
WAN2 Configuration (includes DMZ Enable) .................................................................................. 4-23
Using DMZ Mode ....................................................................................................................... 4-26
LAN Interface............................................................................................................................ 4-27
802.1Q VLAN Setting ................................................................................................................. 4-27
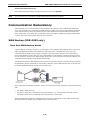
Communication Redundancy .............................................................................................................. 4-28
WAN Backup (EDR-G903 only) .................................................................................................... 4-28
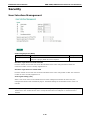
Security ........................................................................................................................................... 4-30
User Interface Management ........................................................................................................ 4-30
Authentication Certificate ........................................................................................................... 4-31
RADIUS Settings ....................................................................................................................... 4-31
Traffic Prioritization Setup .......................................................................................................... 4-32
Monitor............................................................................................................................................ 4-36
System Log ...................................................................................................................................... 4-36
EventLog .................................................................................................................................. 4-36
Syslog ..................................................................................................................................... 4-37
5. Routing ............................................................................................................................................. 5-1
Unicast Route ..................................................................................................................................... 5-2
Static Routing ............................................................................................................................. 5-2
RIP (Routing Information Protocol) ................................................................................................ 5-3
Dynamic Routing with Open Shortest Path First (OSPF) .................................................................... 5-4
Routing Table ............................................................................................................................. 5-8
Multicast Route ................................................................................................................................... 5-9
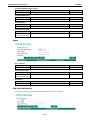
Static Multicast ........................................................................................................................... 5-9
Distance Vector Multicast Routing Protocol (DVMRP) ........................................................................ 5-9
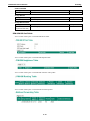
Protocol Independent Multicast Sparse Mode (PIM-SM) .................................................................. 5-10
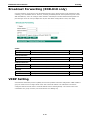
Broadcast Forwarding (EDR-810 only) ................................................................................................. 5-14
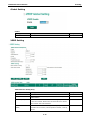
VRRP Setting .................................................................................................................................... 5-14
6. Network Redundancy ........................................................................................................................ 6-1
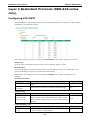
Layer 2 Redundant Protocols (EDR-810 series only) ................................................................................ 6-2
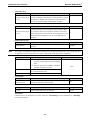
Configuring STP/RSTP .................................................................................................................. 6-2
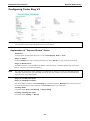
Configuring Turbo Ring V2 ............................................................................................................ 6-4
Layer 3 Redundant Protocols ................................................................................................................ 6-6
VRRP Settings ............................................................................................................................. 6-6
7. Network Address Translation ............................................................................................................ 7-1
Network Address Translation (NAT) ....................................................................................................... 7-2
NAT Concept ............................................................................................................................... 7-2
1-to-1 NAT Overview ................................................................................................................... 7-2
1-to-1 NAT ................................................................................................................................. 7-3
Bidirectional 1-to-1 NAT ............................................................................................................... 7-4
N-to-1 NAT ................................................................................................................................. 7-5
Port Forward ............................................................................................................................... 7-6
8. Firewall ............................................................................................................................................. 8-1
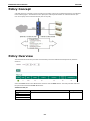
Policy Concept .................................................................................................................................... 8-2
Policy Overview .................................................................................................................................. 8-2
Firewall ............................................................................................................................................. 8-3
Layer 2 policy ............................................................................................................................. 8-3
Layer 2 Policy Setup (Only in Bridge Mode for EDR-G902/G903) ....................................................... 8-4

Layer 3 policy ............................................................................................................................. 8-5
Quick Automation Profile .............................................................................................................. 8-8
Policy Check ............................................................................................................................. 8-10
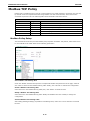
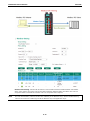
Modbus TCP Policy ............................................................................................................................ 8-12
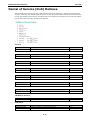
Denial of Service (DoS) Defense ......................................................................................................... 8-16
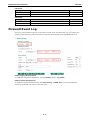
Firewall Event Log............................................................................................................................. 8-17
9. Virtual Private Network (VPN) .......................................................................................................... 9-1
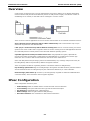
Overview ........................................................................................................................................... 9-2
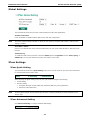
IPsec Configuration ............................................................................................................................. 9-2
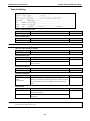
Global Settings ........................................................................................................................... 9-3
IPsec Settings ............................................................................................................................. 9-3
IPsec Use Case Demonstration ...................................................................................................... 9-8
IPsec Status ............................................................................................................................. 9-11
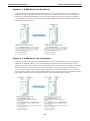
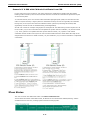
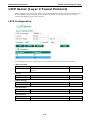
L2TP Server (Layer 2 Tunnel Protocol) ................................................................................................. 9-12
L2TP Configuration .................................................................................................................... 9-12
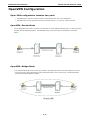
OpenVPN Configuration ..................................................................................................................... 9-13
Server Settings ......................................................................................................................... 9-14
Client Settings .......................................................................................................................... 9-22
Examples for Typical VPN Applications ................................................................................................. 9-24
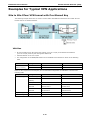
Site to Site IPsec VPN tunnel with Pre-Shared Key ......................................................................... 9-24
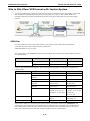
Site to Site IPsec VPN tunnel with Jupiter System .......................................................................... 9-25
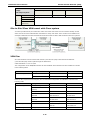
L2TP for Remote User Maintenance .............................................................................................. 9-27
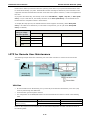
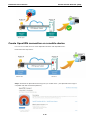
Client-to-Client communication via OpenVPN ................................................................................ 9-28
Redirect default gateway via OpenVPN ......................................................................................... 9-28
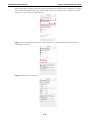
Create OpenVPN connection on a mobile device ............................................................................ 9-29
10. Certificate Management .................................................................................................................. 10-1
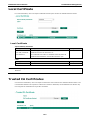
Local Certificate ................................................................................................................................ 10-2
Trusted CA Certificates ...................................................................................................................... 10-2
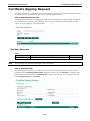
Certificate Signing Request ................................................................................................................ 10-3
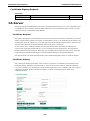
CA Server ........................................................................................................................................ 10-4
11. Diagnosis ........................................................................................................................................ 11-1
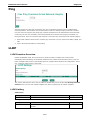
Ping ................................................................................................................................................ 11-2
LLDP ............................................................................................................................................... 11-2
Monitor............................................................................................................................................ 11-3
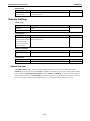
Statistics .................................................................................................................................. 11-3
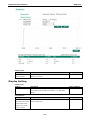
Bandwidth Utilization ................................................................................................................. 11-3
Display Setting.......................................................................................................................... 11-4
Display Setting.......................................................................................................................... 11-5
A. MIB Groups ....................................................................................................................................... A-1
A-
A-


1
1. Introduction
Welcome to the Moxa Industrial Secure Router series, the EDR-G902, EDR-G902, and EDR-810. The all-in-
one Firewall/NAT/VPN secure routers are designed for connecting Ethernet-enabled devices with network IP
security.
The following topics are covered in this chapter:
Overview
Package Checklist
Features
Industrial Networking Capability
Designed for Industrial Applications
Useful Utility and Remote Configuration

Industrial Secure Router Introduction
1-2
Overview
As the world’s network and information technology becomes more mature, the trend is to use Ethernet as
the major communications interface in many industrial communications and automation applications. In
fact, a entirely new industry has sprung up to provide Ethernet products that comply with the requirements
of demanding industrial applications.
Moxa’s Industrial Secure Router series is a Gigabit speed, all-in-one Firewall/VPN/Router for Ethernet
security applications in sensitive remote control and monitoring networks. The Industrial Secure Router
supports one WAN, one LAN, and a user-configurable WAN/DMZ interface (EDR-G903) that provides high
flexibility for different applications, such as WAN redundancy or Data/FTP server security protection.
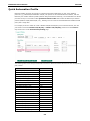
The Quick Automation Profile function of the Industrial Secure Router’s firewall supports most common
Fieldbus protocols, including EtherCAT, EtherNet/IP, FOUNDATION Fieldbus, Modbus/TCP, and PROFINET.
Users can easily create a secure Ethernet Fieldbus network from a user-friendly web UI with a single click.
In addition, wide temperature models are available that operate reliably in hazardous, -40 to 75°C
environments.
Package Checklist
The Industrial Secure Routers are shipped with the following items. If any of these items are missing or
damaged, please contact your customer service representative for assistance.
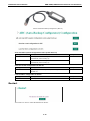
• 1 Moxa Industrial Secure Router
• RJ45 to DB9 console port cable
• Protective caps for unused ports
• DIN rail mounting kit (attached to the Industrial Secure Router’s rear panel by default)
• Hardware installation guide (printed)
• CD-ROM with user’s manual and Windows utility
• Warranty card
Features
Industrial Networking Capability
• Router/Firewall/VPN all in one
• 1 WAN, 1 LAN, and 1 user-configurable WAN or DMZ interface
• Network address translation (N-to-1, 1-to-1, and port forwarding)
Designed for Industrial Applications
• Dual WAN redundancy function
• Firewall with Quick Automation Profile for Fieldbus protocols
• Intelligent PolicyCheck and SettingCheck tools
• -40 to 75°C operating temperature (T models)
• Long-haul transmission distance of 40 km or 80 km (with optional mini-GBIC)
• Redundant, dual 12 to 48 VDC power inputs
• IP30, rugged high-strength metal case
• DIN rail or panel mounting ability
Useful Utility and Remote Configuration
• Configurable using a Web browser and Telnet/Serial console

Industrial Secure Router Introduction
1-3
• Send ping commands to identify network segment integrity

2
2. Getting Started
This chapter explains how to access the Industrial Secure Router for the first time. There are three ways to
access the router: (1) serial console, (2) Telnet console, and (3) web browser. The serial console connection
method, which requires using a short serial cable to connect the Industrial Secure Router to a PC’s COM
port, can be used if you do not know the Industrial Secure Router’s IP address. The Telnet console and web
browser connection methods can be used to access the Industrial Secure Router over an Ethernet LAN, or
over the Internet. A web browser can be used to perform all monitoring and administration functions, but
the serial console and Telnet console only provide basic functions.
The following topics are covered in this chapter:
RS-232 Console Configuration (115200, None, 8, 1, VT100)
Using Telnet to Access the Industrial Secure Router’s Console
Using a Web Browser to Configure the Industrial Secure Router

Industrial Secure Router Getting Started
2-2
RS-232 Console Configuration (115200, None,
8, 1, VT100)
NOTE
Connection Caution!
We strongly suggest that you do NOT use more than one connection method at the same time. Following
this advice will allow you to maintain better control over the configuration of your
Industrial Secure Router
NOTE
We recommend using Moxa PComm Terminal
Emulator, which can be downloaded free of charge from
Moxa’s website.
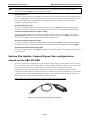
Before running PComm Terminal Emulator, use an RJ45 to DB9-F (or RJ45 to DB25-F) cable to connect the
Industrial Secure Router’s RS-232 console port to your PC’s COM port (generally COM1 or COM2, depending
on how your system is set up).
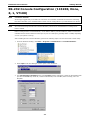
After installing PComm Terminal Emulator, perform the following steps to access the RS-232 console utility.
1. From the Windows desktop, click Start Programs PCommLite1.3 Terminal Emulator.
2. Select Open in the Port Manager menu to open a new connection.
3. The Communication Parameter page of the Property window will appear. Select the appropriate COM
port from the Ports drop-down list, 115200 for Baud Rate, 8 for Data Bits, None for Parity, and 1 for
Stop Bits.

Industrial Secure Router Getting Started
2-3
4. Click the Terminal tab, select VT100 for Terminal Type, and then click OK to continue.
5. The Console login screen will appear. Use the keyboard to enter the login account (admin or user),
and then press Enter to jump to the Password field. Enter the console Password (the same as the Web
Browser password; leave the Password field blank if a console password has not been set), and then
press Enter.
NOTE
The defaul
t password for the EDR series with firmware v3.0 and later is “moxa”. For previous firmware
versions, the default password is blank. For greater security, please change the default password after the
first log in.
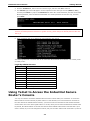
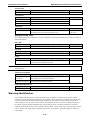
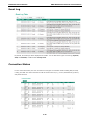
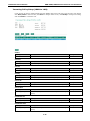
6. Enter a question mark (?) to display the command list in the console.
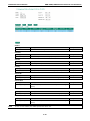
The following table lists commands that can be used when the Industrial Secure Router is in console (serial
or Telnet) mode:
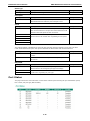
Login by Admin Account
Command Description
quit Exit Command Line Interface
exit Exit Command Line Interface
reload Halt and Perform a Cold Restart
terminal Configure Terminal Page Length
copy
Import or Export File
save Save Running Configuration to Flash
ping Send Echo Messages
clear Clear Information
show Show System Information
configure Enter Configuration Mode
Using Telnet to Access the Industrial Secure
Router’s Console
You may use Telnet to access the Industrial Secure Router’s console utility over a network. To access the
EDR’s functions over the network (by either Telnet or a web browser) from a PC host that is connected to
the same LAN as the Industrial Secure Router, you need to make sure that the PC host and the Industrial
Secure Router are on the same logical subnet. To do this, check your PC host’s IP address and subnet mask.
By default, the LAN IP address is 192.168.127.254 and the Industrial subnet mask is 255.255.255.0 (for a
Class C subnet). If you do not change these values, and your PC host’s subnet mask is 255.255.0.0, then its

Industrial Secure Router Getting Started
2-4
IP address must have the form 192.168.xxx.xxx. On the other hand, if your PC host’s subnet mask is
255.255.255.0, then its IP address must have the form, 192.168.127.xxx.
NOTE
To use the
Industrial Secure Router’s management and monitoring functions from a PC host connected to
the same LAN as the
Industrial Secure Router, you must make sure that the PC host and the Industrial
Secure R
outer are connected to the same logical subnet.
NOTE
Before accessing the console utility via Telnet, first connect the
Industrial Secure Router’s RJ45 Ethernet
LAN p
orts to your Ethernet LAN, or directly to your PC’s Ethernet card (NIC). You can use either a straight
-
through or cross
-over Ethernet cable.
NOTE
The
Industrial Secure Router’s default LAN IP address is 192.168.127.254.
Perform the following steps to access the console utility via Telnet.
1. Click Start Run, and then telnet to the Industrial Secure Router’s IP address from the Windows Run
window. (You may also issue the Telnet command from the MS-DOS prompt.)
2. Refer to instructions 6 and 7 in the RS-232 Console Configuration (115200, None, 8, 1, VT100)
section on page 2-2.
Using a Web Browser to Configure the
Industrial Secure Router
The Industrial Secure Router’s web browser interface provides a convenient way to modify the router’s
configuration and access the built-in monitoring and network administration functions. The recommended
web browser is Microsoft Internet Explorer 6.0 with JVM (Java Virtual Machine) installed.
NOTE
To use the
Industrial Secure Router’s management and monitoring functions from a PC host connected to
the same LAN as the
Industrial Secure Router, you must make sure that the PC host and the Industrial
Secure R
outer are connected to the same logical subnet.
NOTE
Before accessing the
Industrial Secure Router’s web browser, first connect the Industrial Secure Router’s
RJ45 Ethernet LAN ports to your Ethernet LAN, or directly to your PC’s Ethernet card (NIC). You can use
either a straight
-through or cross-over Ethernet cable.
NOTE
The
Industrial Secure Router’s default LAN IP address is 192.168.127.254.
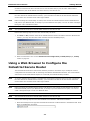
Perform the following steps to access the Industrial Secure Router’s web browser interface.
1. Start Internet Explorer and type the Industrial Secure Router’s LAN IP address in the Address field. Press
Enter to establish the connection.

Industrial Secure Router Getting Started
2-5
2. The web login page will open. Select the login account (Admin or User) and enter the Password (the
same as the Console password), and then click Login to continue. Leave the Password field blank if a
password has not been set.
NOTE
The default password for the EDR series with firmware v3.0 and later is “moxa”. For previous firmware
versions, the default password is blank. For greater security, please change the default password after the
first log in.
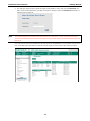
You may need to wait a few moments for the web page to be downloaded to your computer. Use the menu
tree on the left side of the window to open the function pages to access each of the router’s functions.

3
3. EDR-810 Series Features and Functions
In this chapter, we explain how to access the Industrial Secure Router’s configuration options, perform
monitoring, and use administration functions. There are three ways to access these functions: (1) RS-232
console, (2) Telnet console, and (3) web browser.
The web browser is the most user-friendly way to configure the Industrial Secure Router, since you can both
monitor the Industrial Secure Router and use administration functions from the web browser. An RS-232 or
Telnet console connection only provides basic functions. In this chapter, we use the web browser to
introduce the Industrial Secure Router’s configuration and monitoring functions.
The following topics are covered in this chapter:
Quick Setting Profile
WAN Routing Quick Setting
Bridge Routing Quick Setting
System
Fast Bootup Setting
System Information
User Account
Password and Login Policy
Date and Time
Warning Notification
SettingCheck
System File Update—by Remote TFTP
System File Update—by Local Import/Export
System File Update –Import/Export the configurations stored on the ABC-02-USB
Restart
Reset to Factory Default
Port
Port Settings
Port Status
Link Aggregation
The Port Trunking Concept
Port Mirror
Using Virtual LAN
The VLAN Concept
Configuring Virtual LAN
Multicast
The Concept of Multicast Filtering
IGMP Snooping
IGMP Snooping Settings
IGMP Table

Industrial Secure Router EDR-810 Series Features and Functions
3-2
Stream Table
Static Multicast MAC
QoS and Rate Control
ToS/DSCP Mapping
MAC Address Table
Interface
WAN
LAN
Bridge Group Interface
Network Service
DHCP Settings
SNMP Settings
SNMP Trap Setting
Dynamic DNS
Security
User Interface Management
Authentication Certificate
Trusted Access
RADIUS Server Settings
Security Notification Setting
Diagnosis
Event Log
Connection Status

Industrial Secure Router EDR-810 Series Features and Functions
3-3
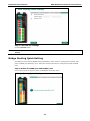
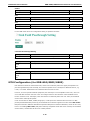
Quick Setting Profile
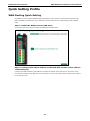
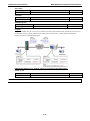
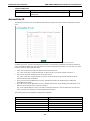
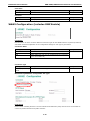
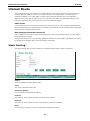
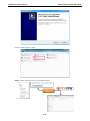
WAN Routing Quick Setting
The EDR-810 series supports WAN Routing Quick Setting, which creates a routing function between LAN
ports and WAN ports defined by users. Follow the wizard’s instructions to configuring the LAN and WAN
ports.
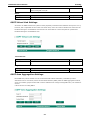
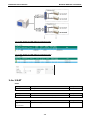
Step 1: Define the WAN ports and LAN ports
Click on the ports in the figure to define the WAN ports and LAN ports.
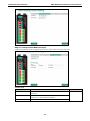
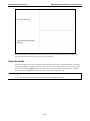
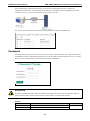
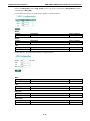
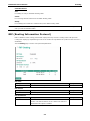
Step 2: Configure the LAN IP address of the EDR-810 and the subnet address
of the LAN ports
Configure the LAN IP address of the EDR-810 to define the subnet of the LAN ports on the secure router.
The default IP address of the EDR-810 on the LAN side is 192.168.127.254, and the default subnet address
is 192.168.127.0/24.

Industrial Secure Router EDR-810 Series Features and Functions
3-4
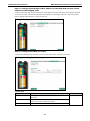
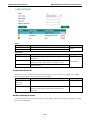
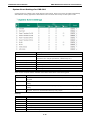
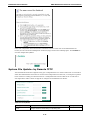
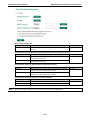
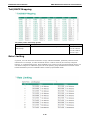
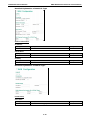
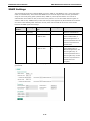
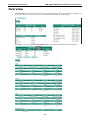
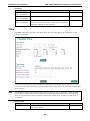
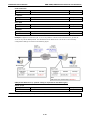
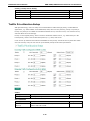
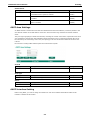
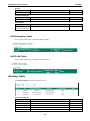
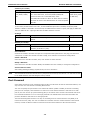
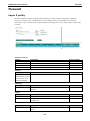
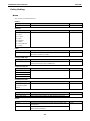
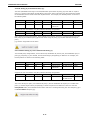
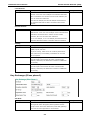
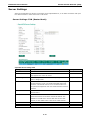
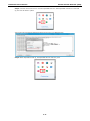
Step 3: Configure the WAN port type
Configure the WAN port type to define how the secure router switch connects to the WAN.
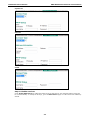
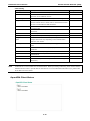
Connect Type
Setting Description Factory Default
Dynamic IP Get the WAN IP address from a DHCP server or via a PPTP
connection.
Dynamic IP
Static IP Set a specific static WAN IP address or create a connection to
a PPTP server with a specific IP address.
PPPoE Get the WAN IP address through PPPoE Dialup.

Industrial Secure Router EDR-810 Series Features and Functions
3-5
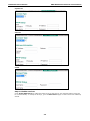
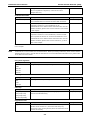
Dynamic IP
Static IP
PPPoE
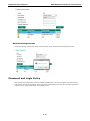
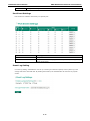
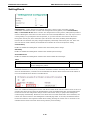
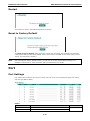
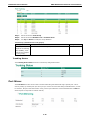
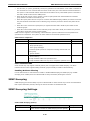
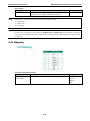
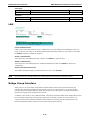
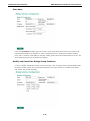
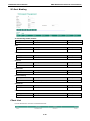
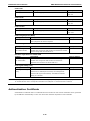
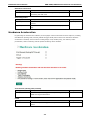
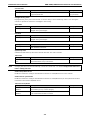
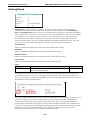
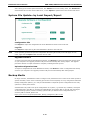
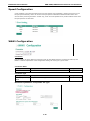
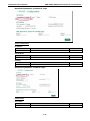
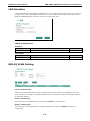
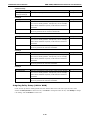
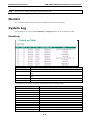
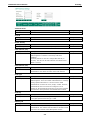
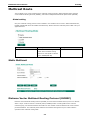
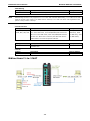
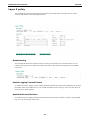
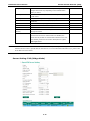
Step 4: Enable services
Check Enable DHCP Server to enable the DHCP server for LAN devices. The default IP address range will
be set automatically. To modify the IP range, go to the DHCP Server page. N-1 NAT will be also enabled by
default.

Industrial Secure Router EDR-810 Series Features and Functions
3-6
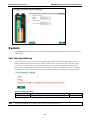
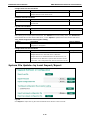
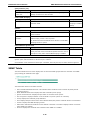
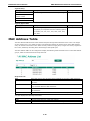
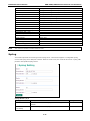
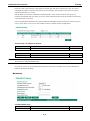
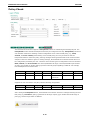
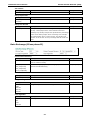
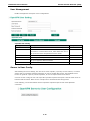
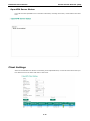
Step 5: Activate the settings
Click the Activate button.
NOTE
An existing
configuration will be overwritten by new settings when processing WAN Routing Quick
Setting
.
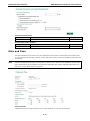
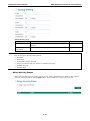
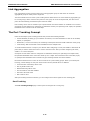
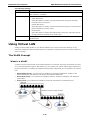
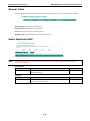
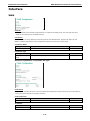
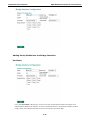
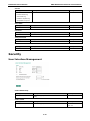
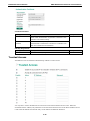
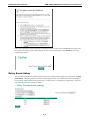
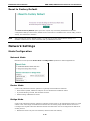
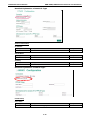
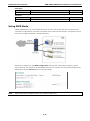
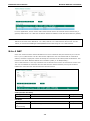
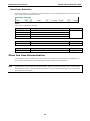
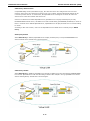
Bridge Routing Quick Setting
The EDR-810 series supports WAN Routing Quick Setting, which creates a routing function between LAN
ports and WAN ports defined by users. Follow the wizard’s instructions to configuring the LAN and WAN
ports.
Step1: Define the WAN port and Bridge ports
Click on the ports in the figure to define the WAN ports and Bridge ports.
Page is loading ...
Page is loading ...
Page is loading ...
Page is loading ...
Page is loading ...
Page is loading ...
Page is loading ...
Page is loading ...
Page is loading ...
Page is loading ...
Page is loading ...
Page is loading ...
Page is loading ...
Page is loading ...
Page is loading ...
Page is loading ...
Page is loading ...
Page is loading ...
Page is loading ...
Page is loading ...
Page is loading ...
Page is loading ...
Page is loading ...
Page is loading ...
Page is loading ...
Page is loading ...
Page is loading ...
Page is loading ...
Page is loading ...
Page is loading ...
Page is loading ...
Page is loading ...
Page is loading ...
Page is loading ...
Page is loading ...
Page is loading ...
Page is loading ...
Page is loading ...
Page is loading ...
Page is loading ...
Page is loading ...
Page is loading ...
Page is loading ...
Page is loading ...
Page is loading ...
Page is loading ...
Page is loading ...
Page is loading ...
Page is loading ...
Page is loading ...
Page is loading ...
Page is loading ...
Page is loading ...
Page is loading ...
Page is loading ...
Page is loading ...
Page is loading ...
Page is loading ...
Page is loading ...
Page is loading ...
Page is loading ...
Page is loading ...
Page is loading ...
Page is loading ...
Page is loading ...
Page is loading ...
Page is loading ...
Page is loading ...
Page is loading ...
Page is loading ...
Page is loading ...
Page is loading ...
Page is loading ...
Page is loading ...
Page is loading ...
Page is loading ...
Page is loading ...
Page is loading ...
Page is loading ...
Page is loading ...
Page is loading ...
Page is loading ...
Page is loading ...
Page is loading ...
Page is loading ...
Page is loading ...
Page is loading ...
Page is loading ...
Page is loading ...
Page is loading ...
Page is loading ...
Page is loading ...
Page is loading ...
Page is loading ...
Page is loading ...
Page is loading ...
Page is loading ...
Page is loading ...
Page is loading ...
Page is loading ...
Page is loading ...
Page is loading ...
Page is loading ...
Page is loading ...
Page is loading ...
Page is loading ...
Page is loading ...
Page is loading ...
Page is loading ...
Page is loading ...
Page is loading ...
Page is loading ...
Page is loading ...
Page is loading ...
Page is loading ...
Page is loading ...
Page is loading ...
Page is loading ...
Page is loading ...
Page is loading ...
Page is loading ...
Page is loading ...
Page is loading ...
Page is loading ...
Page is loading ...
Page is loading ...
Page is loading ...
Page is loading ...
Page is loading ...
Page is loading ...
Page is loading ...
Page is loading ...
Page is loading ...
Page is loading ...
Page is loading ...
Page is loading ...
Page is loading ...
Page is loading ...
Page is loading ...
Page is loading ...
Page is loading ...
Page is loading ...
Page is loading ...
Page is loading ...
Page is loading ...
Page is loading ...
Page is loading ...
Page is loading ...
Page is loading ...
Page is loading ...
Page is loading ...
Page is loading ...
Page is loading ...
Page is loading ...
Page is loading ...
Page is loading ...
Page is loading ...
Page is loading ...
Page is loading ...
Page is loading ...
Page is loading ...
Page is loading ...
Page is loading ...
Page is loading ...
Page is loading ...
Page is loading ...
Page is loading ...
Page is loading ...
Page is loading ...
Page is loading ...
Page is loading ...
Page is loading ...
Page is loading ...
Page is loading ...
Page is loading ...
Page is loading ...
Page is loading ...
Page is loading ...
Page is loading ...
-
 1
1
-
 2
2
-
 3
3
-
 4
4
-
 5
5
-
 6
6
-
 7
7
-
 8
8
-
 9
9
-
 10
10
-
 11
11
-
 12
12
-
 13
13
-
 14
14
-
 15
15
-
 16
16
-
 17
17
-
 18
18
-
 19
19
-
 20
20
-
 21
21
-
 22
22
-
 23
23
-
 24
24
-
 25
25
-
 26
26
-
 27
27
-
 28
28
-
 29
29
-
 30
30
-
 31
31
-
 32
32
-
 33
33
-
 34
34
-
 35
35
-
 36
36
-
 37
37
-
 38
38
-
 39
39
-
 40
40
-
 41
41
-
 42
42
-
 43
43
-
 44
44
-
 45
45
-
 46
46
-
 47
47
-
 48
48
-
 49
49
-
 50
50
-
 51
51
-
 52
52
-
 53
53
-
 54
54
-
 55
55
-
 56
56
-
 57
57
-
 58
58
-
 59
59
-
 60
60
-
 61
61
-
 62
62
-
 63
63
-
 64
64
-
 65
65
-
 66
66
-
 67
67
-
 68
68
-
 69
69
-
 70
70
-
 71
71
-
 72
72
-
 73
73
-
 74
74
-
 75
75
-
 76
76
-
 77
77
-
 78
78
-
 79
79
-
 80
80
-
 81
81
-
 82
82
-
 83
83
-
 84
84
-
 85
85
-
 86
86
-
 87
87
-
 88
88
-
 89
89
-
 90
90
-
 91
91
-
 92
92
-
 93
93
-
 94
94
-
 95
95
-
 96
96
-
 97
97
-
 98
98
-
 99
99
-
 100
100
-
 101
101
-
 102
102
-
 103
103
-
 104
104
-
 105
105
-
 106
106
-
 107
107
-
 108
108
-
 109
109
-
 110
110
-
 111
111
-
 112
112
-
 113
113
-
 114
114
-
 115
115
-
 116
116
-
 117
117
-
 118
118
-
 119
119
-
 120
120
-
 121
121
-
 122
122
-
 123
123
-
 124
124
-
 125
125
-
 126
126
-
 127
127
-
 128
128
-
 129
129
-
 130
130
-
 131
131
-
 132
132
-
 133
133
-
 134
134
-
 135
135
-
 136
136
-
 137
137
-
 138
138
-
 139
139
-
 140
140
-
 141
141
-
 142
142
-
 143
143
-
 144
144
-
 145
145
-
 146
146
-
 147
147
-
 148
148
-
 149
149
-
 150
150
-
 151
151
-
 152
152
-
 153
153
-
 154
154
-
 155
155
-
 156
156
-
 157
157
-
 158
158
-
 159
159
-
 160
160
-
 161
161
-
 162
162
-
 163
163
-
 164
164
-
 165
165
-
 166
166
-
 167
167
-
 168
168
-
 169
169
-
 170
170
-
 171
171
-
 172
172
-
 173
173
-
 174
174
-
 175
175
-
 176
176
-
 177
177
-
 178
178
-
 179
179
-
 180
180
-
 181
181
-
 182
182
-
 183
183
-
 184
184
-
 185
185
-
 186
186
-
 187
187
-
 188
188
-
 189
189
-
 190
190
-
 191
191
-
 192
192
-
 193
193
-
 194
194
-
 195
195
-
 196
196
-
 197
197
-
 198
198
-
 199
199


Moxa EDR-G902 Series User manual
- Type
- User manual
- This manual is also suitable for
Ask a question and I''ll find the answer in the document
Finding information in a document is now easier with AI
Related papers
-
Moxa EDR-G902 User manual
-
-
Moxa TN-5500A Series User manual
-
Moxa ICS-G7826A Series User manual
-
Moxa TN-5800A Series User manual
-
-
Moxa MDS-G4028-L3 Series User manual
-
 Moxa Technologies SDS-3008 Series User manual
-
-

Other documents
-
Comtrend Corporation WAP-5813n User manual
-
Digisol DG-LB1054UV User manual
-
Telewell TW-LTE/4G/3G router User manual
-
Araknis Networks AN-310-RT-4L2W User guide
-
 Moxa Technologies PT-7528 User manual
-
Allnet ALL1297 User guide
-
 Moxa Technologies EtherDevice EDR-G903 Hardware Installation Manual
-
Cisco Small Business Pro SA 520 Administration Manual
-
LevelOne GBR-4001 User manual
-

