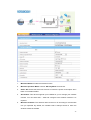
Telewell TW-LTE/4G/3G router User manual
- Category
- Routers
- Type
- User manual
This manual is also suitable for

1
Copyright © TeleWell Oy
TW-LTE/4G/3G
WLAN 802.11ac
router
User Manual

2
Copyright
The contents of this publication may not be reproduced in any part or as a whole, stored,
transcribed in an information retrieval system, translated into any language, or transmitted in
any form or by any means, mechanical, magnetic, electronic, optical, photocopying, manual, or
otherwise, without the prior written permission from TeleWell Oy.
Trademarks
All products, company, brand names are trademarks or registered trademarks of their
respective companies TeleWell. They are used for identification purpose only. Specifications
are subject to be changed without prior notice.
CE Declaration of Conformity
This equipment complies with the requirements relating to electromagnetic compatibility, EN
55022/A1 Class B.

3
TABLE OF CONTENTS
INTRODUCTION ................................................................................................................................... 5!
PACKAGE LIST .......................................................................................................................... 5!
HARDWARE INSTALLATION ...................................................................................................... 6!
Hardware configuration ........................................................................................................... 6!
LED indicators ......................................................................................................................... 7!
How to Operate ........................................................................................................................ 8!
Making Configuration .............................................................................................................. 9!
Configure with the setup wizard ............................................................................................... 9!
1. BASIC NETWORK .......................................................................................................................... 13!
STATUS PAGE .......................................................................................................................... 13!
1.1 WAN SETUP ..................................................................................................................... 14!
1.1.1 Physical Interface .......................................................................................................... 14!
1.1.2 Network Setup ................................................................................................................ 15!
1.1.3 Load Balance ................................................................................................................. 26!
1.1.4 Virtual WAN .................................................................................................................. 26!
1.2 LAN & VLAN SETUP ....................................................................................................... 26!
1.2.1 Network Setting ............................................................................................................. 27!
1.2.2 LAN & VLAN ................................................................................................................. 27!
1.2.3 DHCP server ................................................................................................................. 29!
1.3 WIRELESS SETUP .............................................................................................................. 30!
1.3.1 Wifi Configuration ......................................................................................................... 31!
1.3.2 Wireless Client List ........................................................................................................ 40!
1.3.3 Advanced Configuration ................................................................................................ 41!
1.4 IPV6 SETUP ....................................................................................................................... 41!
1.5 NAT .................................................................................................................................. 48!
1.5.1 Virtual Server ................................................................................................................ 48!
1.5.2 Virtual Computers ......................................................................................................... 49!
1.5.3 Special AP ..................................................................................................................... 50!
1.5.4 NAT Loopback ............................................................................................................... 51!
1.5.5 DMZ ....................................................................................................................... 51!
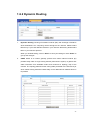
1.6 ROUTING SETUP ................................................................................................................ 51!
1.6.1 Static Routing ................................................................................................................ 52!
1.6.2 Dynamic Routing ........................................................................................................... 53!
1.6.3 Routing information ....................................................................................................... 55!
1.7 CLIENT / SERVER / PROXY ................................................................................................. 55!
1.7.1 Dynamic DNS ................................................................................................................ 55!

4
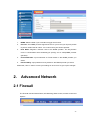
2. ADVANCED NETWORK ............................................................................................................ 56!
2.1 FIREWALL ......................................................................................................................... 56!
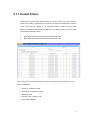
2.1.1 Packet Filters ................................................................................................................. 57!
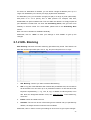
2.1.2 URL Blocking ................................................................................................................ 58!
2.1.3 MAC Control ................................................................................................................. 59!
2.1.4 Access Control ............................................................................................................... 59!
2.1.5 Options ....................................................................................................................... 60!
2.2 QOS (QUALITY OF SERVICE) ............................................................................................. 60!
2.2.1 Rule-based QoS ............................................................................................................. 61!
2.3 MANAGEMENT .................................................................................................................. 64!
2.3.1 UPnP ....................................................................................................................... 64!
2.3.2 SNMP ....................................................................................................................... 65!
2.3.3 TR069 ....................................................................................................................... 67!
3. SYSTEM ......................................................................................................................................... 68!
3.1 SYSTEM INFORMATION ..................................................................................................... 68!
3.2 SYSTEM STATUS ................................................................................................................ 69!
3.2.1 Web Log ....................................................................................................................... 69!
3.2.2 Syslog ....................................................................................................................... 69!
3.2.3 Email Alert ..................................................................................................................... 70!
3.3 SYSTEM TOOLS ................................................................................................................. 71!
3.3.1 Change Password .......................................................................................................... 71!
3.3.2 Firmware Upgrade ........................................................................................................ 71!
3.3.3 System Time ................................................................................................................... 72!
3.3.4 Others ....................................................................................................................... 73!
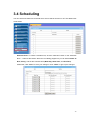
3.4 SCHEDULING ..................................................................................................................... 74!
3.5 MMI ................................................................................................................................. 75!
Web UI ...................................................................................................................................................... 75!

5
Introduction
Congratulations on your purchase of this outstanding product: TW-LTE/4G Wlan Router. This
residential gateway is specifically designed for those who need to have the data, voice, video
and file sharing services beyond his home and office. It provides a complete solution for
Internet surfing and broadband sharing. Instructions for installing and configuring this product
can be found in this manual. Before you install and use this product, please read this manual
carefully for fully exploiting the functions of this product.
Package List
Items
Description
Contents
Quantity
1
TW-LTE/4G/3G router
1
2
CD
1
3
Power Adapter
1
4
Manual
1
5
Ethernet cable
1

6
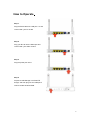
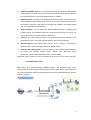
Hardware Installation
Hardware configuration
Antenn
a
Antenn
a
Receptor for
Power Adapter
Reset Button
Auto MDI/MDIX RJ-45 Ports
Automatically sense the types of WAN
and LAN when connecting to Ethernet
Power ON/OFF Switch
USB Port
LAN1~LAN4 LEDs
Status LED
WAN
Wlan 2.4G/5G
WPS Button
WAN Port

7
LED indicators
LED Status
Description
Status (USB)
Green in flash
power is on
Green in fast flash
Reset mode
Green
USB storage attached
Green in flash
Data access
WAN
Green
WAN is on.
Green in flash
Data access
WLAN
Green
Wlan is on.
Green in flash
Data access
WLAN
Green
Wlan is on.
Green in flash
Data access
LAN1~4
Green
LAN is on.
Green in flash
Data access

8
How to Operate
Step 1.
Plug the RJ45 cable into LAN port 1~4 and
connect with your PC or NB.
Step 2.
Plug your RJ-45 into the WAN port and
connect with your xDSL modem.
Step 3.
Plug the power jack into it.
Step 4
Prepare a USB Storage or 3G/4G/LTE
dongle, and then plug into the USB port if
need to enable wireless WAN.

9
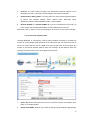
Making Configuration
Whenever you want to configure your network or this device, you can access the Configuration
Menu by opening the web-browser and typing in the IP Address of the device. The default IP
Address is: 192.168.0.254.
Enter the default username “admin” in the System Password and then click ‘login’ button.
Configure with the setup wizard
Select “Wizard” for basic settings in a simple way
Press “Next” to start the Setup Wizard
You can change the password of administrator here

10
Select Time Zone
Select “auto detecting WAN type” or “setup wan type manually”
If selected manually, next select Wireless WAN or Ethernet WAN and setup WAN type
followingly

11
If selected Ethernet, also select WAN type
If selected Wireless LAN, please put settings as in picture (usually in Finland)
Wireless settings (first 2,4G and after that 5G)

12
Wireless authentication and encryption
Check the information again
Click next and System is applying the setting. Click finish to complete it
Afterwards, you can go Basic Network, Advanced Network, Application or System respectively
on left hand side of web page.

13
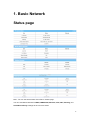
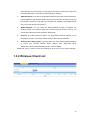
1. Basic Network
Status page
Note : You can see all the status of this RG on ‘Status’ page.
You can enter Basic Network for WAN, LAN&VLAN, Wireless, IPv6, NAT, Routing, and
Client/Server/Proxy settings as the icon here shown

14
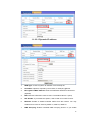
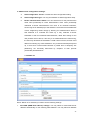
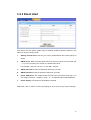
1.1 WAN Setup
You can enter Basic Network, WAN for Ethernet and 3G/4G/LTE setting as below.
1.1.1 Physical Interface
Click on the “Edit” button for each WAN interface and you can get the detail
physical interface settings and then configure the settings as well.

15
1. WAN-1: The operation mode of this interface is forced to “Always-on” mode, and
operates as the primary internet connection. You can click on the respective “Edit”
button and configure the rest items for this interface.
2. WAN-2: The operation mode of this interface is disabled by default, you can click
on the respective “Edit” button and configure the second WAN interface to operate
as “fail over” mode, so that when the WAN-1 connection broken, the device will try
to failover the internet connection to WAN-2.
3. Physical Interface: Select the WAN interface from the available list. For this device,
there are “Ethernet” and “3G/4G/LTE” items. If you would like the RJ45 WAN port to
operate as the primary internet connection, Please choose “Ethernet”; Otherwise,
choose “3G/4G” for configuring the embedded 3G/4G/LTE modem as primary WAN
connection.
4. Line Speed (Kbps): You can specify the downstream / upstream speed for the
corresponding WAN connection. Such information will be referred in QoS and load
balance function to manage the traffic load for each WAN connection.
5. VLAN Tag Insertion, Tag Value: If your ISP required a VLAN tag been inserted
into the WAN packets, you can enable this setting, and enter the specified tag
value.
Afterwards, click on “Save” to store your settings or click “Undo” to give up the changes.
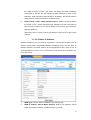
1.1.2 Network Setup
There are two physical WAN interfaces that you can configure one by one to get
proper internet connection setup. They include the Wireless WAN - the remote
wireless ISP such as 3G/4G/LTE and the Ethernet WAN - the DSL ISP such as
Dynamic IP, Static IP, PPPoE, PPTP and L2TP
1.1.2.1 Wireless WAN – 3G/4G/LTE
Click on the “Edit” button for the 3G/4G/LTE WAN interface and you can get
the detail WAN settings and then configure the settings as well.

16
1. WAN Type: Choose “3G” from the drop list
2. Dial-up Profile: Choose “Auto-Detection” or “Manual”. If you select
“Auto-Detection”, then system will check the information automatically. If you
select “Manual”, then you have to specify more ISP-related settings, such as
Country, Service Provider, and APN, to get the 3G/4G/LTE service. The
“Auto-Detection” option is suggested.
3. PIN Code: Enter the PIN Code for your SIM card(Optional)
4. Dialed Number: Enter the dialed number that is provided by your ISP.
5. Account, Password: Enter the account / Password that is provided by your
ISP(Optional).
6. Authentication: Choose “auto”, “PAP”, or “CHAP” according your ISP’s
authentication approach.
7. Primary / Secondary DNS: Enter the Domain Name Server settings

17
(Optional)
8. Connection Control: Select your connection control scheme from the drop
list; “auto-reconnect (always-on)” option is recommended.
9. Allowed Connection Time: You can select “Always” or “By Schedule” for
connection method. If you choose “By Schedule” rule, you have to add a new
schedule for this connection.
10. MTU: Most ISP offers MTU value to users. The default value is o (auto).
11. Keep Alive: You can do preferred settings by using this feature to prevent the
built-in 3G/4G/LTE modem from some sort of auto-timeout and disconnects
from the internet after a period of inactivity.
12. Multicast: Enable or disable multicast traffics from the internet. You may
enable as auto mode or select by IGMP v1, IGMP v2, IGMP v3.
13. IGMP Snooping: Enable or disable IGMP snooping function. If you enable
the IGMP snooping function, this device will detect all IGMP messages
exchanged on the link and will maintain a table indicating for each of the
interfaces, what multicast groups should be forwarded. This simple solution
easily prevents multicast flooding on an Ethernet link.
14. Disable PPTP / L2TP / IPSec Passthrough: By default, the device allows
the PPTP / L2TP / IPSec VPN traffic that initiated from local VPN client to
pass through to Internet. If you want to disable such function, just change the
setting to disable it.
Afterwards, click on “Save” to store your settings or click “Undo” to give up the
changes.
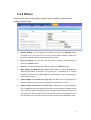
1.1.2.2 Ethernet WAN
Click on the “Edit” button for the Ethernet WAN interface and you can get
the detail WAN settings and then configure the settings as well.

18
1.1.2.2.1 Dynamic IP address
1. WAN Type: choose “Dynamic IP Address” from the drop list
2. Host Name: Optional, required by some ISPs, for example, @Home.
3. ISP registered MAC Address: Enter the WAN MAC address of this device.
(Optional)
4. MTU: Most ISP offers MTU value to users. The default value is o (auto)
5. NAT disable: If you enable this option, it will act with a non-NAT function.
6. Multicast: Enable or disable multicast traffics from the internet. You may
enable as auto mode or select by IGMP v1, IGMP v2, IGMP v3.
7. IGMP Snooping: Enable or disable IGMP snooping function. If you enable

19
the IGMP snooping function, this device will detect all IGMP messages
exchanged on the link and will maintain a table indicating for each of the
interfaces, what multicast groups should be forwarded. This simple solution
easily prevents multicast flooding on an Ethernet link.
8. Disable PPTP / L2TP / IPSec Passthrough: By default, the device allows
the PPTP / L2TP / IPSec VPN traffic that initiated from local VPN client to
pass through to Internet. If you want to disable such function, just change the
setting to disable it.
Afterwards, click on “Save” to store your settings or click “Undo” to give up the
changes.
1.1.2.2.2 Static IP Address
Select this option to give your static IP information. You will need to enter in the IP
address, subnet mask, and gateway address, provided to you by your ISP. Each IP
address entered in the fields must be in the appropriate IP form, which is four IP
octets separated by a dot (x.x.x.x). The Router will not accept the IP address if it is
not in this format.
1. WAN Type: Choose “Static IP Address” from the drop list
2. WAN IP address/ Subnet Mask/ Gateway: Enter the IP address, subnet
mask, and gateway address, provided to you by your ISP.

20
3. Primary DNS/ Secondary DNS: input the Primary/Secondary DNS if
necessary.
4. MTU: Most ISP offers MTU value to users. The default value is o (auto)
5. NAT disable: If you enable this option, it will act with a non-NAT function.
6. Multicast: Enable or disable multicast traffics from the internet. You may
enable as auto mode or select by IGMP v1, IGMP v2, IGMP v3.
7. IGMP Snooping: Enable or disable IGMP snooping function. If you enable
the IGMP snooping function, this device will detect all IGMP messages
exchanged on the link and will maintain a table indicating for each of the
interfaces, what multicast groups should be forwarded. This simple solution
easily prevents multicast flooding on an Ethernet link.
8. Disable PPTP / L2TP / IPSec Passthrough: By default, the device allows
the PPTP / L2TP / IPSec VPN traffic that initiated from local VPN client to
pass through to Internet. If you want to disable such function, just change the
setting to disable it.
9. WAN IP alias: The device supports 2 WAN IP address, one is for primary
connection that provides users/devices in the LAN to access Internet; the
other is a virtual connection that let remote user to manage this device.
Afterwards, click on “Save” to store your settings or click “Undo” to give up the
changes.
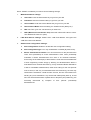
1.1.2.2.3 PPP over Ethernet
Select this option if your ISP requires you to use a PPPoE connection. This option
is typically used for DSL services.
Page is loading ...
Page is loading ...
Page is loading ...
Page is loading ...
Page is loading ...
Page is loading ...
Page is loading ...
Page is loading ...
Page is loading ...
Page is loading ...
Page is loading ...
Page is loading ...
Page is loading ...
Page is loading ...
Page is loading ...
Page is loading ...
Page is loading ...
Page is loading ...
Page is loading ...
Page is loading ...
Page is loading ...
Page is loading ...
Page is loading ...
Page is loading ...
Page is loading ...
Page is loading ...
Page is loading ...
Page is loading ...
Page is loading ...
Page is loading ...
Page is loading ...
Page is loading ...
Page is loading ...
Page is loading ...
Page is loading ...
Page is loading ...
Page is loading ...
Page is loading ...
Page is loading ...
Page is loading ...
Page is loading ...
Page is loading ...
Page is loading ...
Page is loading ...
Page is loading ...
Page is loading ...
Page is loading ...
Page is loading ...
Page is loading ...
Page is loading ...
Page is loading ...
Page is loading ...
Page is loading ...
Page is loading ...
Page is loading ...
Page is loading ...
-
 1
1
-
 2
2
-
 3
3
-
 4
4
-
 5
5
-
 6
6
-
 7
7
-
 8
8
-
 9
9
-
 10
10
-
 11
11
-
 12
12
-
 13
13
-
 14
14
-
 15
15
-
 16
16
-
 17
17
-
 18
18
-
 19
19
-
 20
20
-
 21
21
-
 22
22
-
 23
23
-
 24
24
-
 25
25
-
 26
26
-
 27
27
-
 28
28
-
 29
29
-
 30
30
-
 31
31
-
 32
32
-
 33
33
-
 34
34
-
 35
35
-
 36
36
-
 37
37
-
 38
38
-
 39
39
-
 40
40
-
 41
41
-
 42
42
-
 43
43
-
 44
44
-
 45
45
-
 46
46
-
 47
47
-
 48
48
-
 49
49
-
 50
50
-
 51
51
-
 52
52
-
 53
53
-
 54
54
-
 55
55
-
 56
56
-
 57
57
-
 58
58
-
 59
59
-
 60
60
-
 61
61
-
 62
62
-
 63
63
-
 64
64
-
 65
65
-
 66
66
-
 67
67
-
 68
68
-
 69
69
-
 70
70
-
 71
71
-
 72
72
-
 73
73
-
 74
74
-
 75
75
-
 76
76


Telewell TW-LTE/4G/3G router User manual
- Category
- Routers
- Type
- User manual
- This manual is also suitable for
Ask a question and I''ll find the answer in the document
Finding information in a document is now easier with AI
Related papers
-
Telewell TW-EAV510 AC User manual
-
-
-
-
-
-
-
-
-
Other documents
-
 Link electronic 802.11g User manual
-
Trendnet TEW-411BRP Owner's manual
-
Digisol DG-LB1054UV User manual
-
AirLink AR695W User manual
-
Belkin SURF N300 User manual
-
Trendnet TEW-411BRPPLUS Owner's manual
-
LevelOne WBR-6012 User manual
-
-
-
EnGenius ESR-9855G User manual
